Red Death Revival: Beams
Re: Red Death Revival: Beams
wow, i forgot this thread was here.
wiring came in. Pic from the grams.

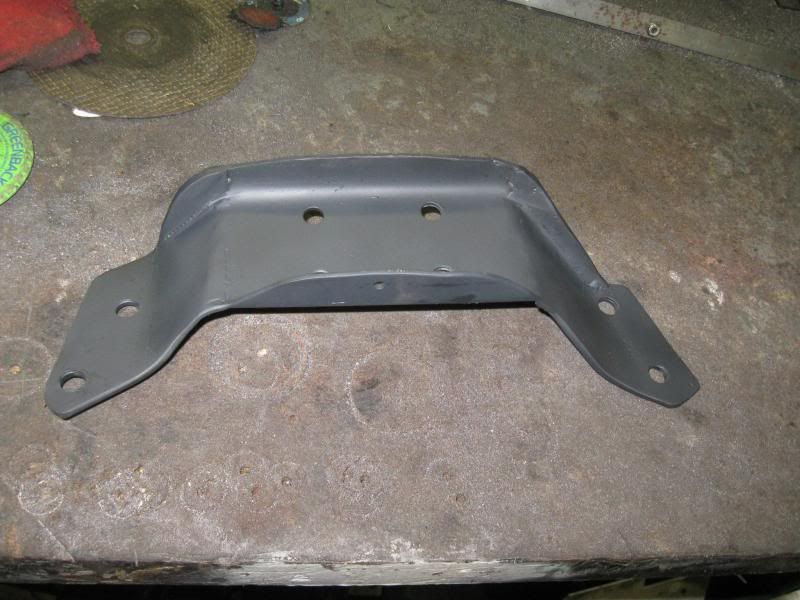
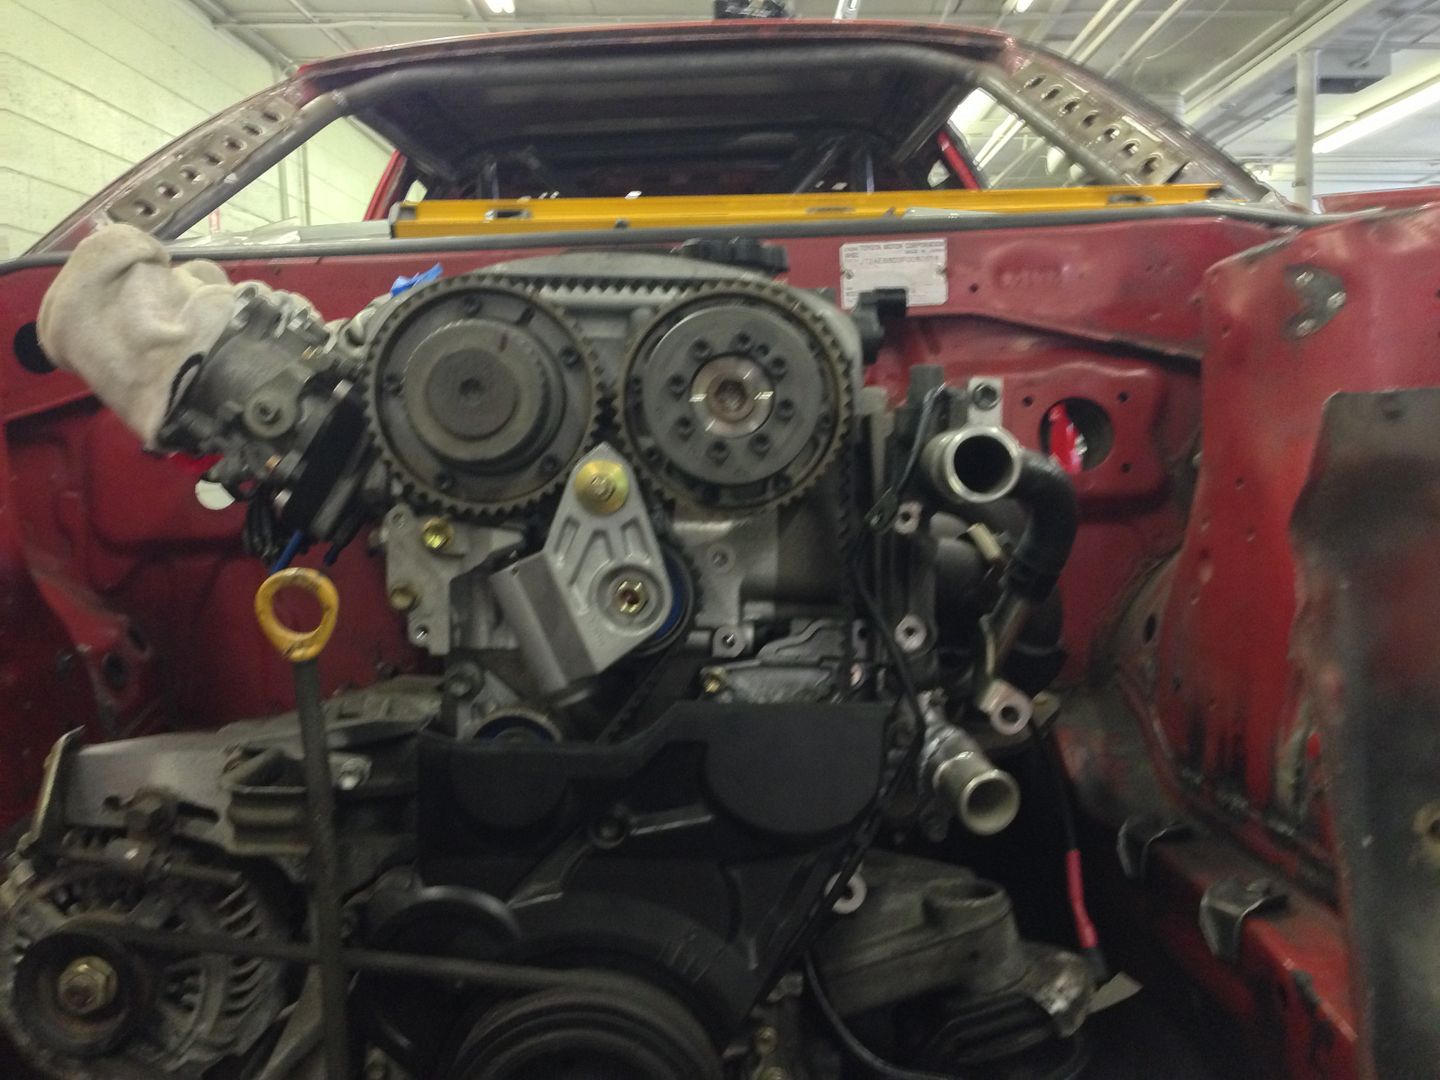
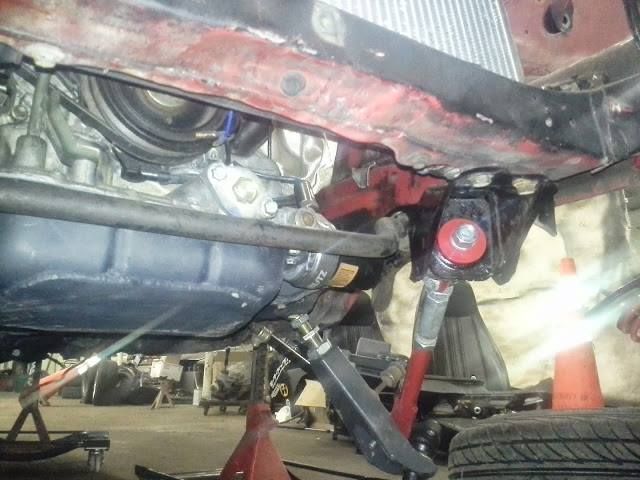
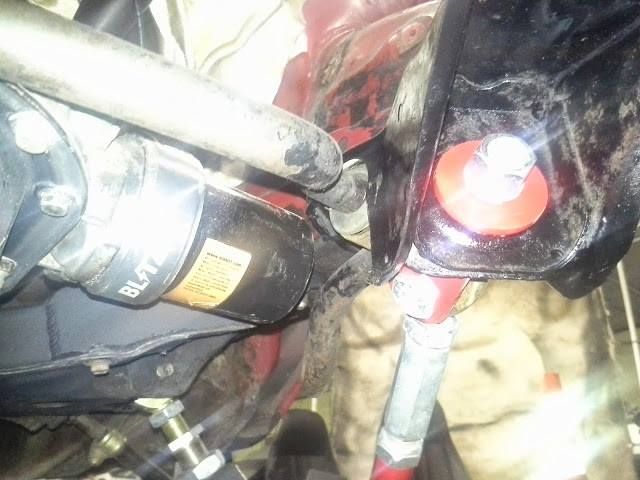
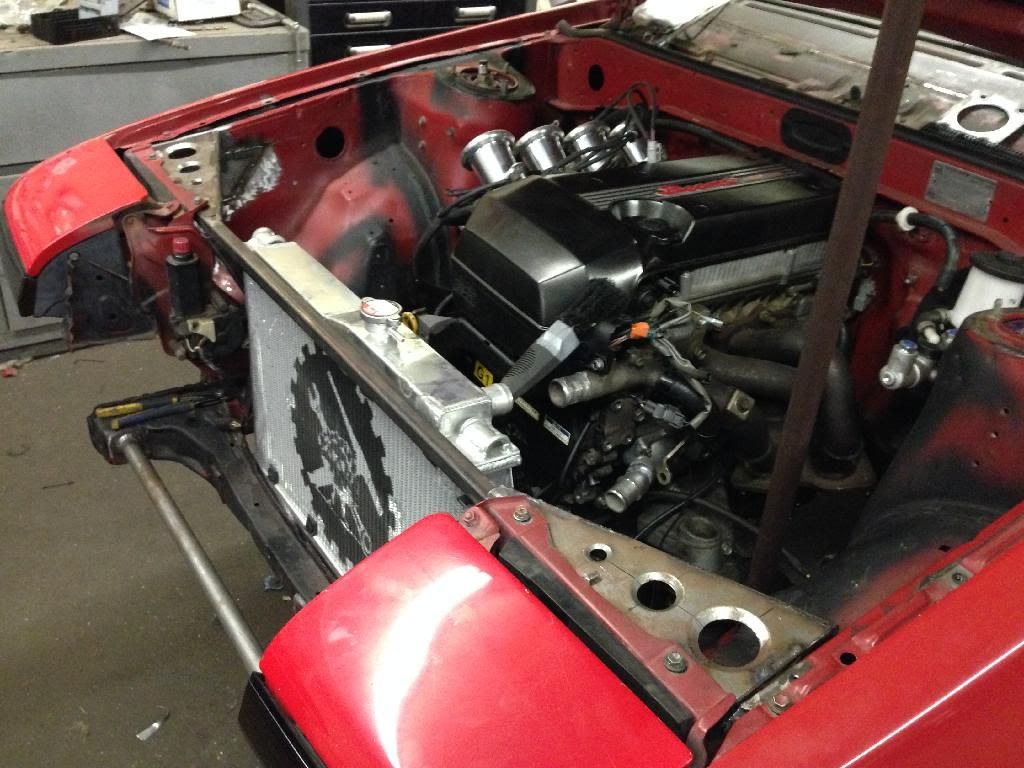
engine mounts are done
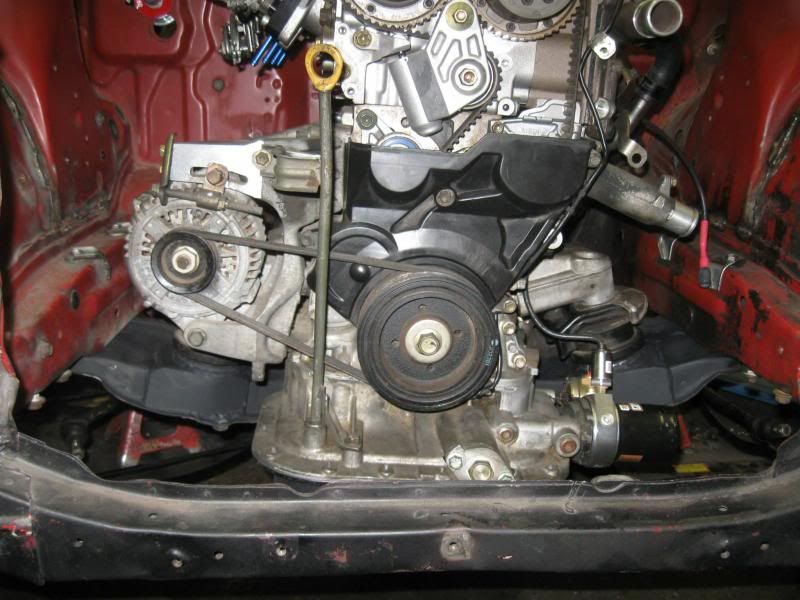
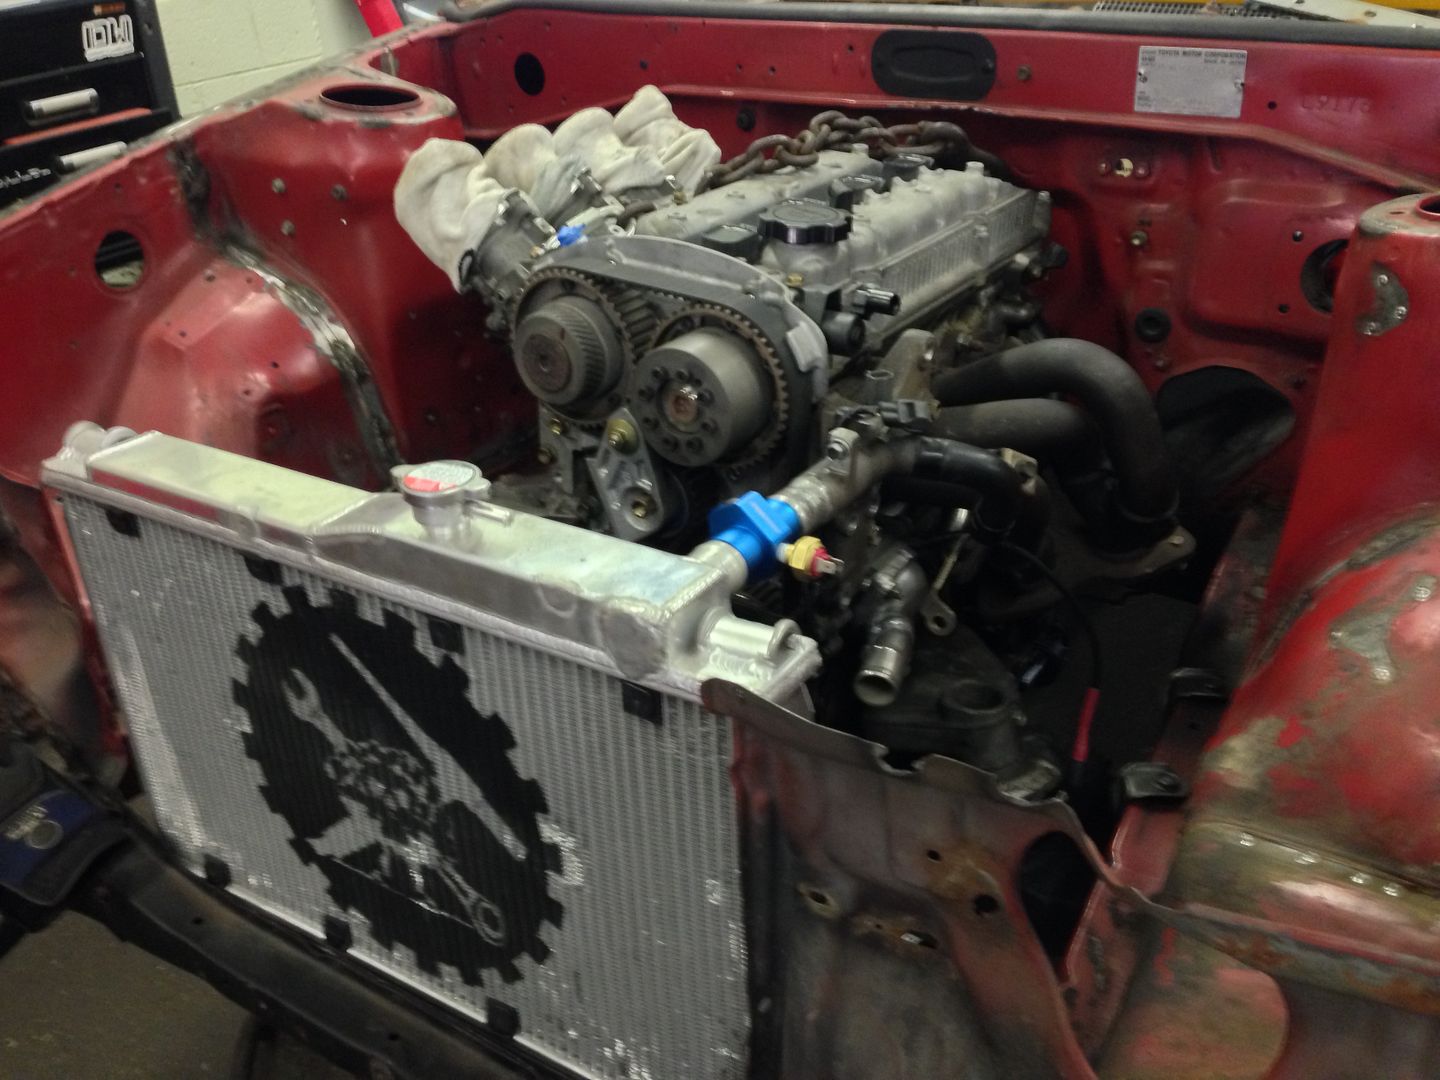
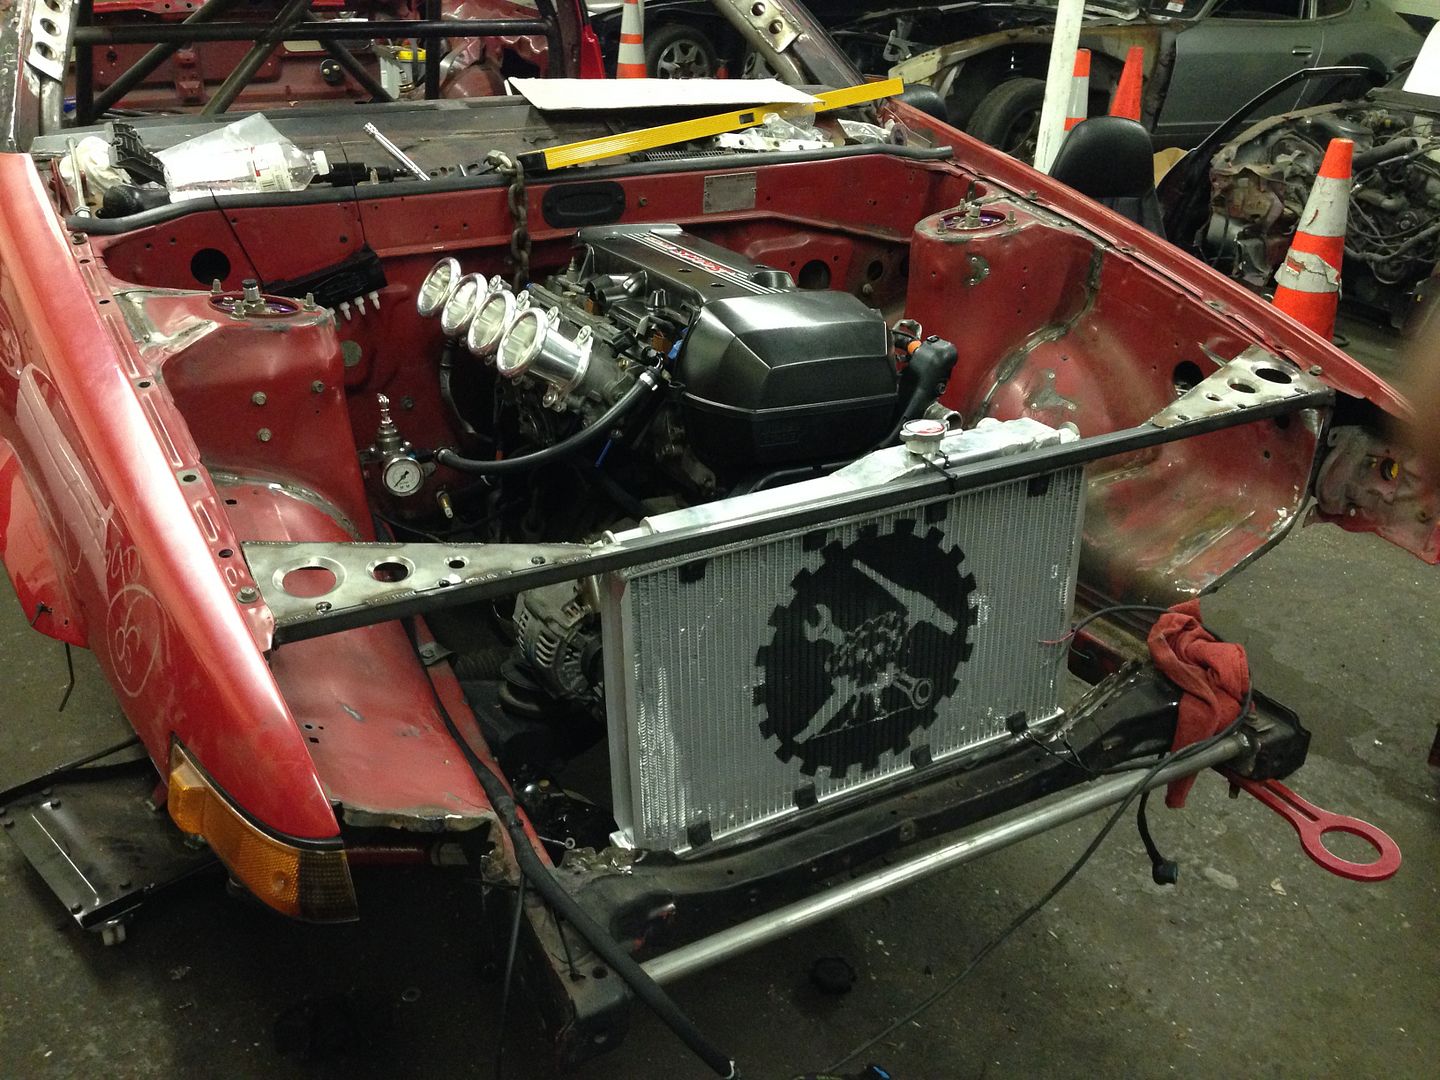
engine sits in there nicely
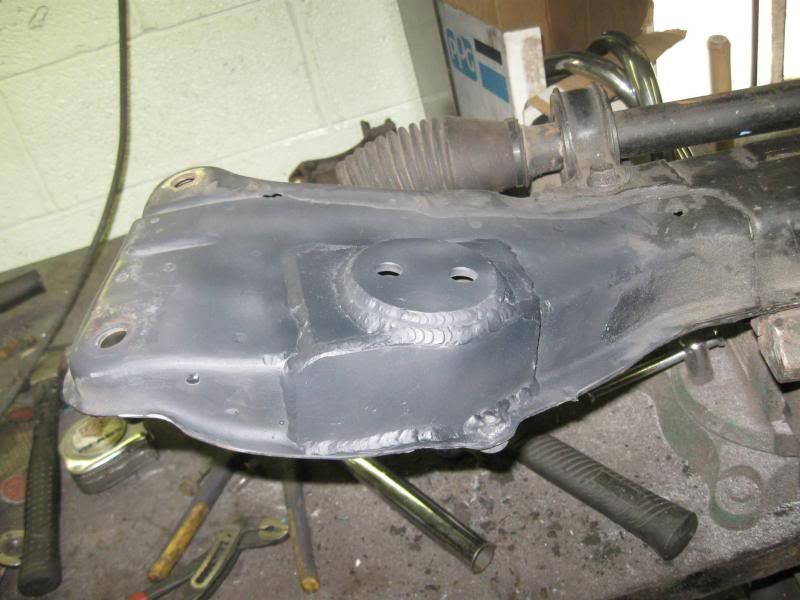
Trans mount is also done, had to do a full custom piece for this.

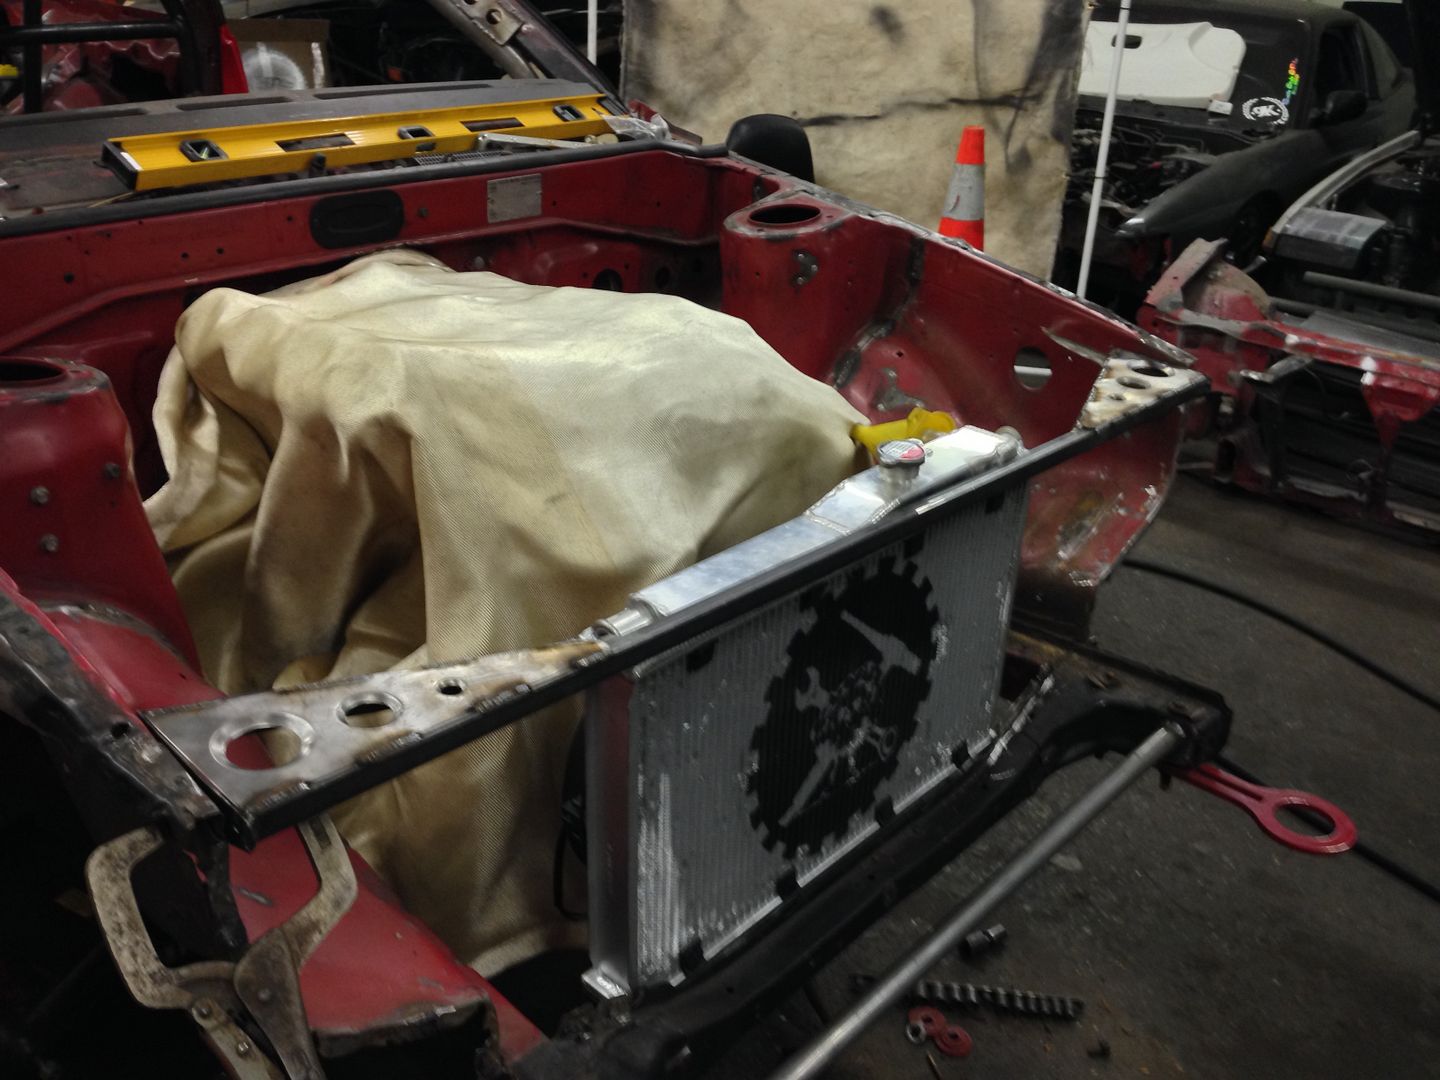
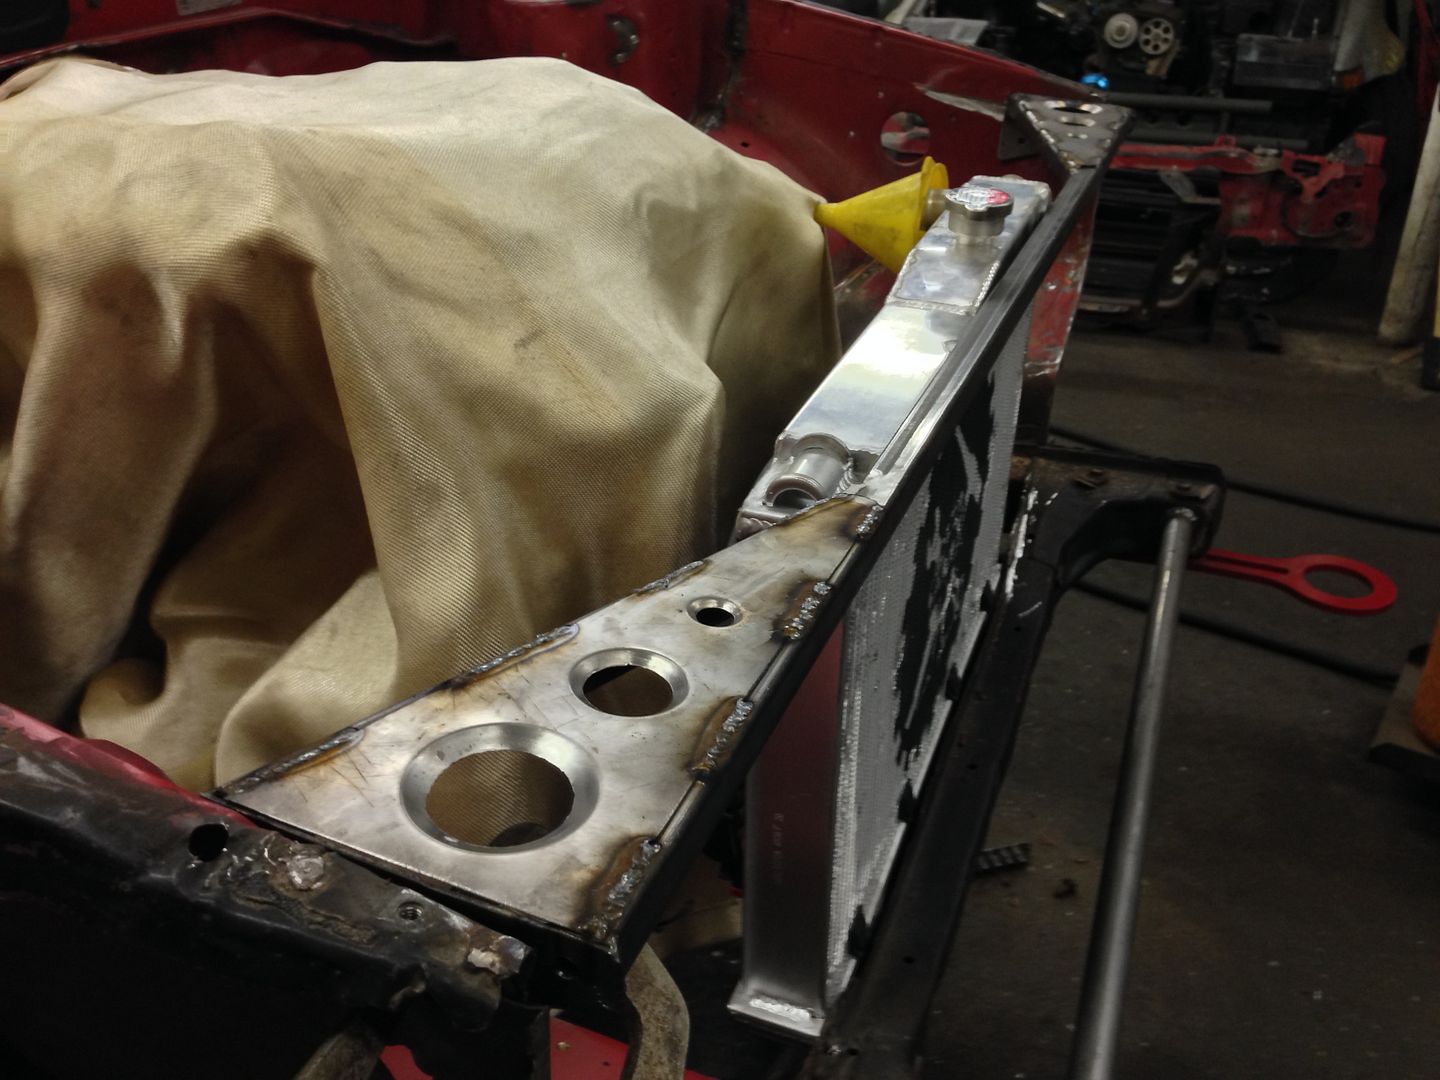
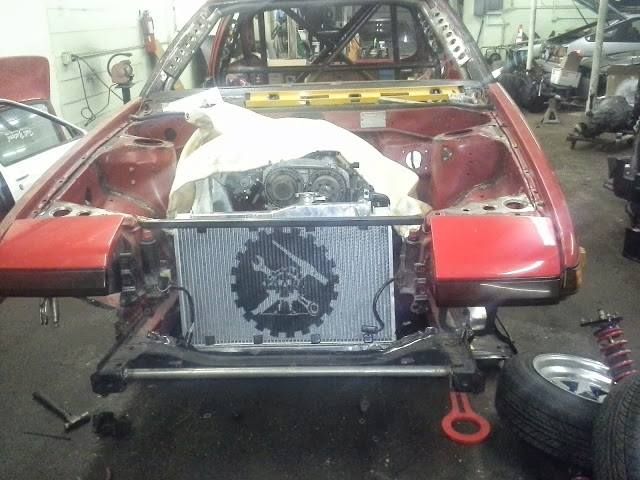
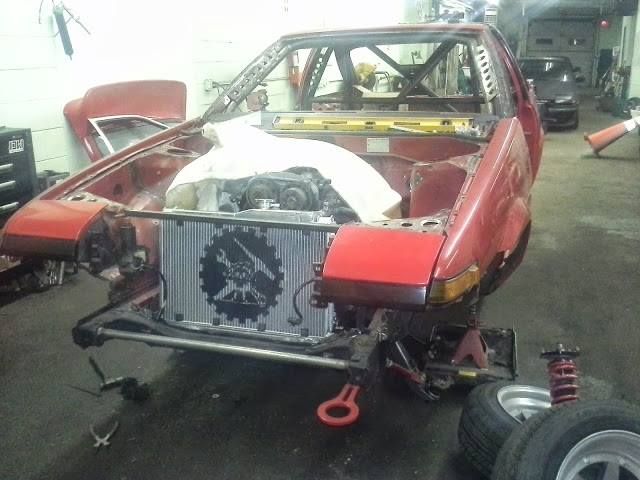
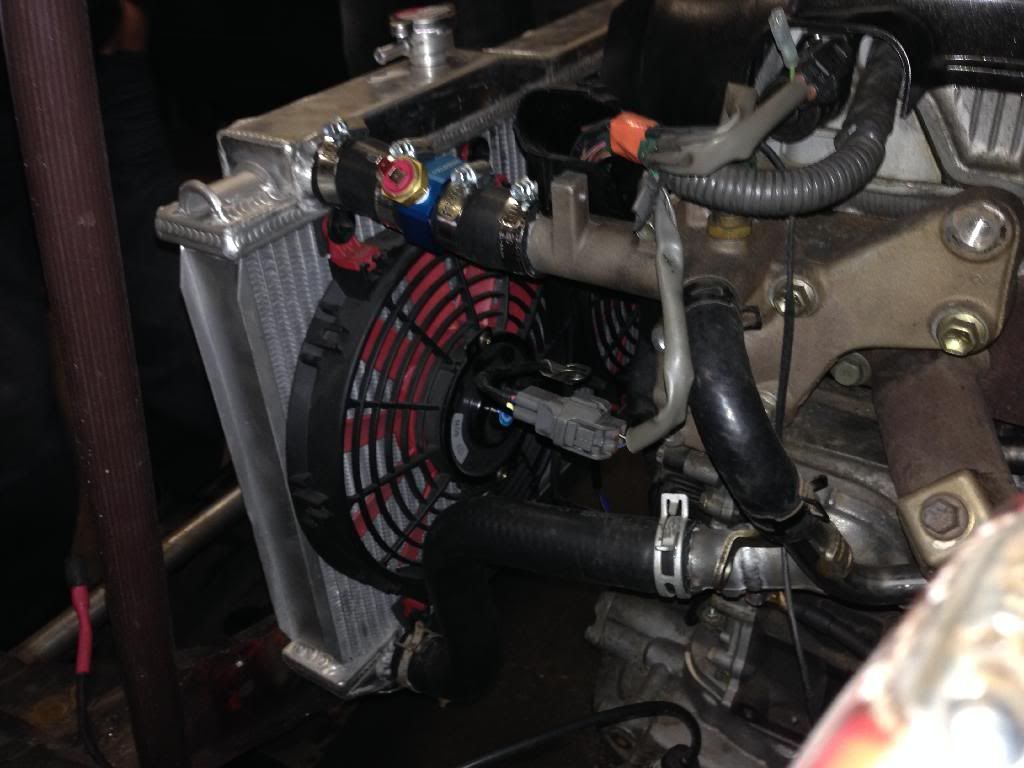
And mocking up radiator
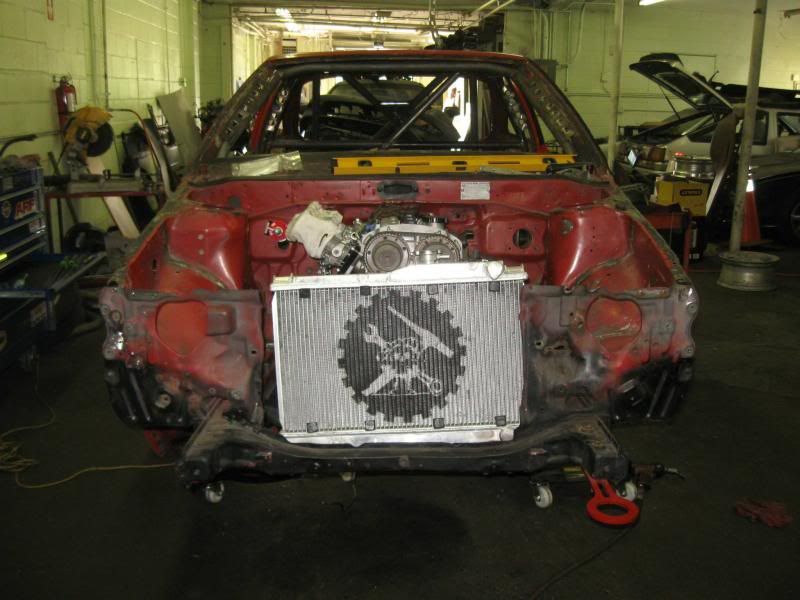
radiator is custom as well, took a CX racing ae86 unit and shopped the inlet, outlet and mounting tabs off of it, welded the holes shut, flipped it around and welded them back on the other side, have to do some mounts and fab up an upper support.
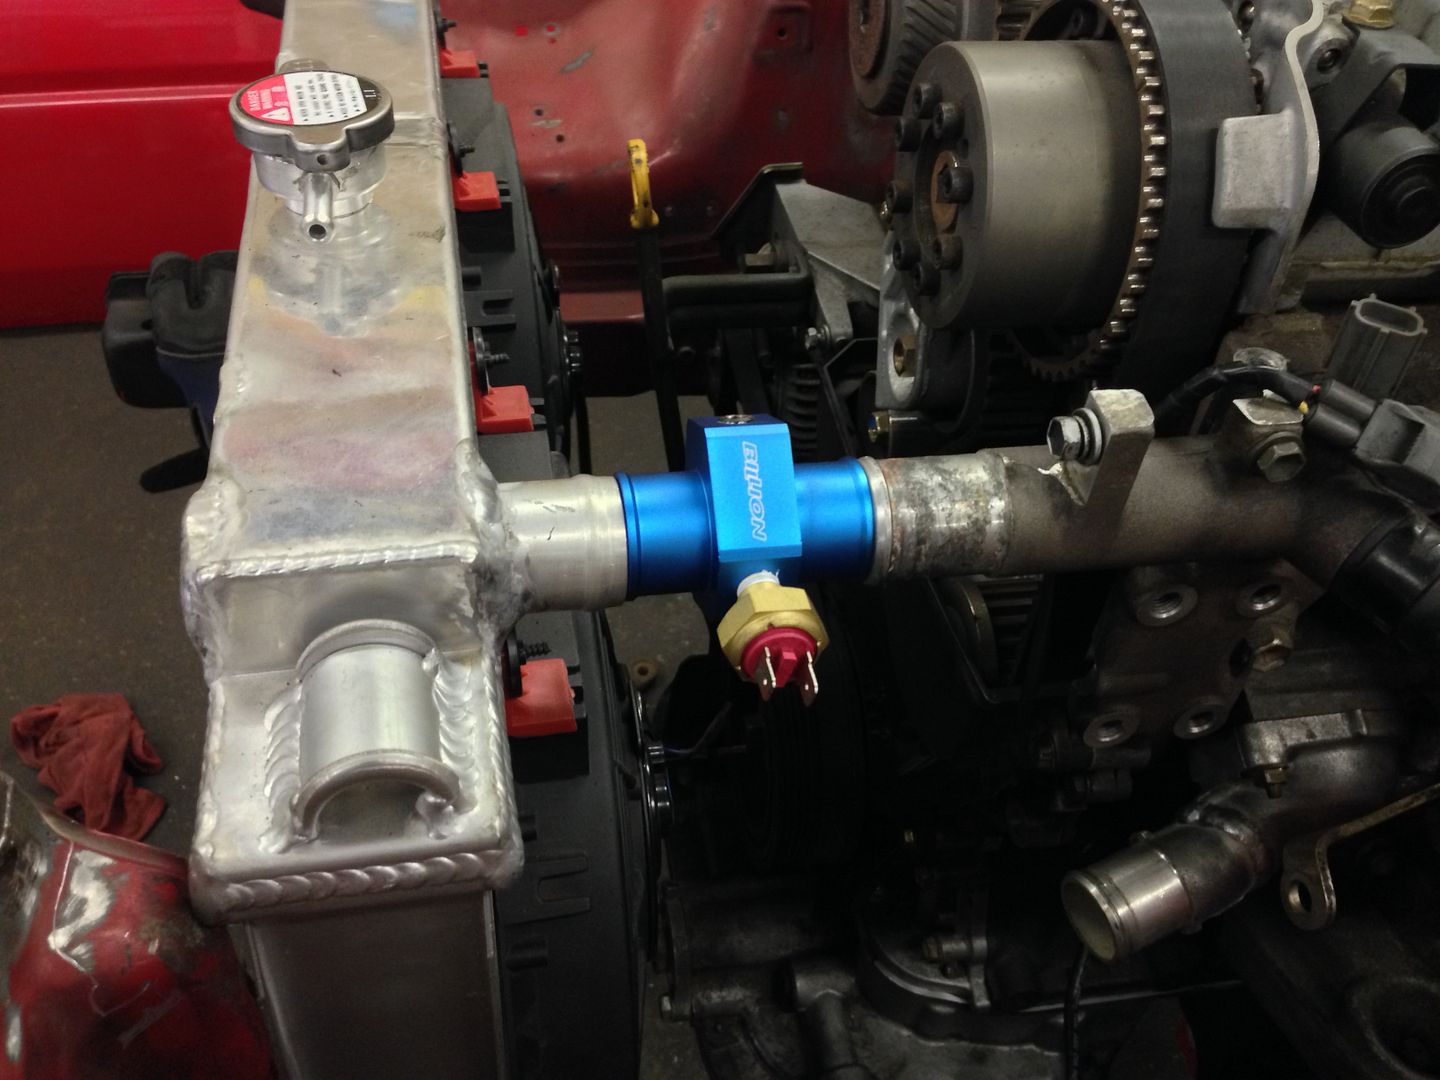
we modified the thermostat housing so that the water outlet faces forward instead of sideways.
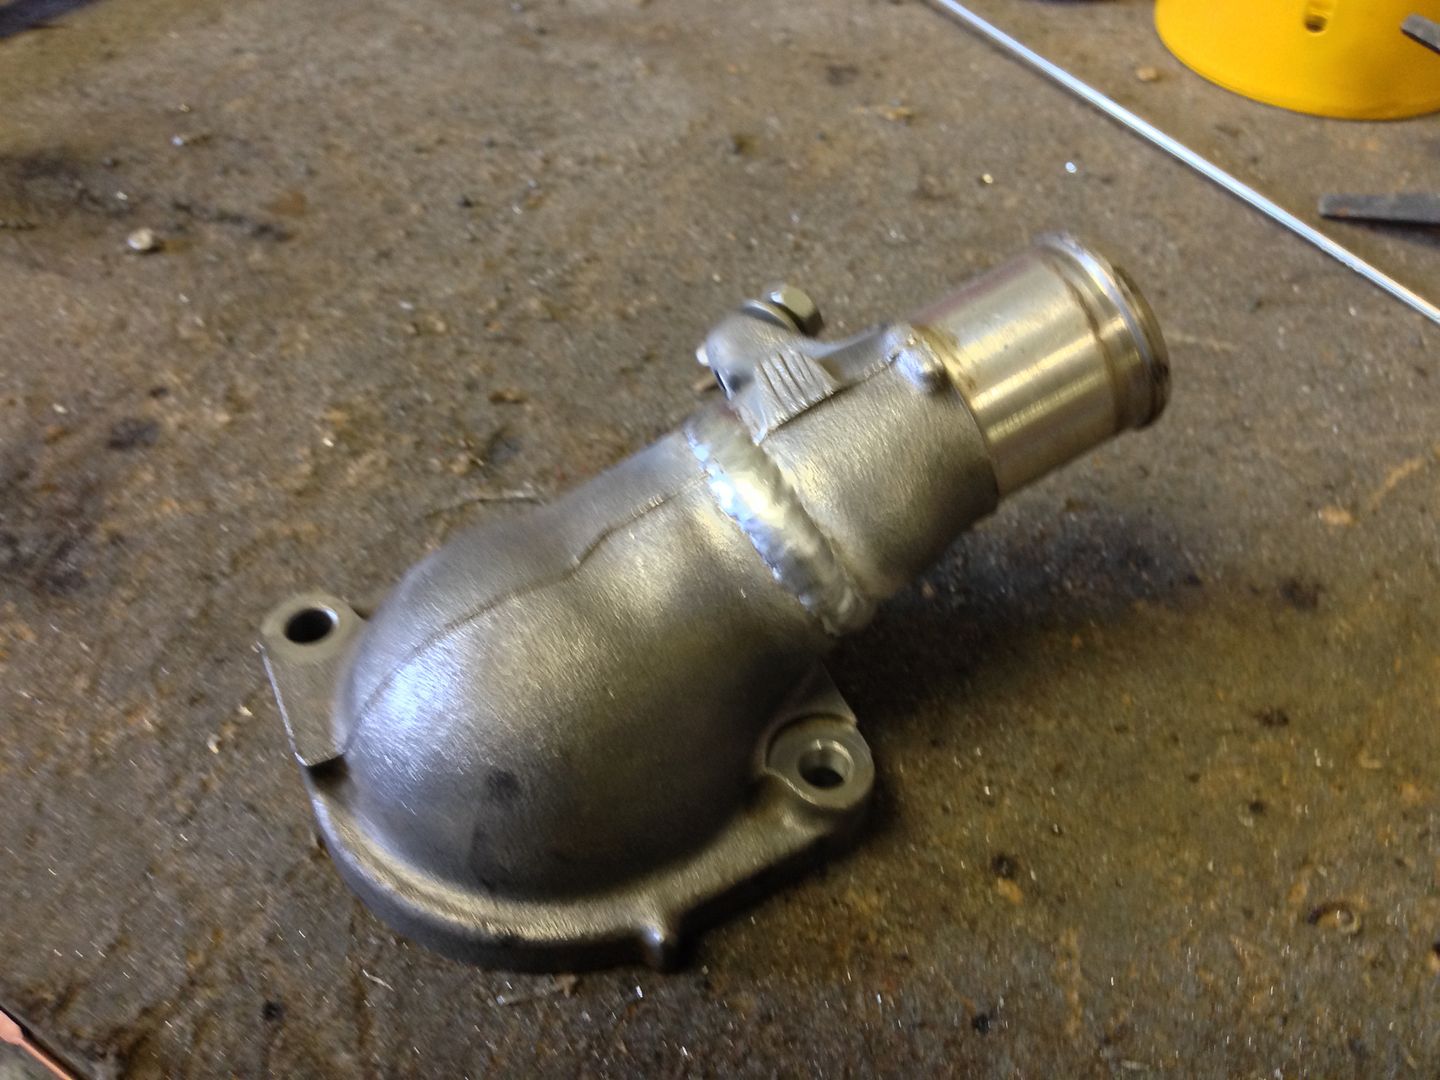
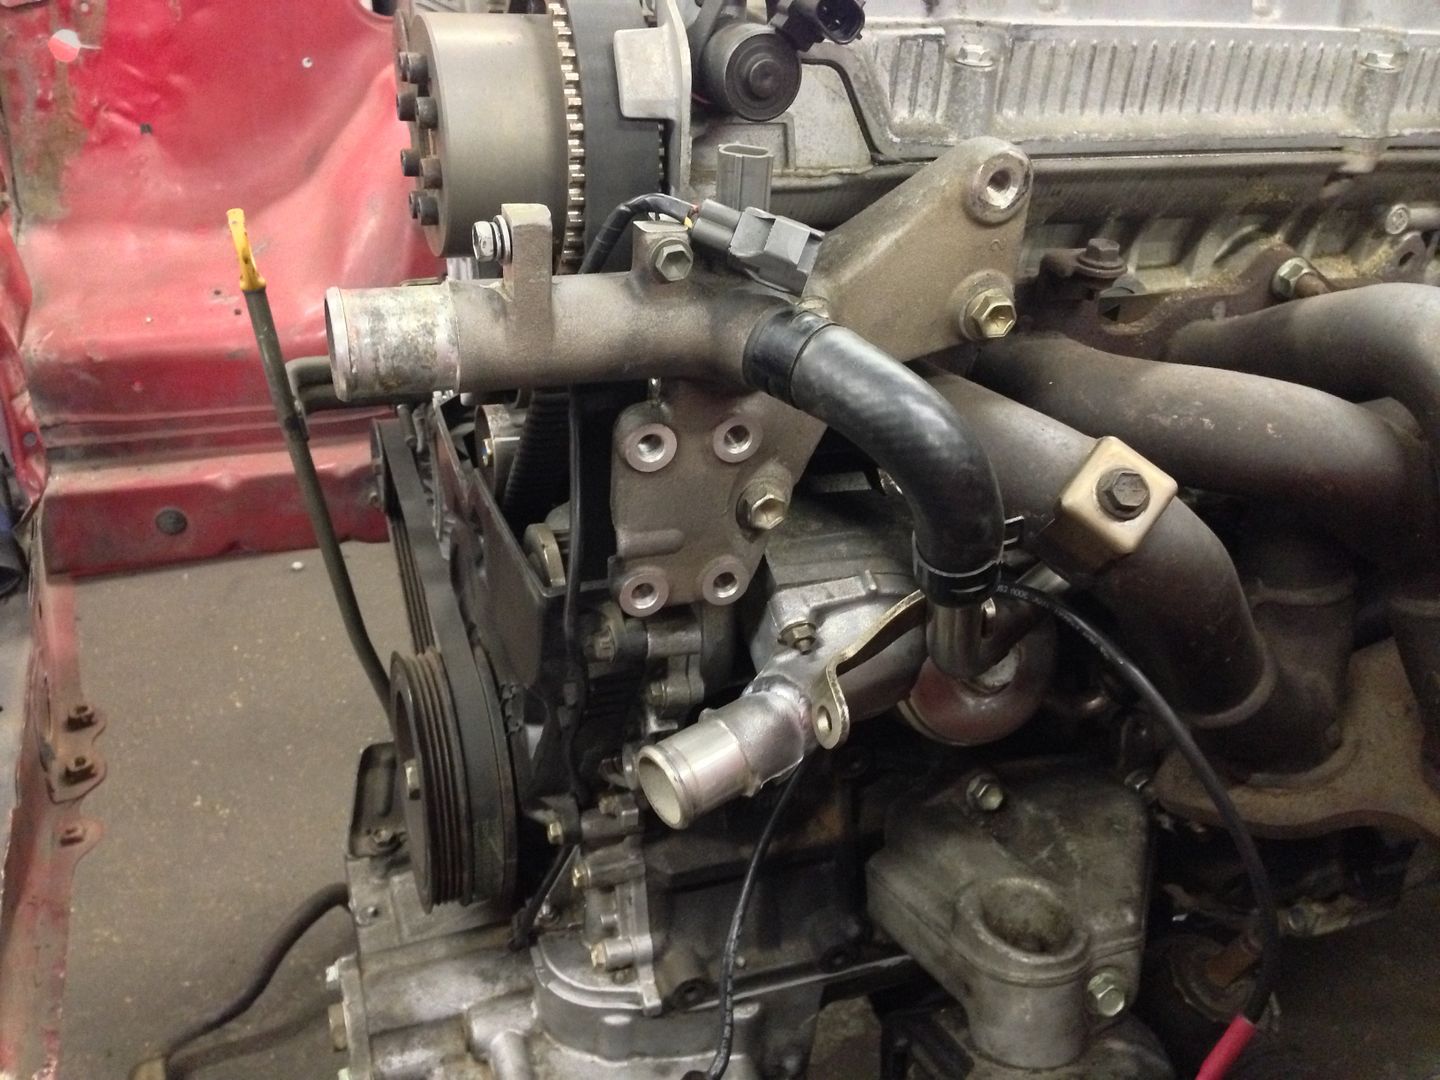
should make for easier radiator hoses.
The top one, well. I'd say it lines up pretty well...
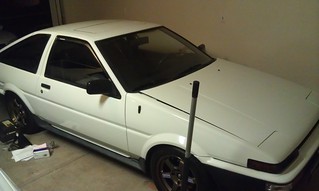
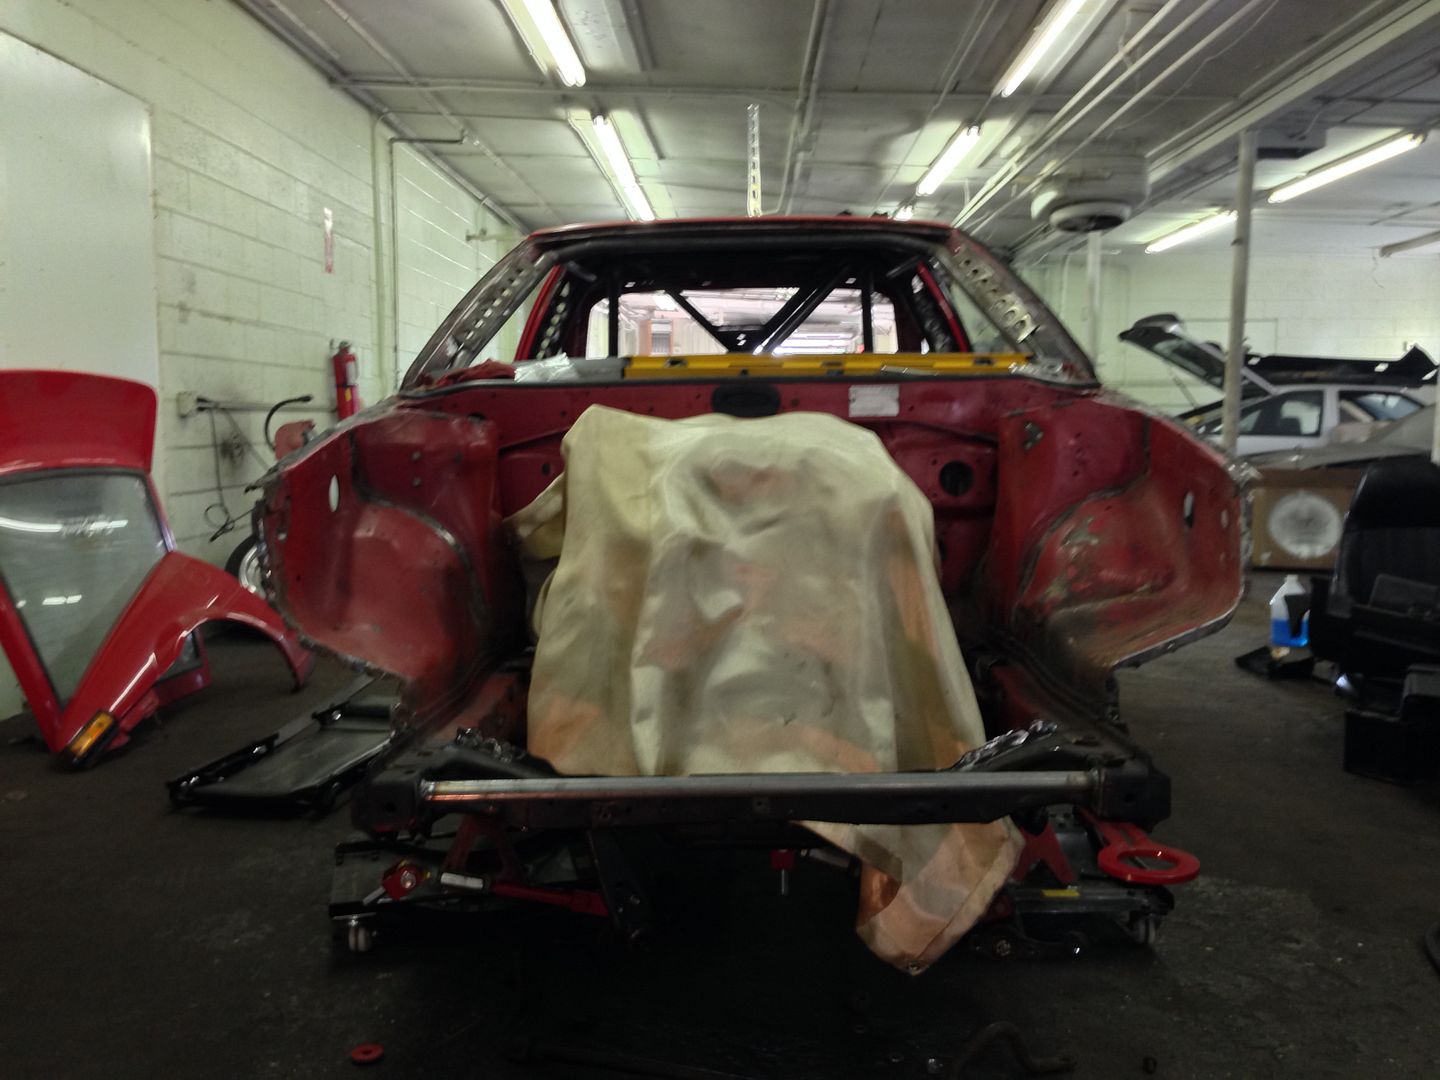
It was refreshing somewhat to see the car with a fender on it, made it look less like a pile of ****.

welded in a "bomber" bar for no reason really other than we could.
My headlight backing plate things (whatever that part of the core support is called) were all mangled and rusted to **** so we decided to take them off, one of them was welded on so poorly we smacked it with a hammer like twice and it came off.
If any of you remember my S13 build, this part is called "not learning from my mistakes"
So we made a new upper tie bar for the core support.

almost got the headlights all lined up and finished up modding the tension rod brackets so that the oil filter and sway bar clear.
sorry but vinny sucks at taking good pics haha.
Then i went down and did some stuff yesterday
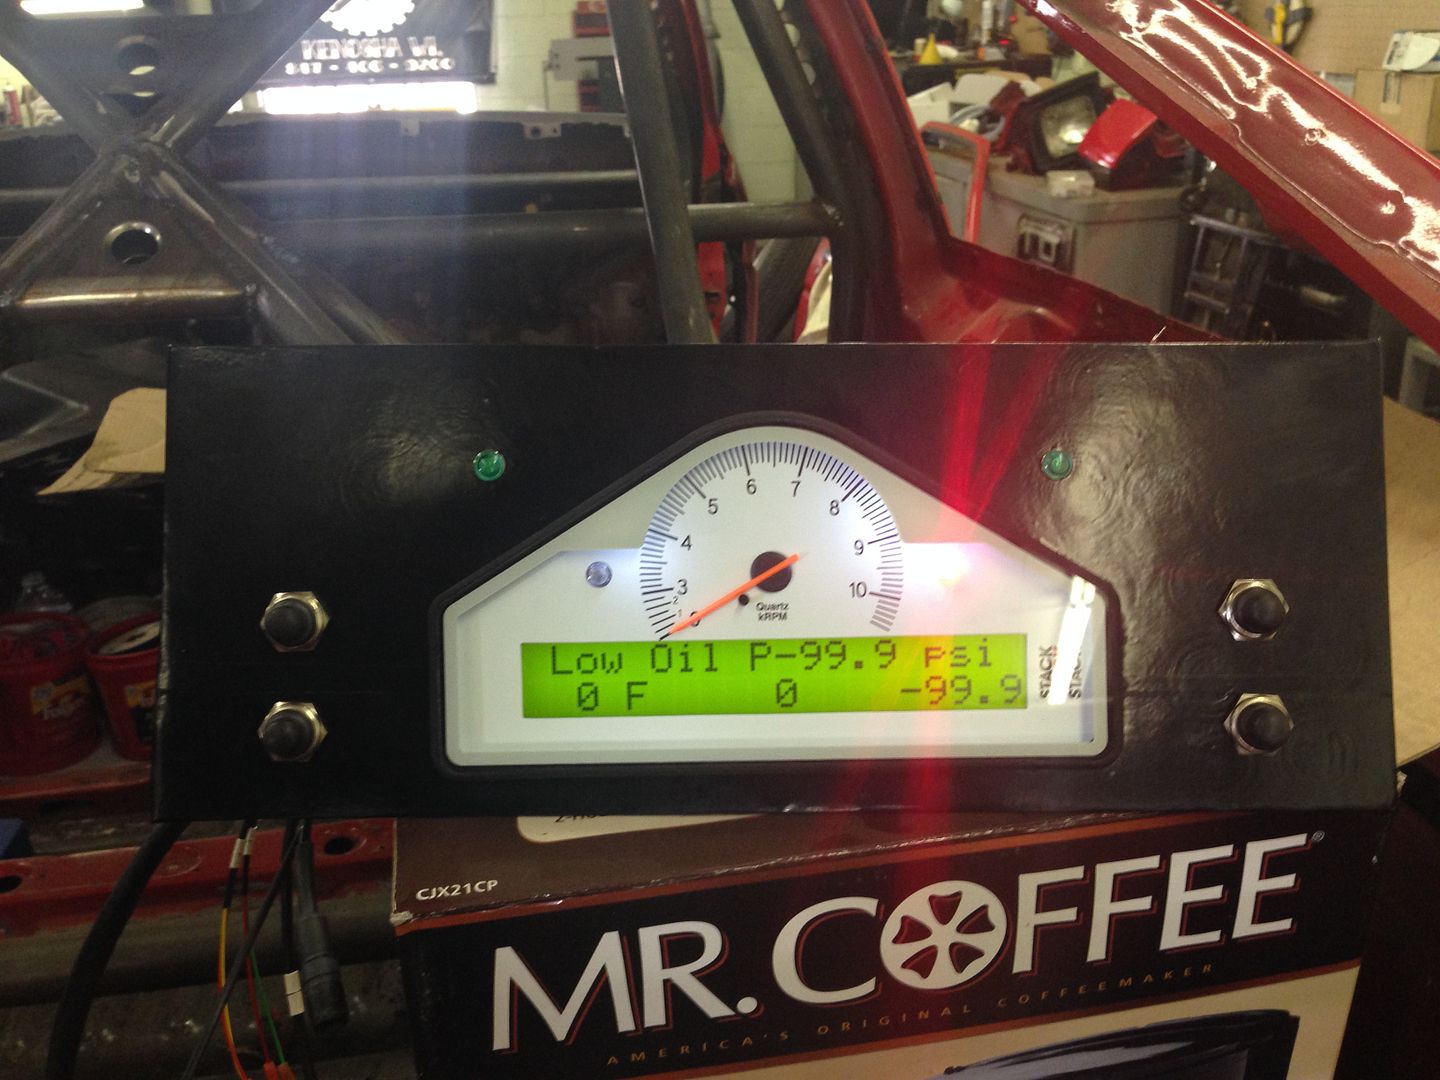
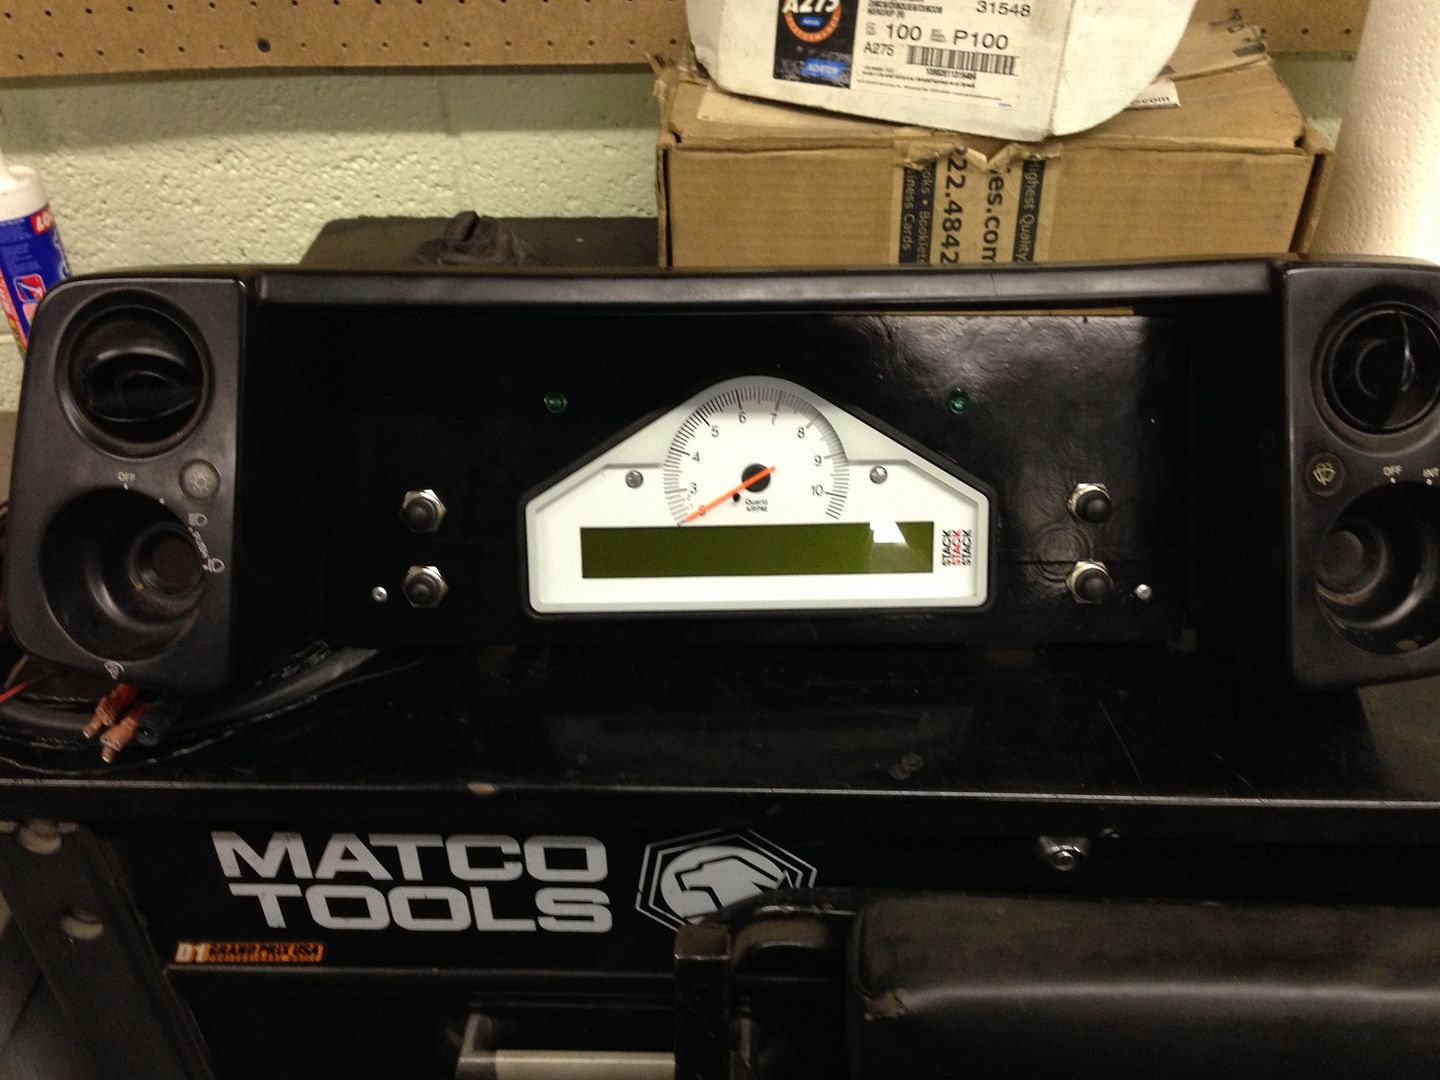
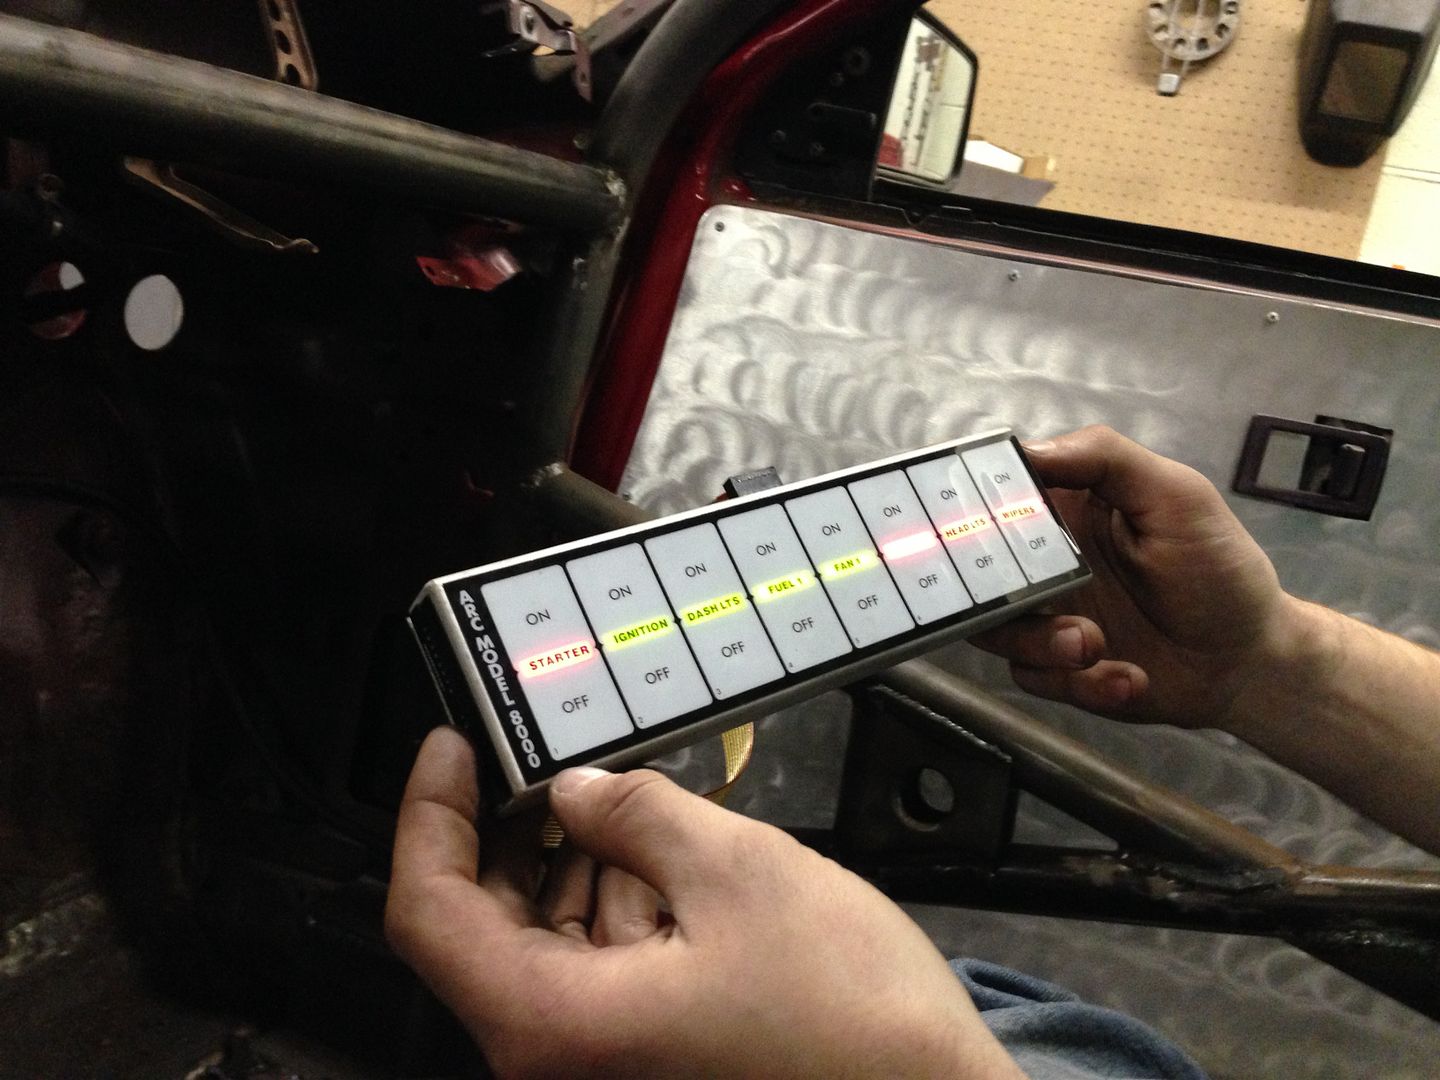
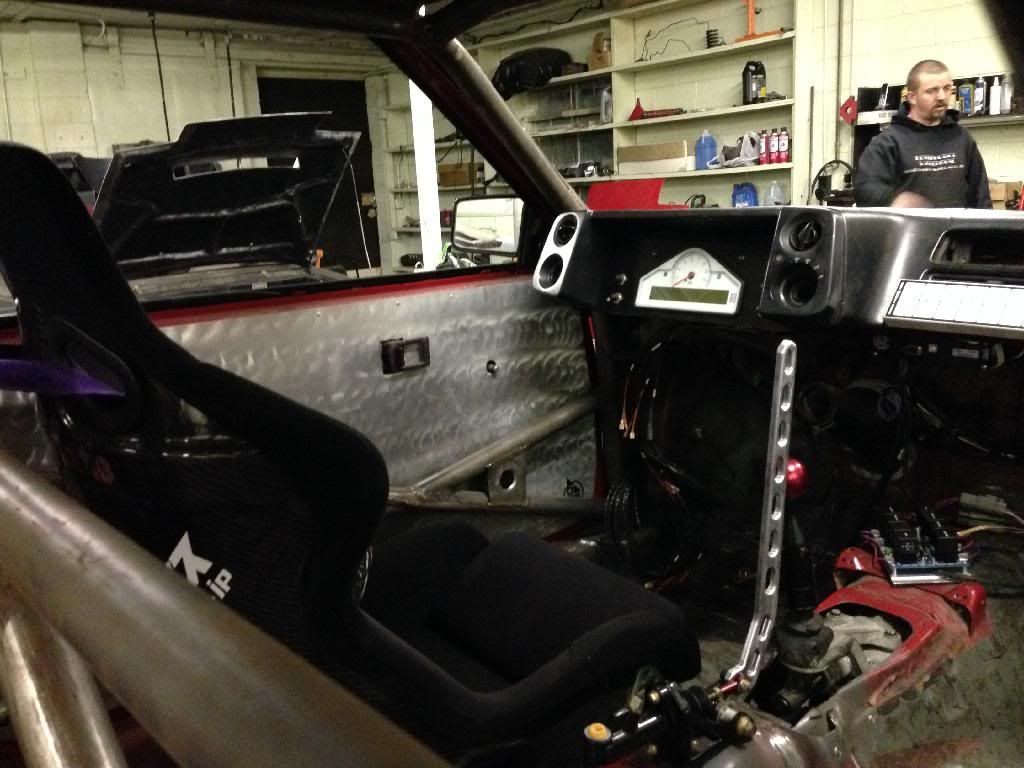
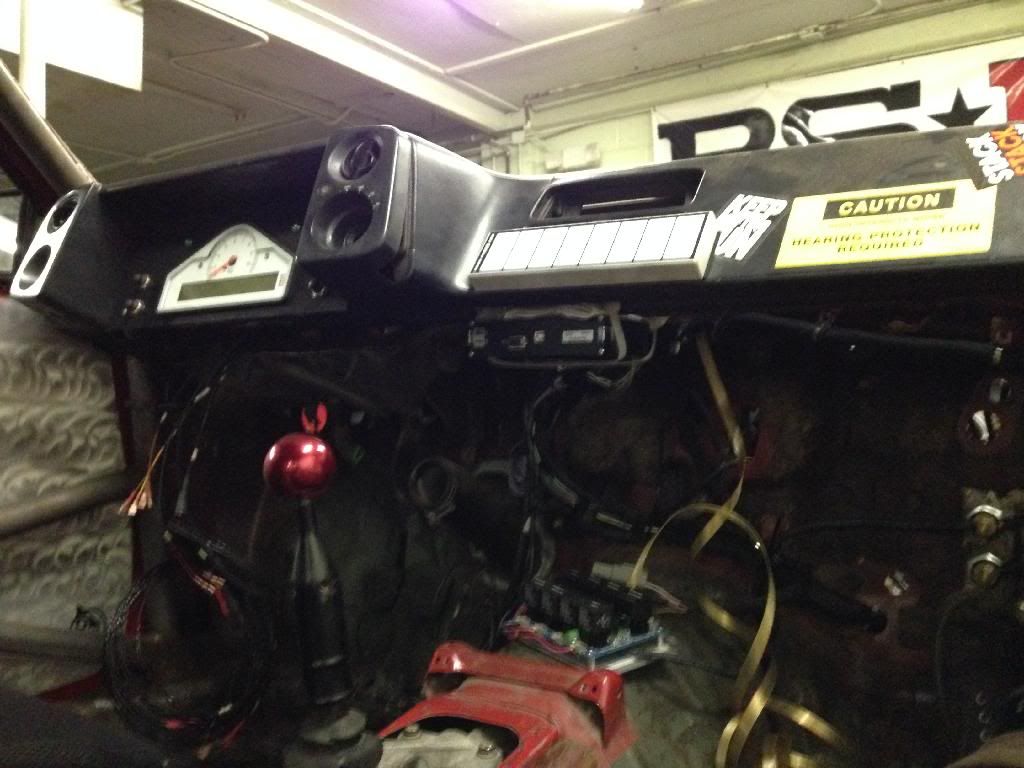
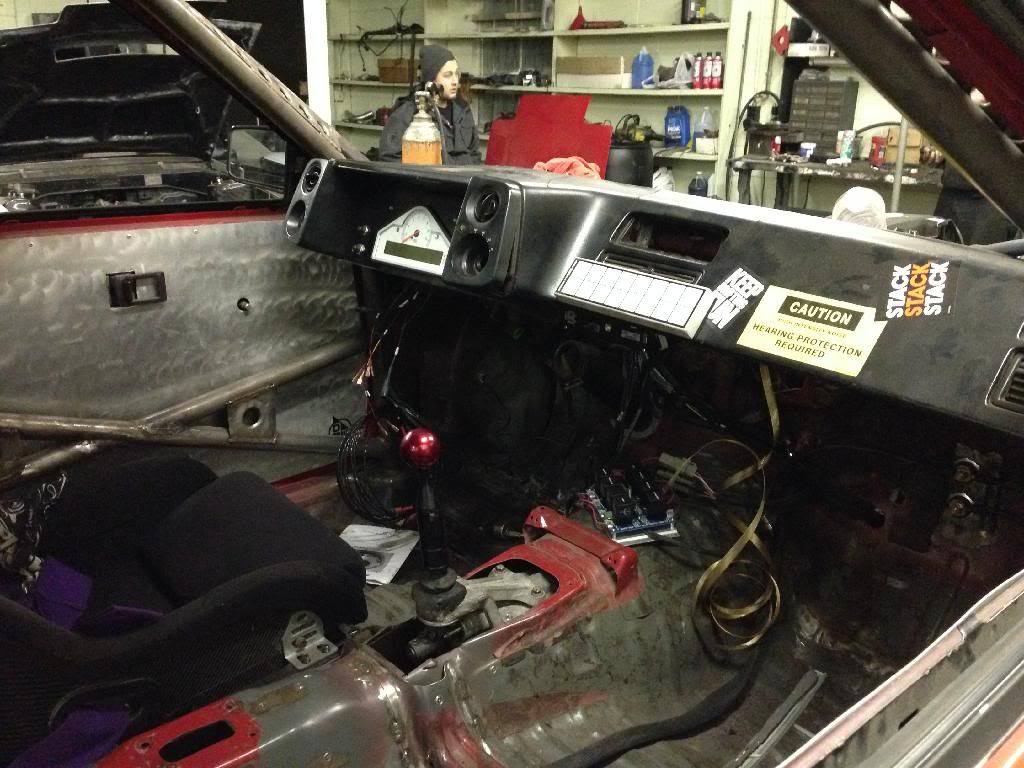
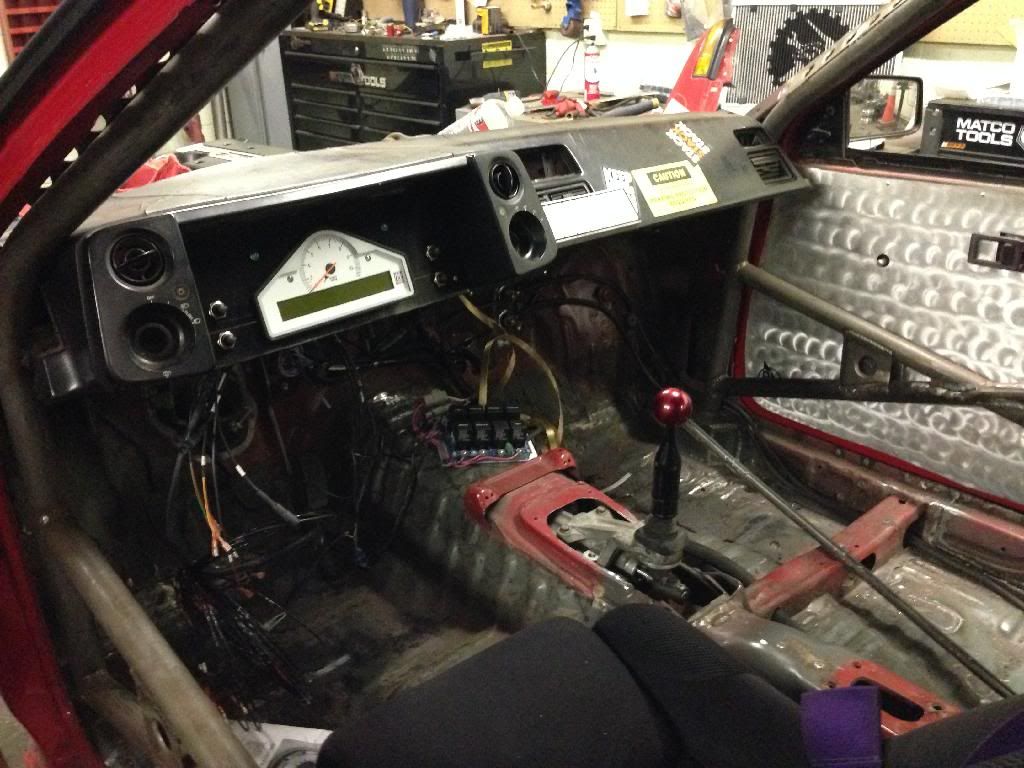
finished my gauge cluster panel and covered it in some black vinyl, also powered up the stack to make sure it works
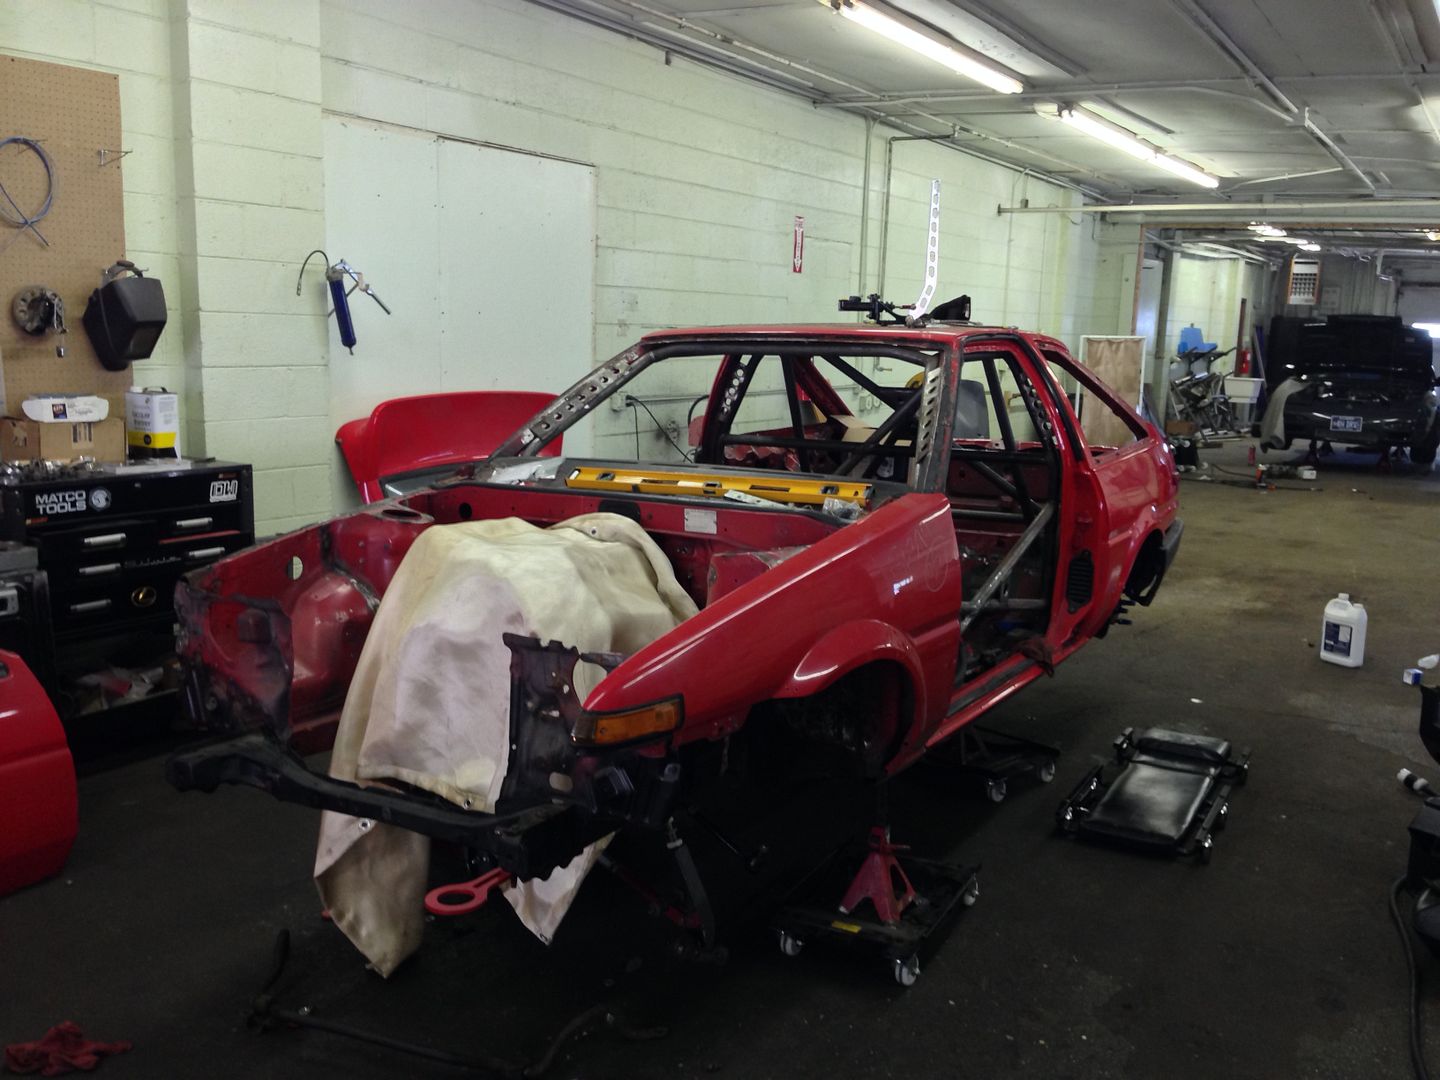
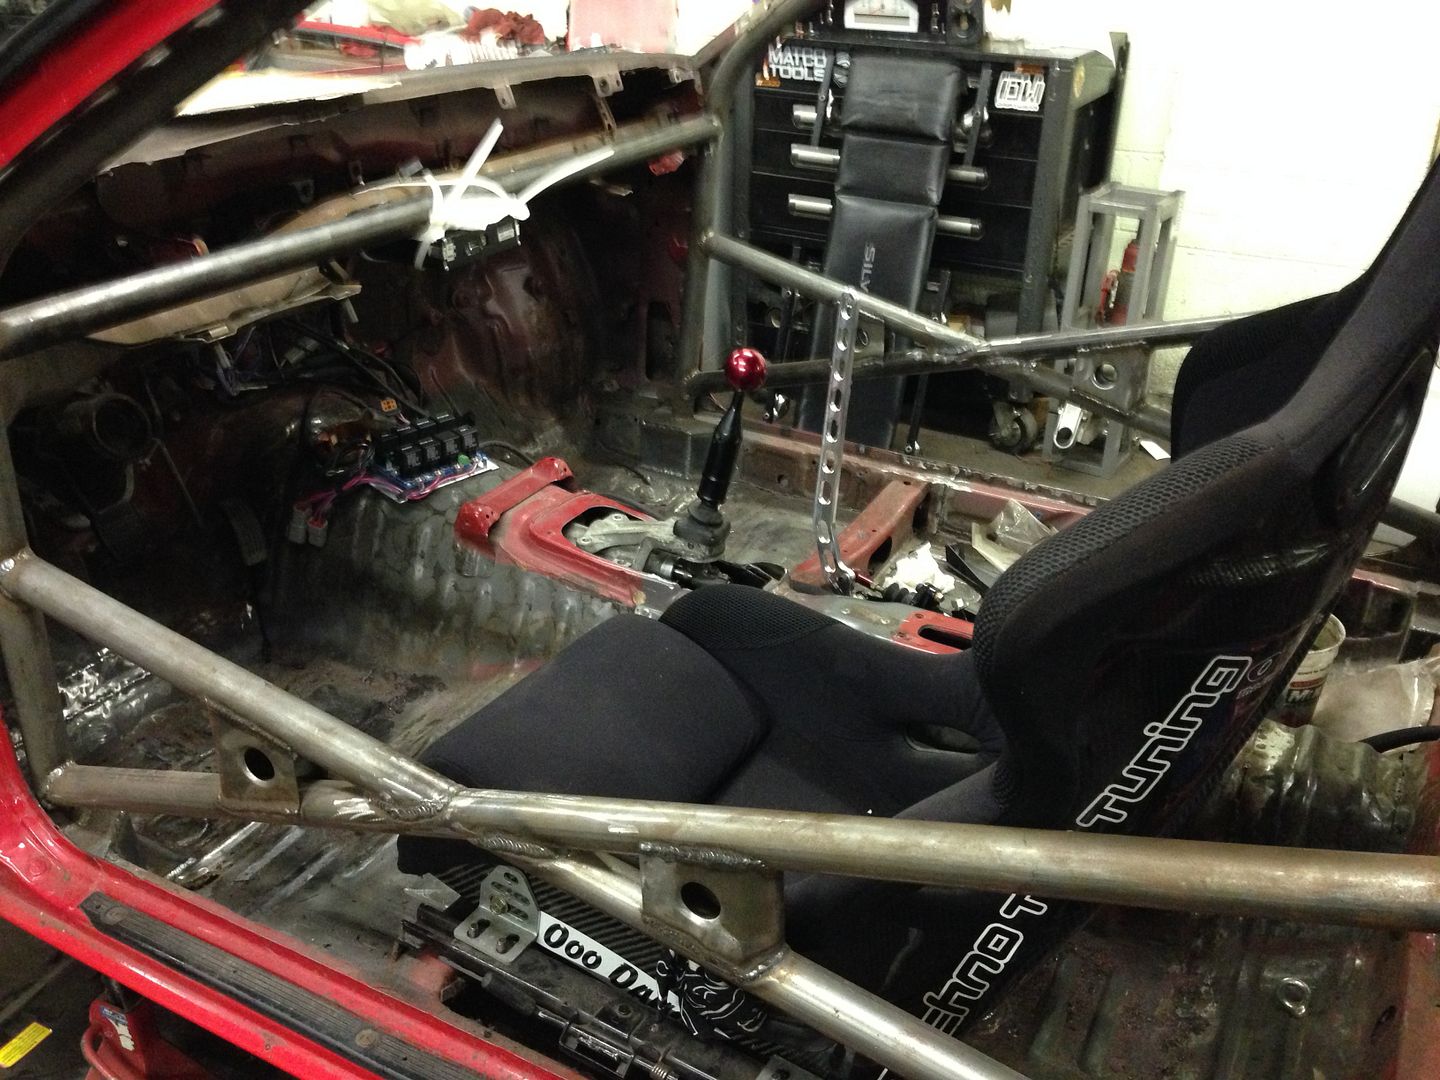
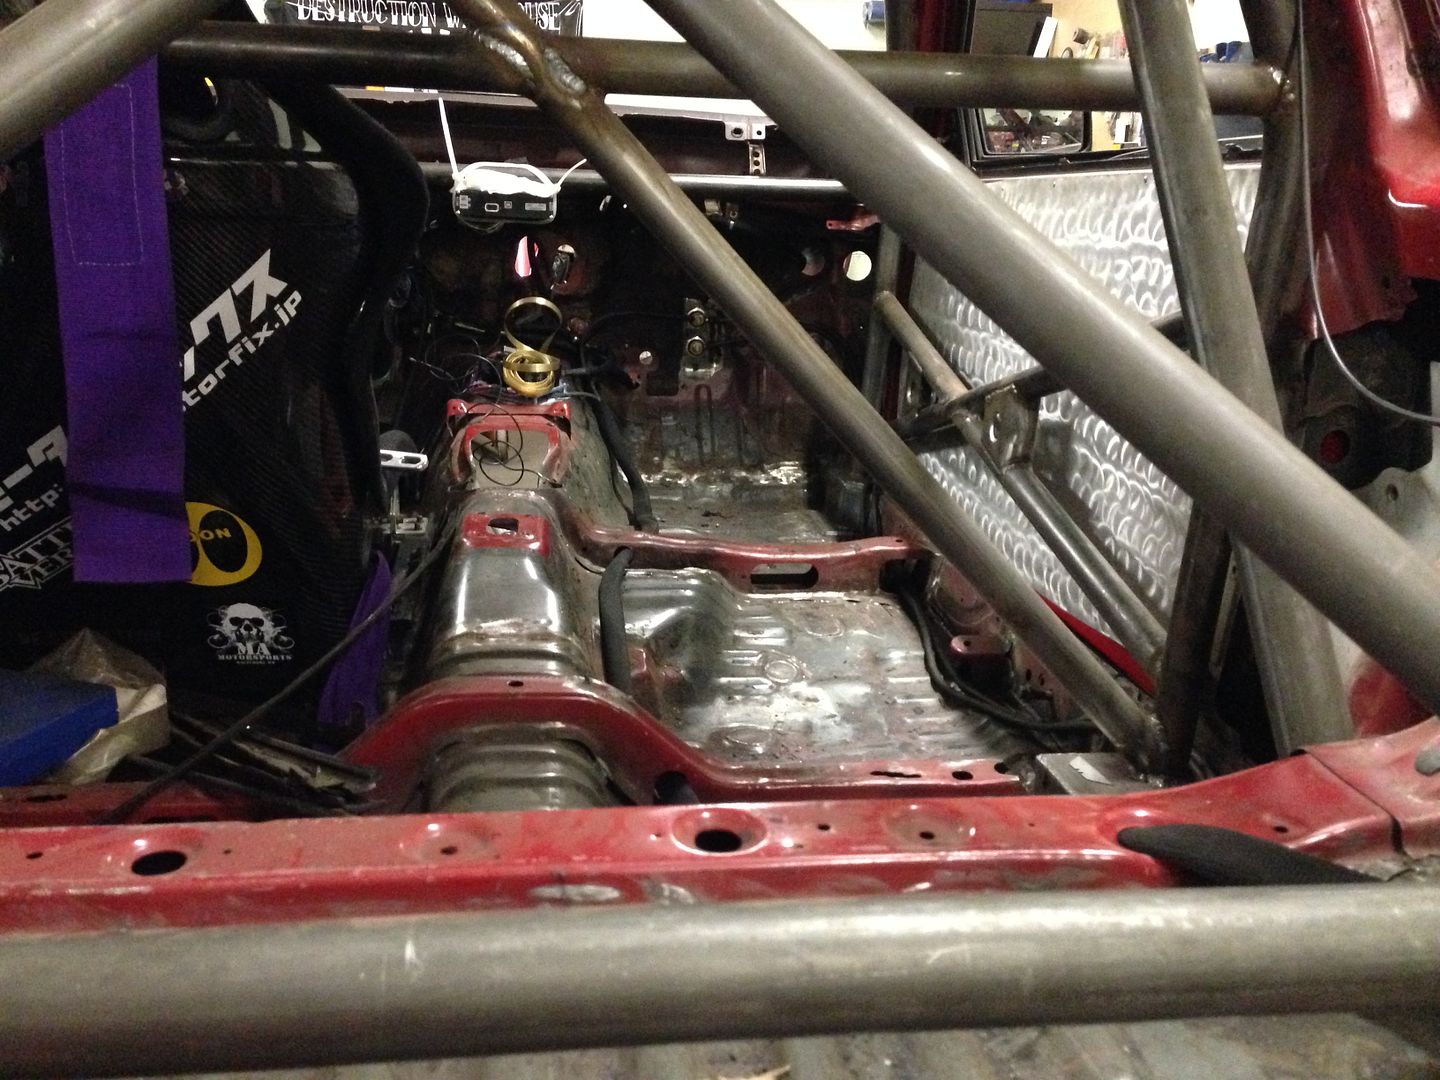
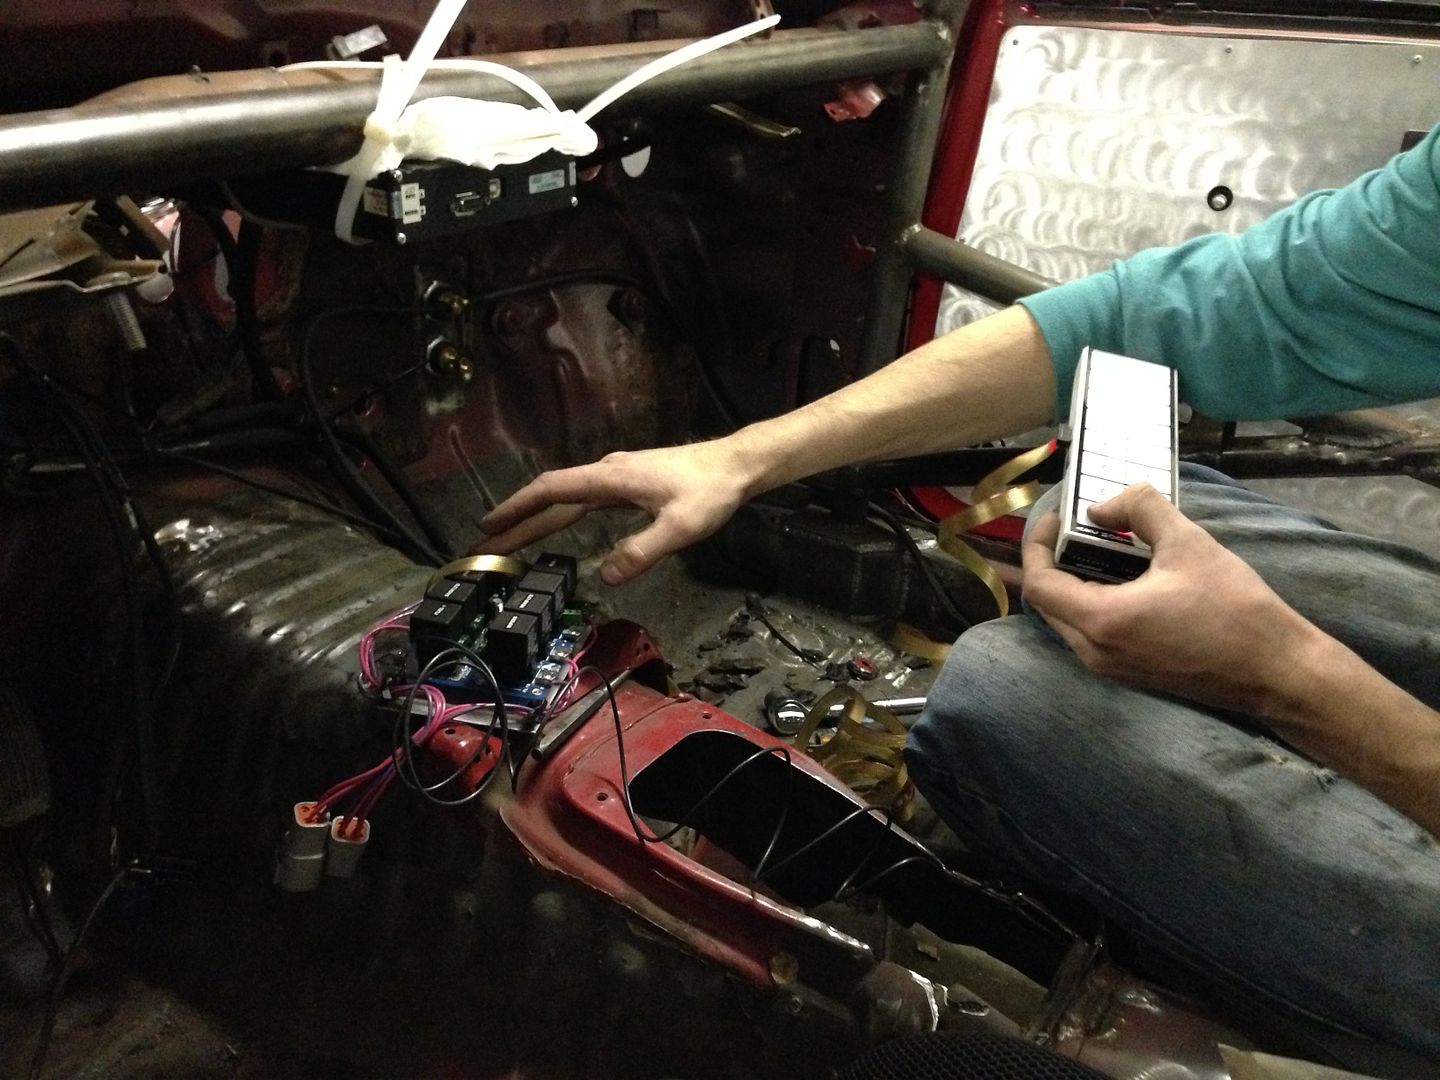
Trimmed the dash to fit in with the cage, It kind of looks like dick, but whatever, dash was trash anyway. Ran the chassis harness through the car as well. Decided to mount the ECU to the dash bar, You can see it sits right below the bottom of the dash, perfect access for serial/usb ports. Its just zip tied there in the pics, were going to make something to hold it there. the fuse box is going to sit on the trans tunnel under the dash, making something to mount that to as well.
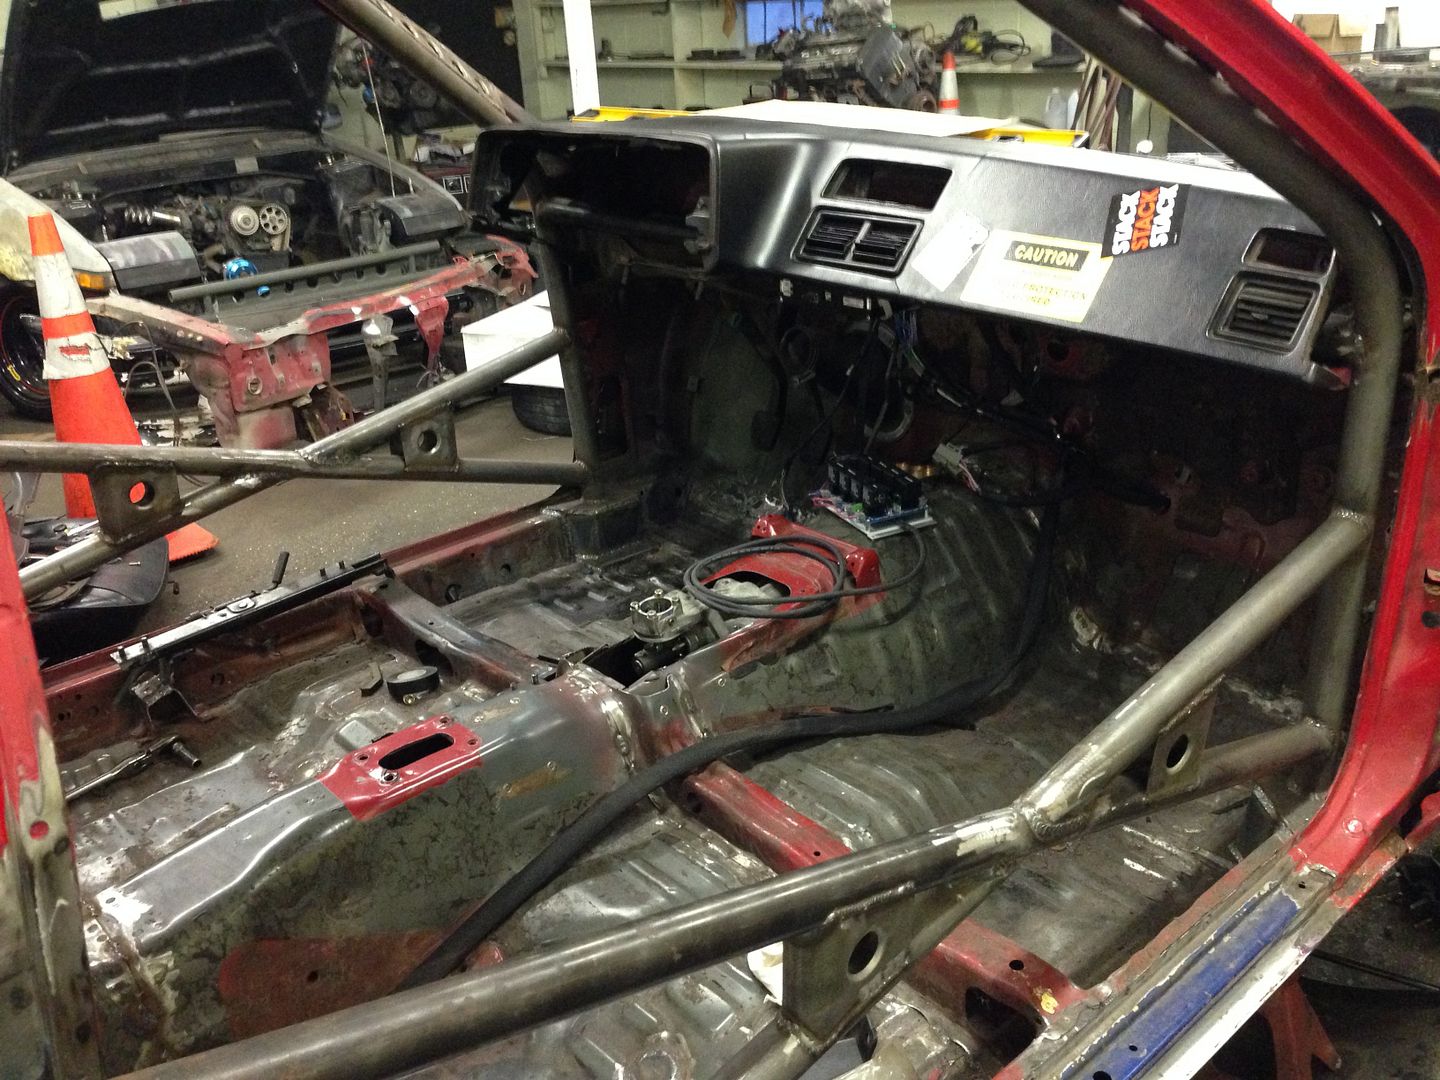
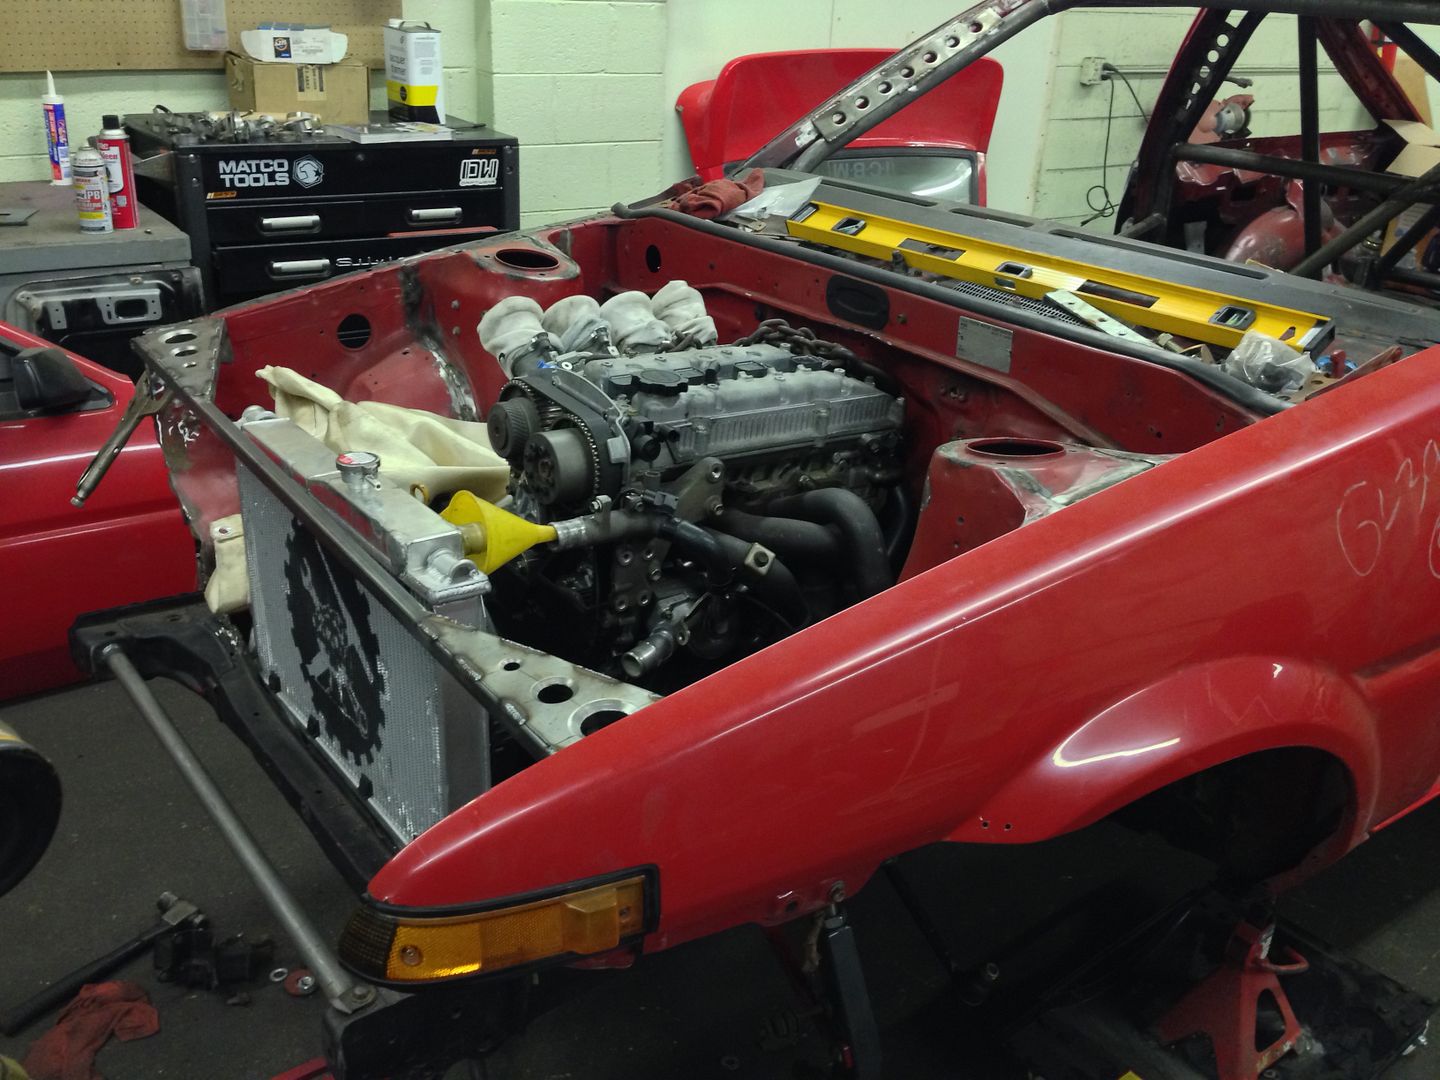
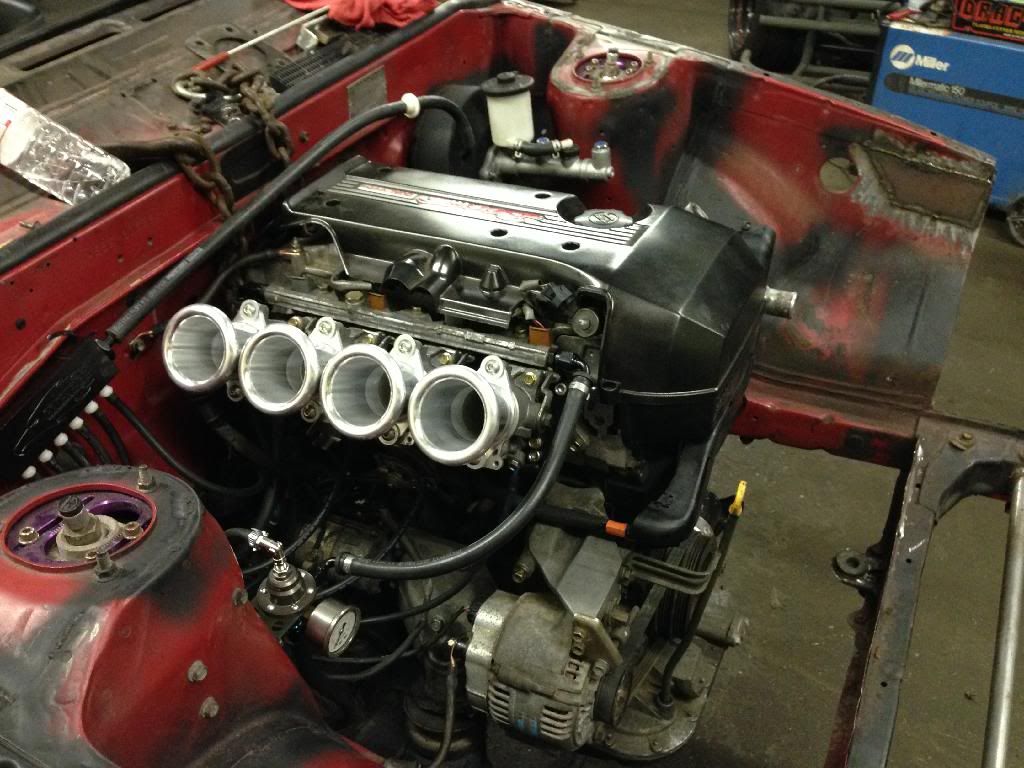
installed engine harness put the engine somewhat back together, mostly for pictures sake since it has to come back out anyway to install clutch/flywheel
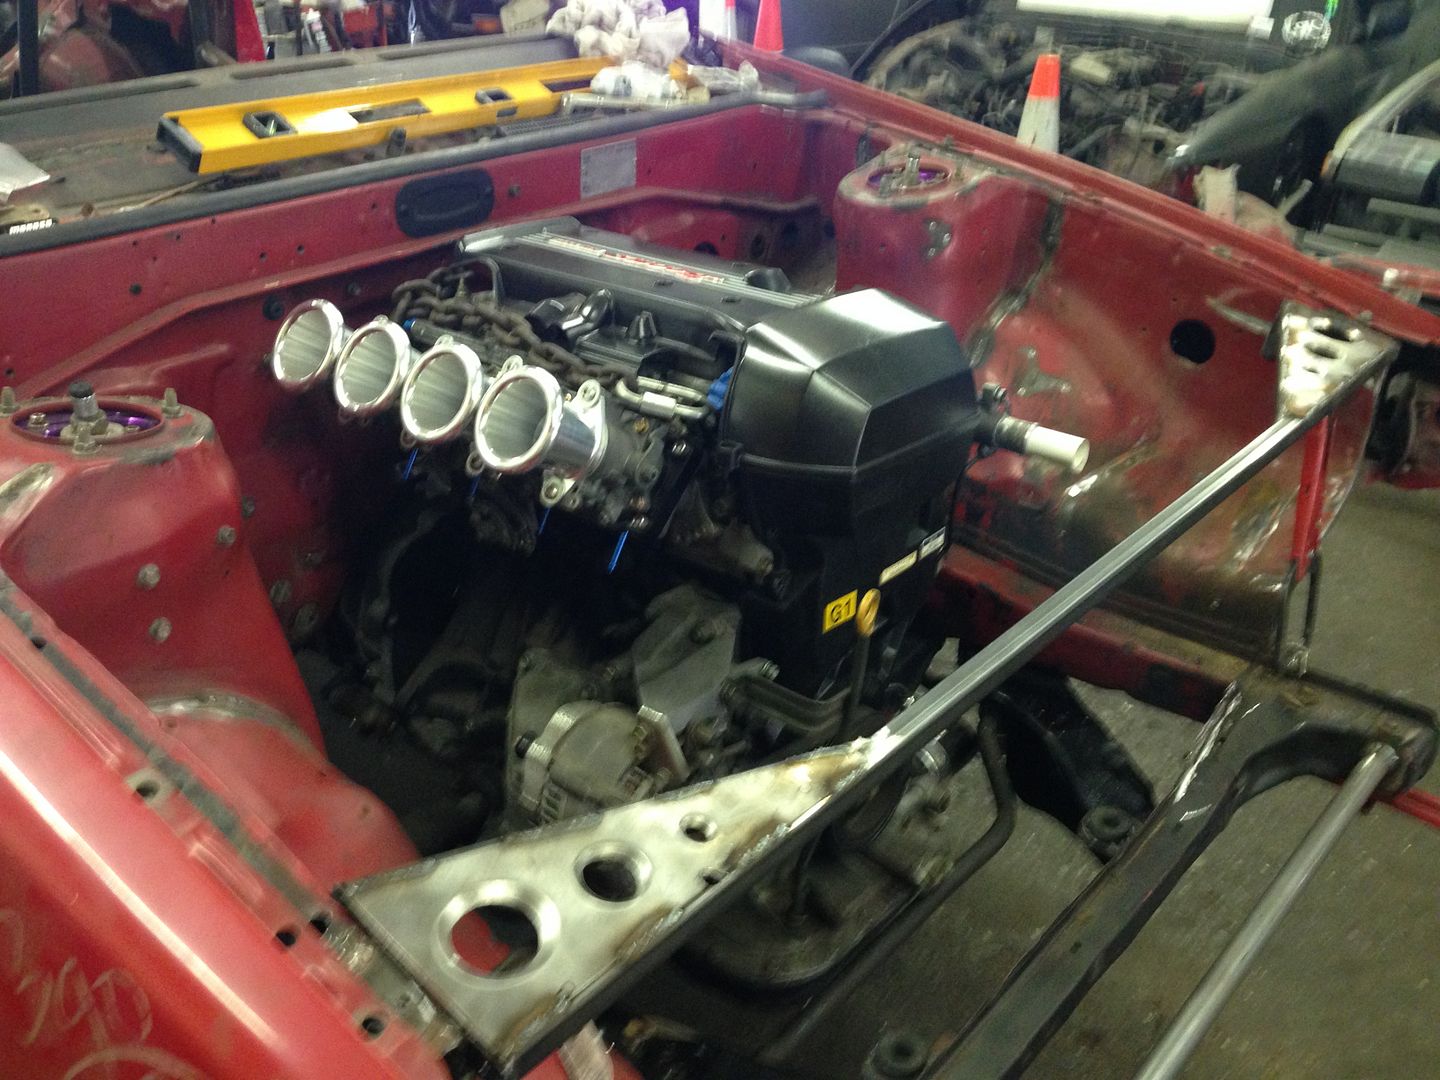
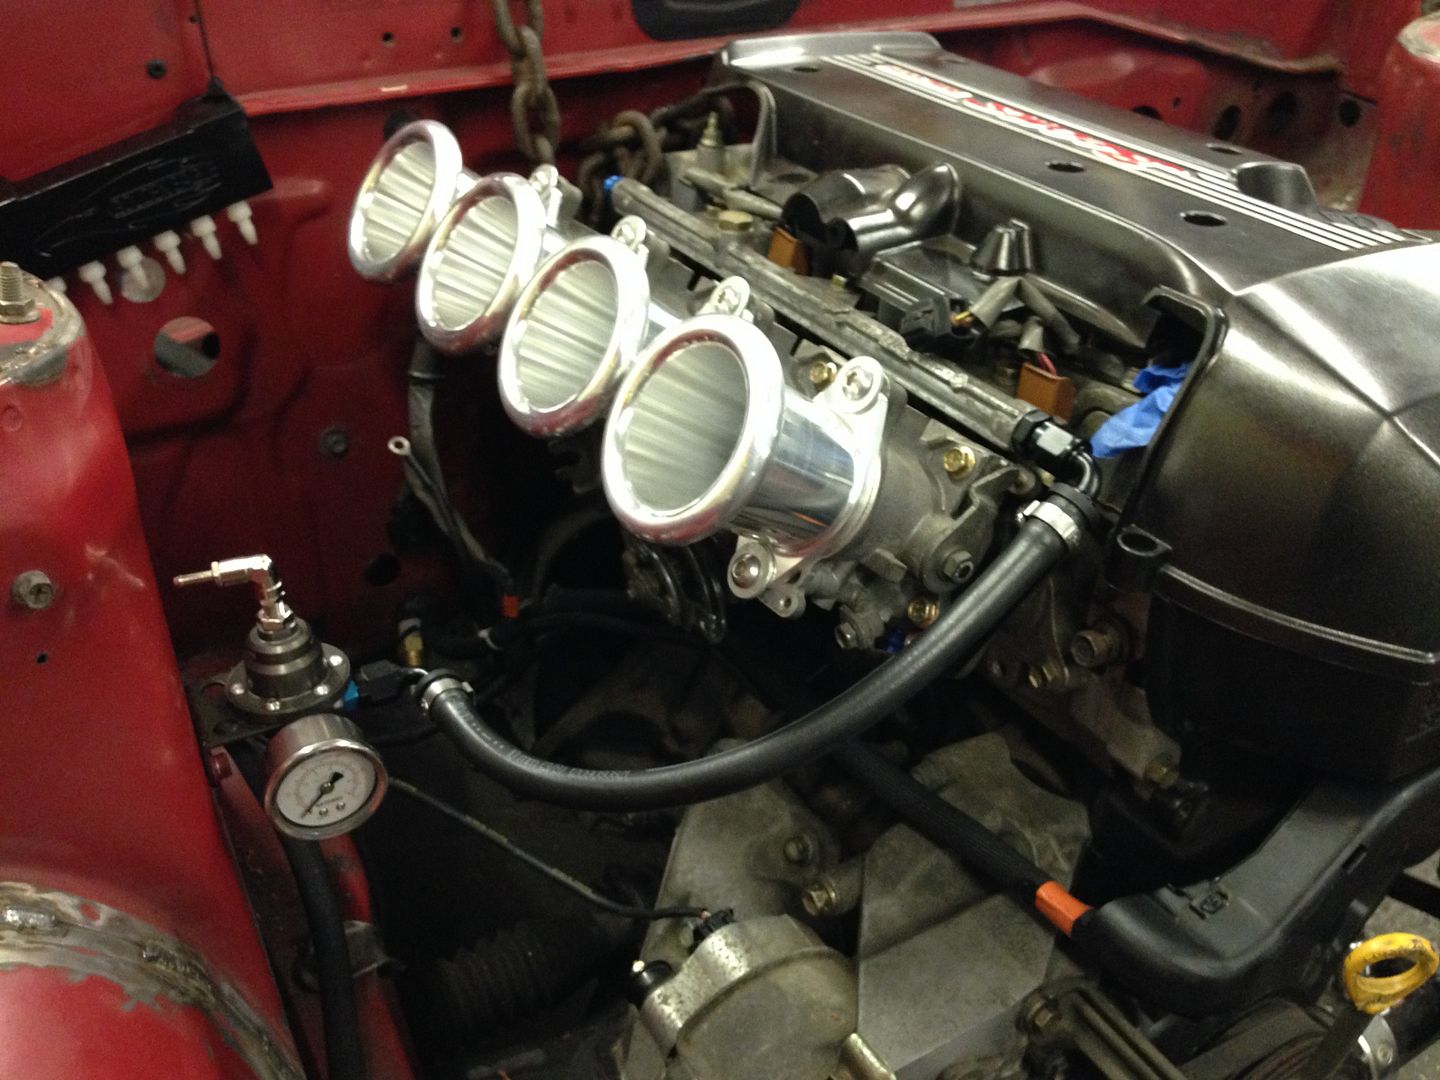
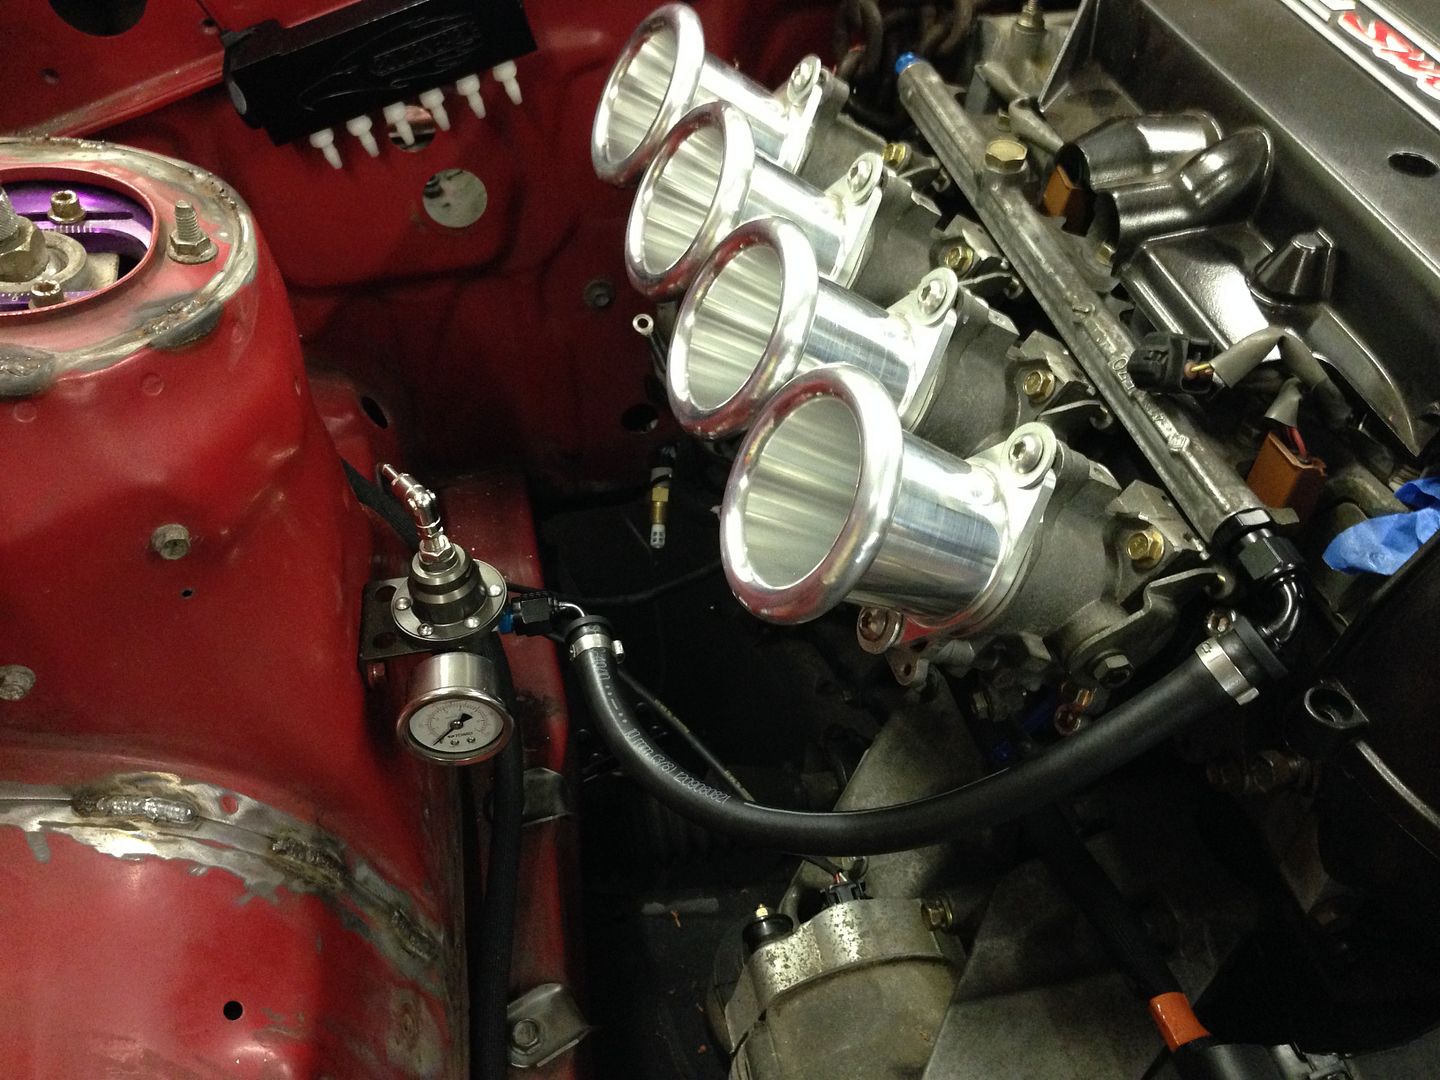
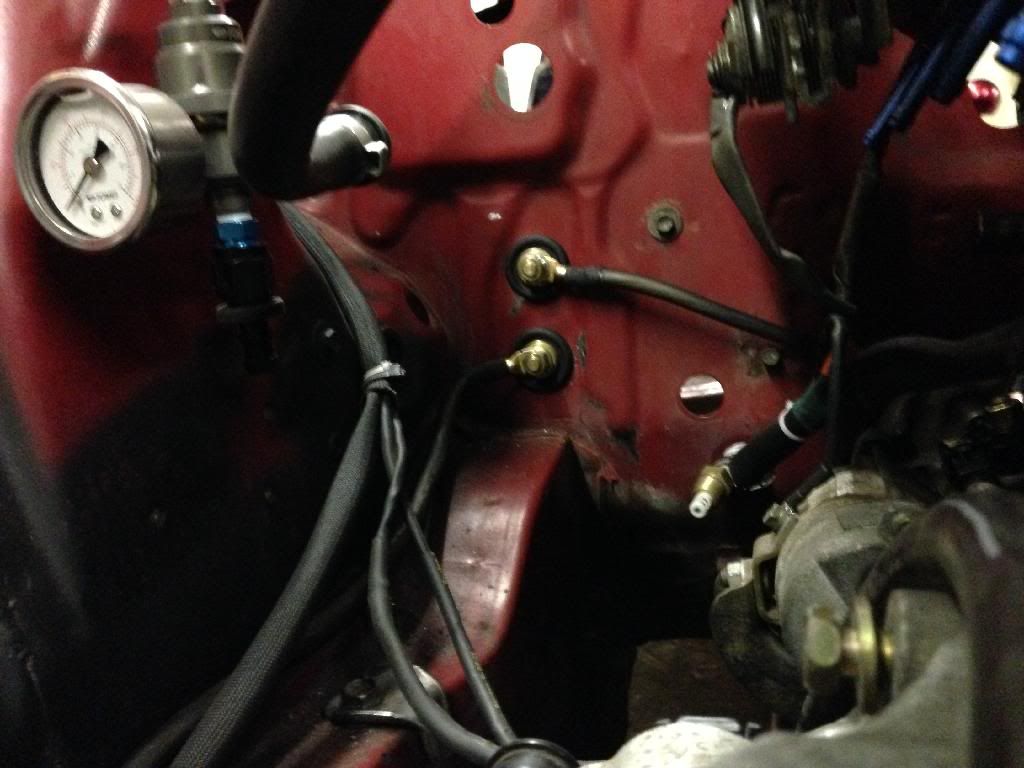
Mounted the vacuum block (well, drilled holes for it anyway, didnt have any bolts the right size) and tomei FPR (used a factory bolt hole/bolt for this. and made the return line going from the rail to the FPR.

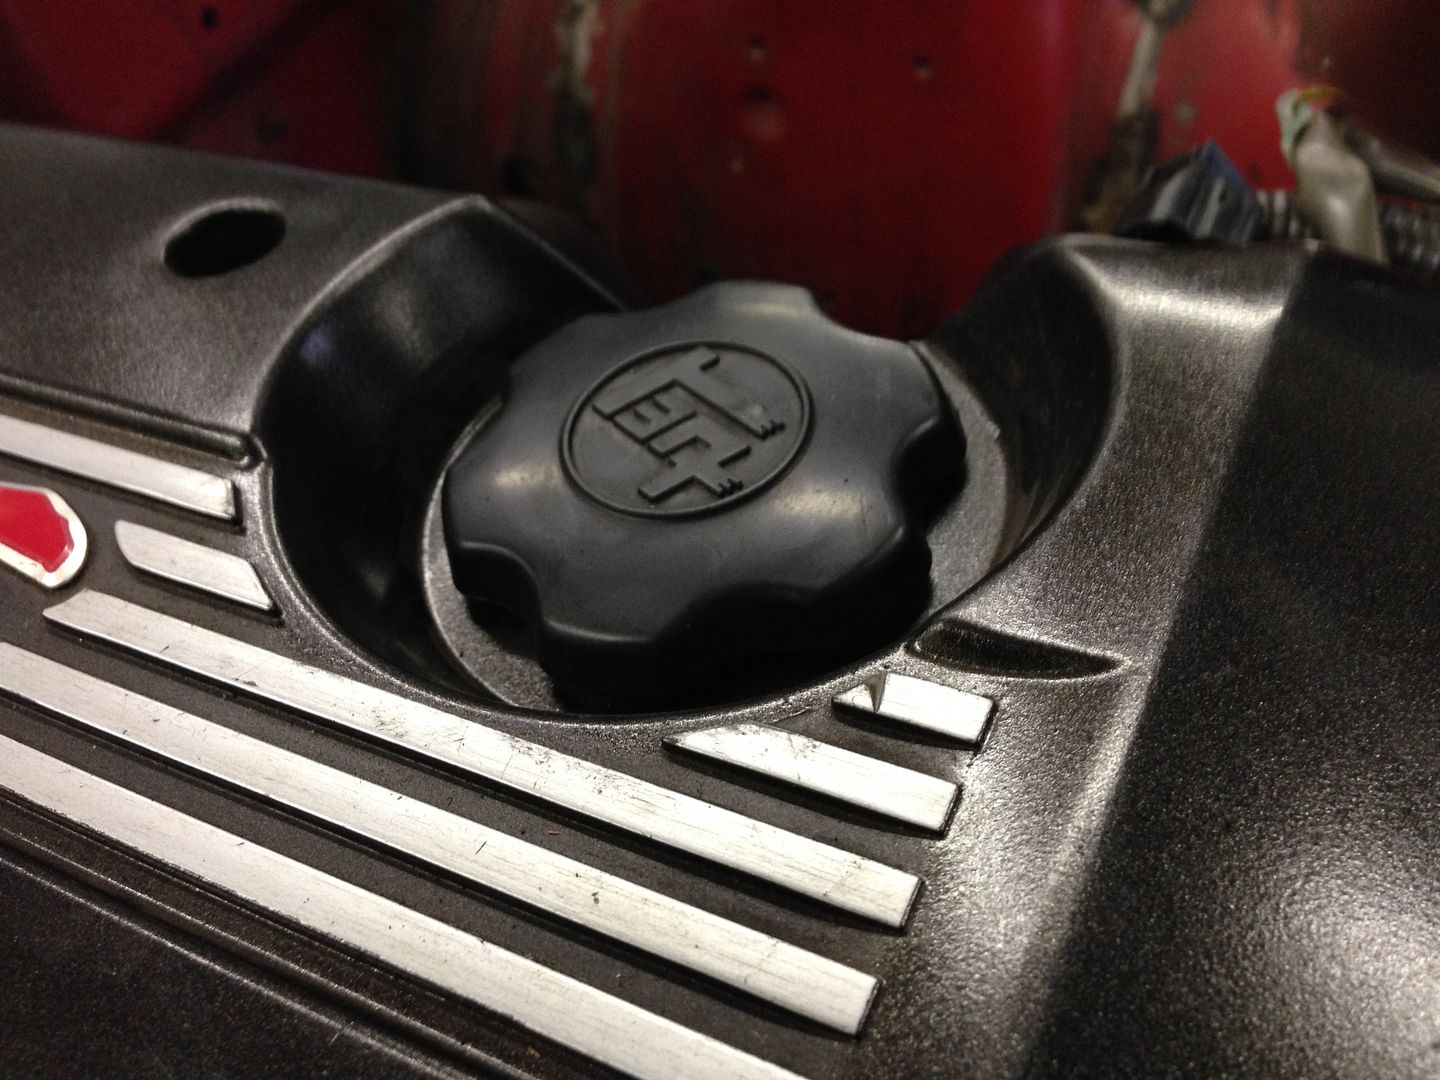
Also got this sweet thing from satty.
This thing is getting ridiculously close to starting, have to run power/ground from the battery to the starter/alt/relay board/kill switch, put gas tank in and run lines to the front, and install clutch, flywheel and starter and it SHOULD fire up.
wiring came in. Pic from the grams.
engine mounts are done

engine sits in there nicely

Trans mount is also done, had to do a full custom piece for this.


And mocking up radiator

radiator is custom as well, took a CX racing ae86 unit and shopped the inlet, outlet and mounting tabs off of it, welded the holes shut, flipped it around and welded them back on the other side, have to do some mounts and fab up an upper support.
we modified the thermostat housing so that the water outlet faces forward instead of sideways.


should make for easier radiator hoses.
The top one, well. I'd say it lines up pretty well...


It was refreshing somewhat to see the car with a fender on it, made it look less like a pile of ****.


welded in a "bomber" bar for no reason really other than we could.

My headlight backing plate things (whatever that part of the core support is called) were all mangled and rusted to **** so we decided to take them off, one of them was welded on so poorly we smacked it with a hammer like twice and it came off.

If any of you remember my S13 build, this part is called "not learning from my mistakes"
So we made a new upper tie bar for the core support.


almost got the headlights all lined up and finished up modding the tension rod brackets so that the oil filter and sway bar clear.
sorry but vinny sucks at taking good pics haha.


Then i went down and did some stuff yesterday
finished my gauge cluster panel and covered it in some black vinyl, also powered up the stack to make sure it works


Trimmed the dash to fit in with the cage, It kind of looks like dick, but whatever, dash was trash anyway. Ran the chassis harness through the car as well. Decided to mount the ECU to the dash bar, You can see it sits right below the bottom of the dash, perfect access for serial/usb ports. Its just zip tied there in the pics, were going to make something to hold it there. the fuse box is going to sit on the trans tunnel under the dash, making something to mount that to as well.


installed engine harness put the engine somewhat back together, mostly for pictures sake since it has to come back out anyway to install clutch/flywheel

Mounted the vacuum block (well, drilled holes for it anyway, didnt have any bolts the right size) and tomei FPR (used a factory bolt hole/bolt for this. and made the return line going from the rail to the FPR.


Also got this sweet thing from satty.

This thing is getting ridiculously close to starting, have to run power/ground from the battery to the starter/alt/relay board/kill switch, put gas tank in and run lines to the front, and install clutch, flywheel and starter and it SHOULD fire up.
Re: Red Death Revival: Beams
nice update it looks good... 

Re: Red Death Revival: Beams
joshearth wrote:impressive build! stoked to see this finished man!
if you don't mind me asking,
how much have you put towards this not including the purchase of the car itself. just for the beams build and all body work, cage work, etc.
thats really impossible for me to say, i've made so many trades for stuff, wheeling and dealing, homie hookups, etc that i cant really give an accurate figure. and the shop doing the work is hooking me up like crazy.
That being said, it has still been an extraordinary amount of money, and it still has a long way to go.
when I look at the things i have accumulated for the car since I decided to "rebuild it" this most recent time, i've probably put 10k into it in the last year, conservatively.
Re: Red Death Revival: Beams
Thanks
Re: Red Death Revival: Beams
Hey interested in the parts used for fuel system I'm doing similar swap and wanted to know the part numbers for the fittings and the hoses. Gracias!!
Re: Red Death Revival: Beams
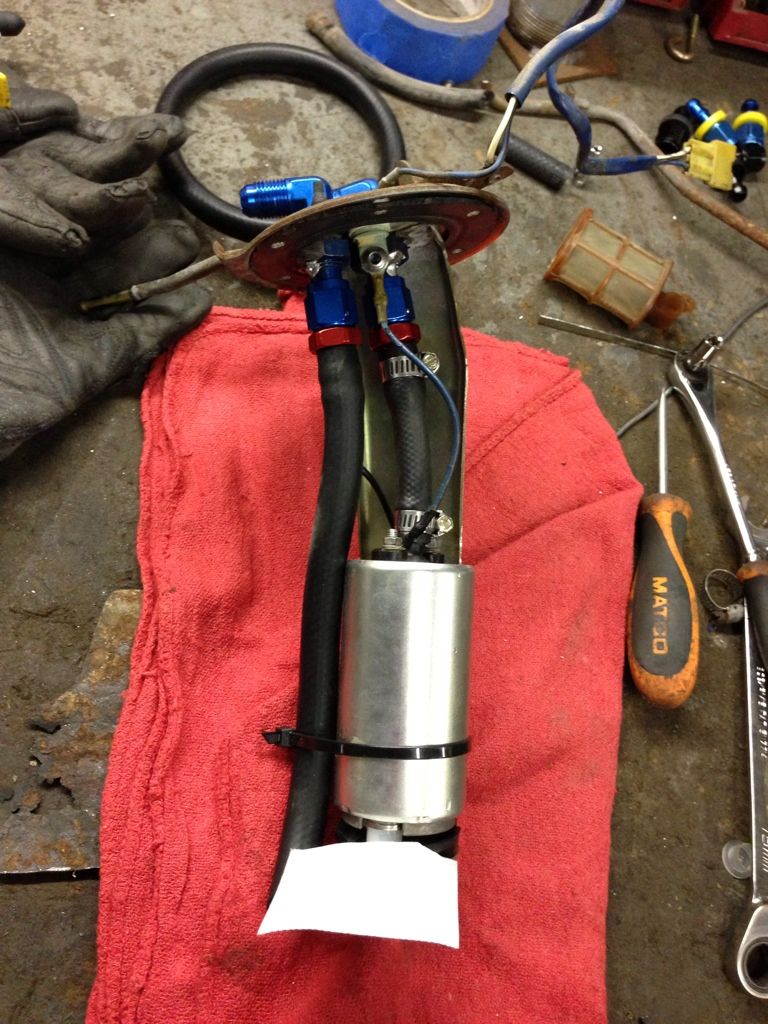
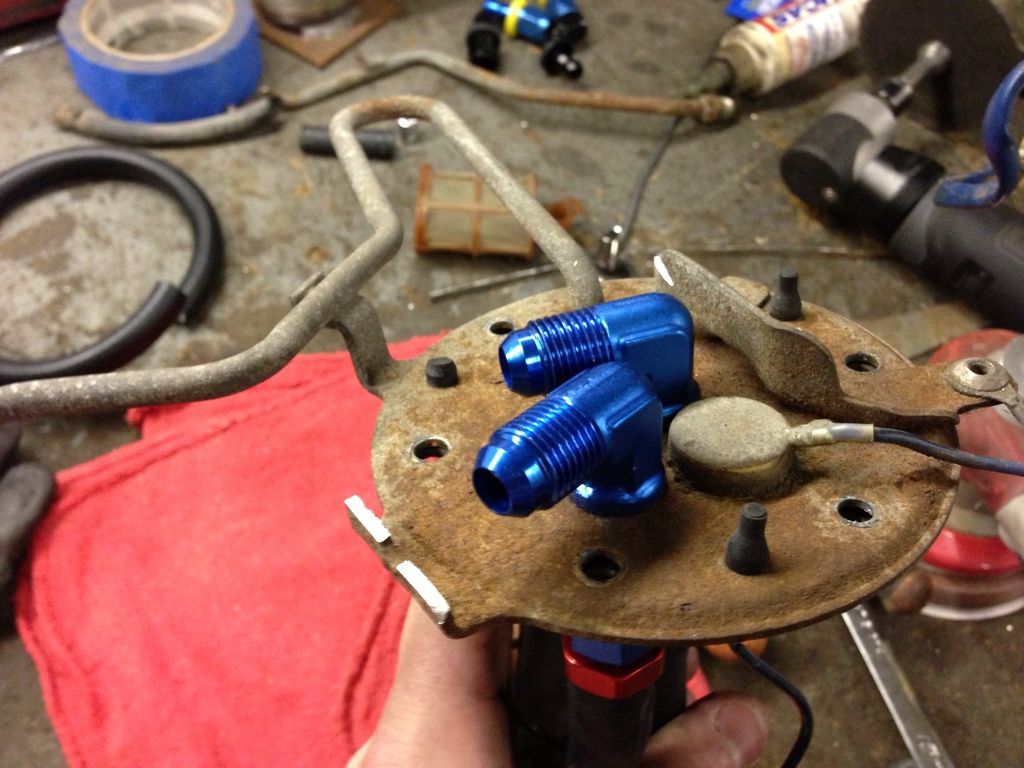
you mean for the fuel pump hanger?
two of these bad boys
http://www.summitracing.com/parts/ear-9 ... /overview/
These come as a pair, so just buy one
http://www.summitracing.com/parts/ear-5 ... /overview/
two of these
http://www.summitracing.com/parts/aed-60949/overview/
Then just buy some submersible fuel hose from napa for the feed (the short section between your pump and your new barb fitting, and the return.
pretty self explanatory how it goes together.

Re: Red Death Revival: Beams
looks good.. nice update.....
Re: Red Death Revival: Beams
Unfortunately didn't get it running this weekend, but did make some good progress.
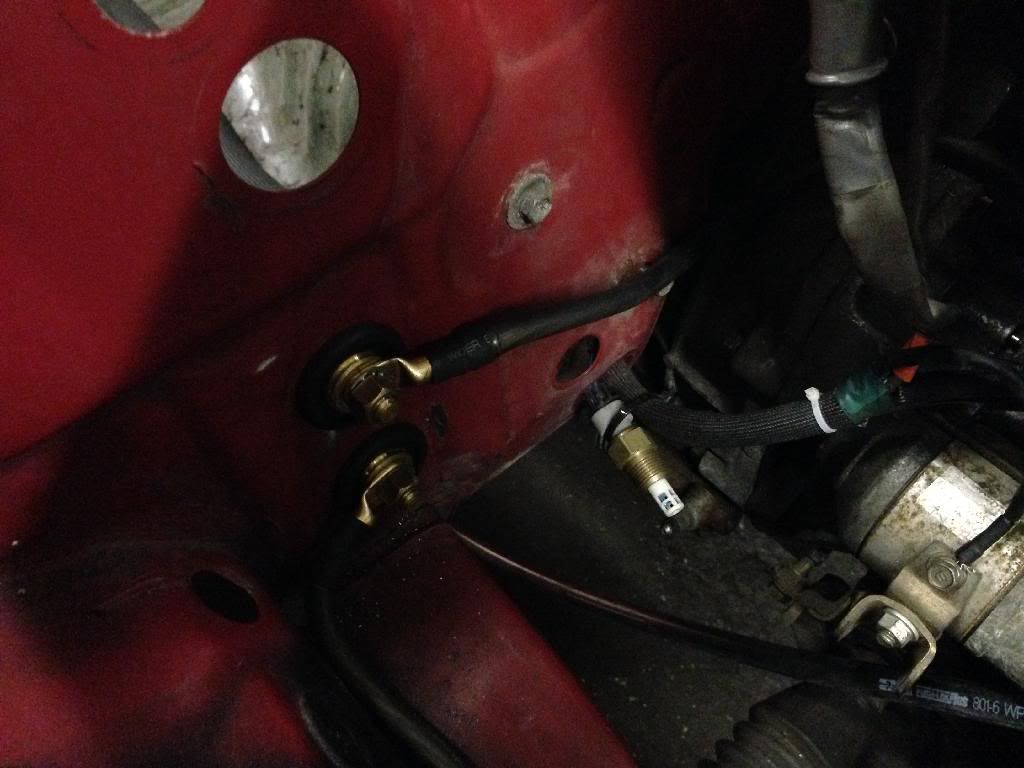
Made all the battery/power wires. Its so nice working with all new wiring stuff.
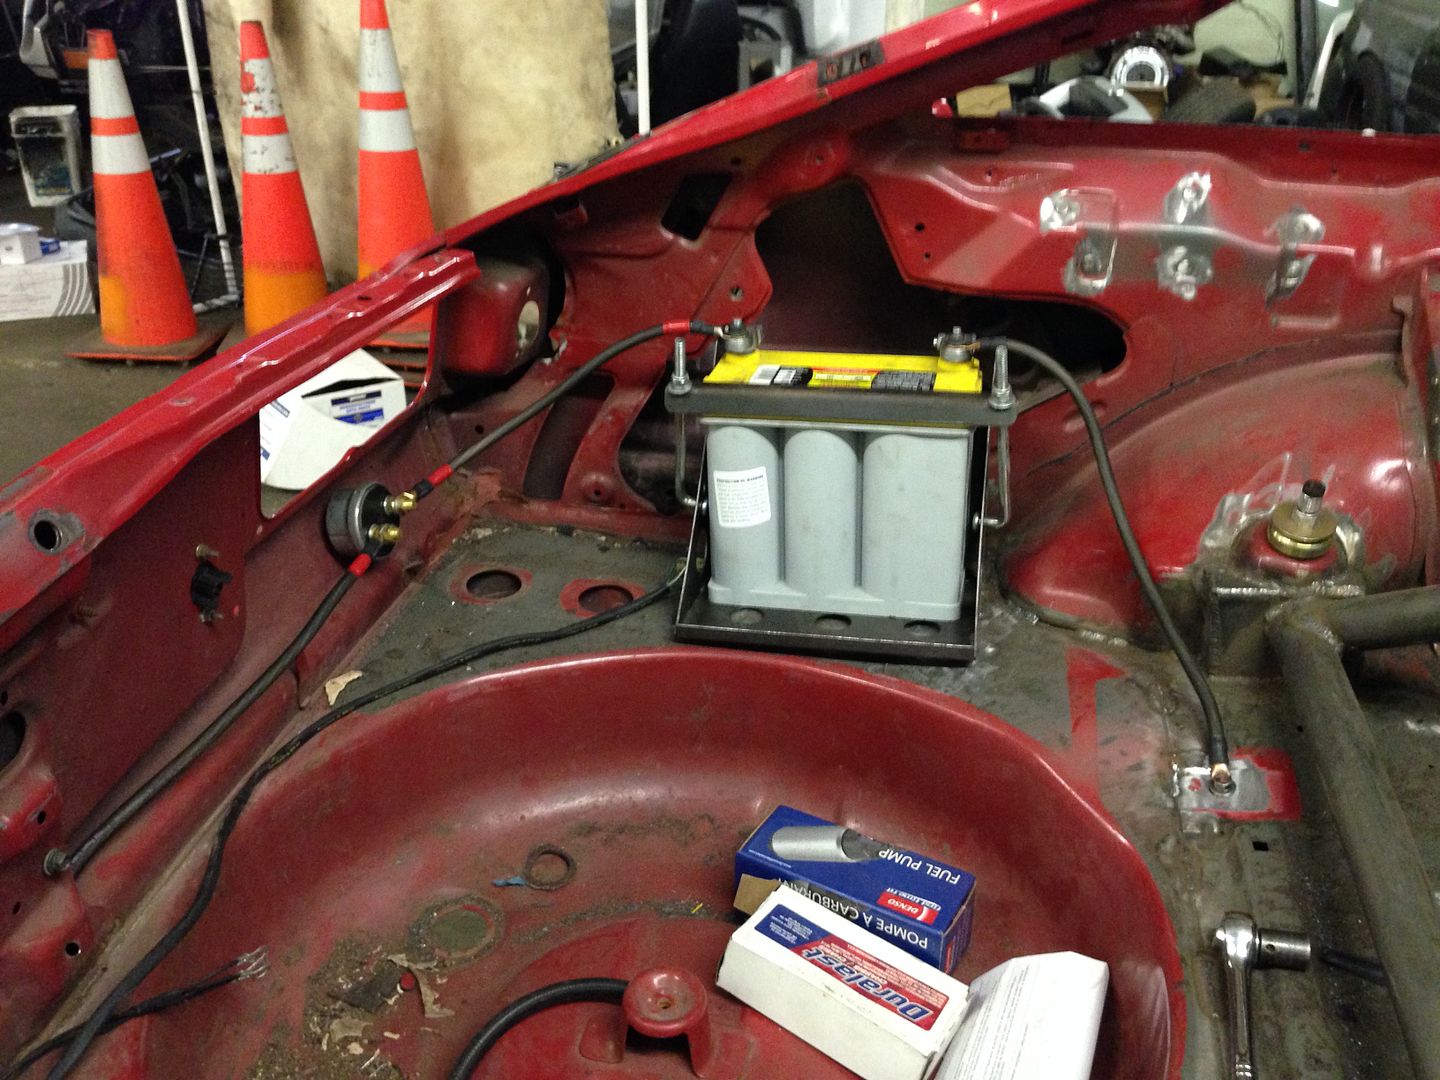

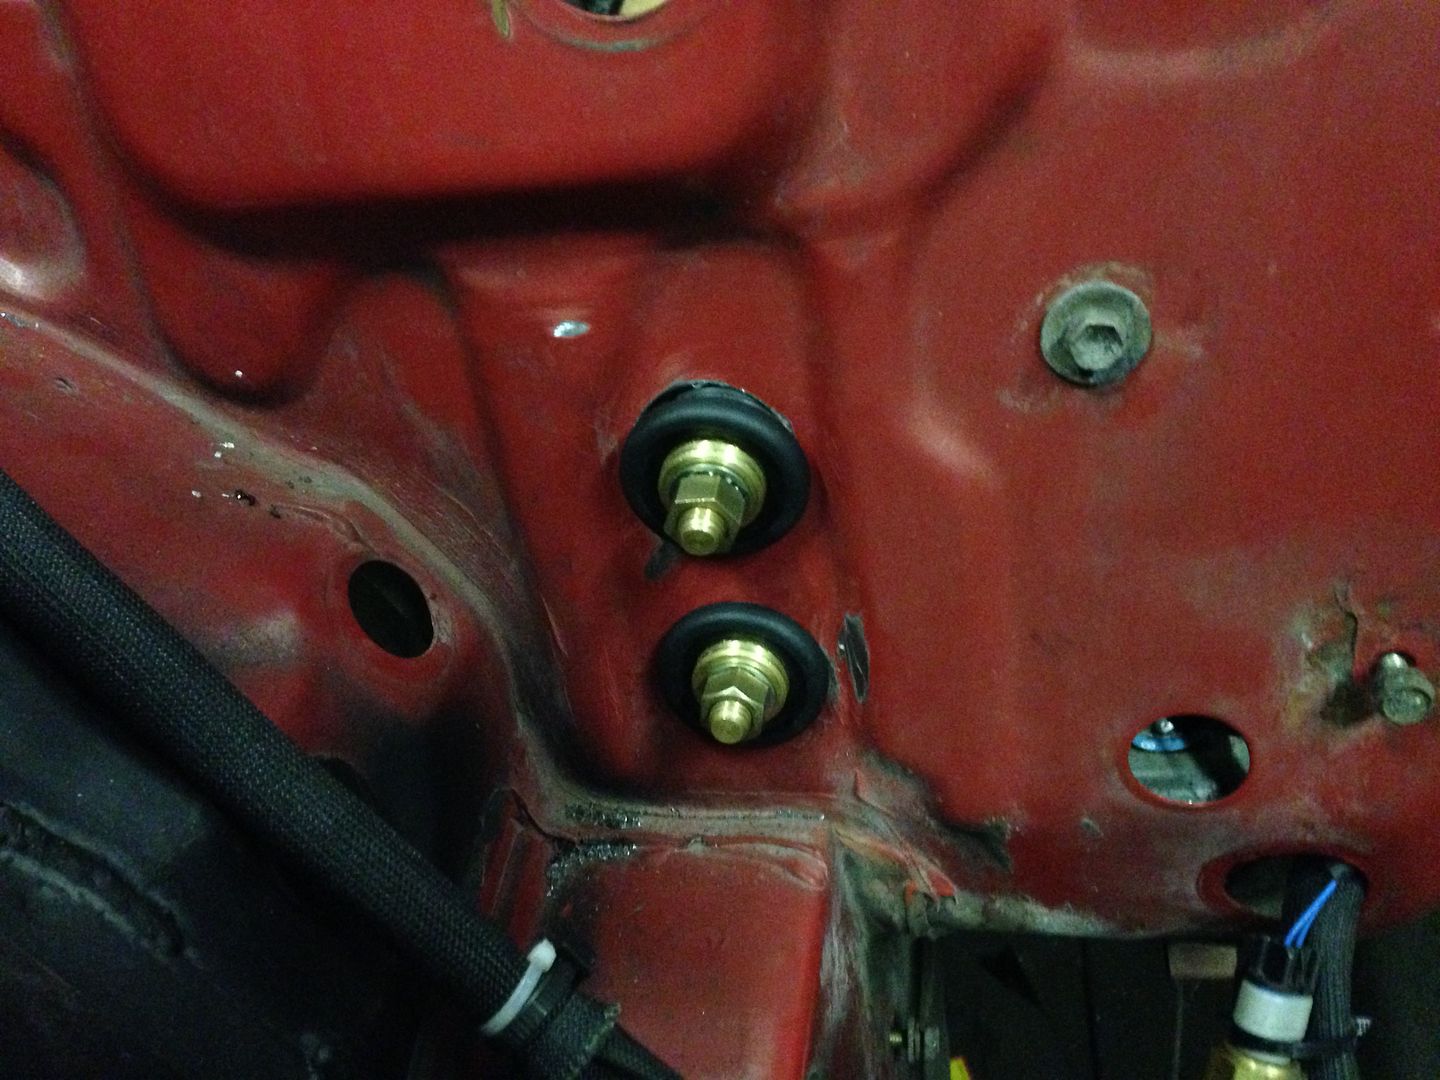
Mounted firewall bulkheads for the starter and alternator power wires.
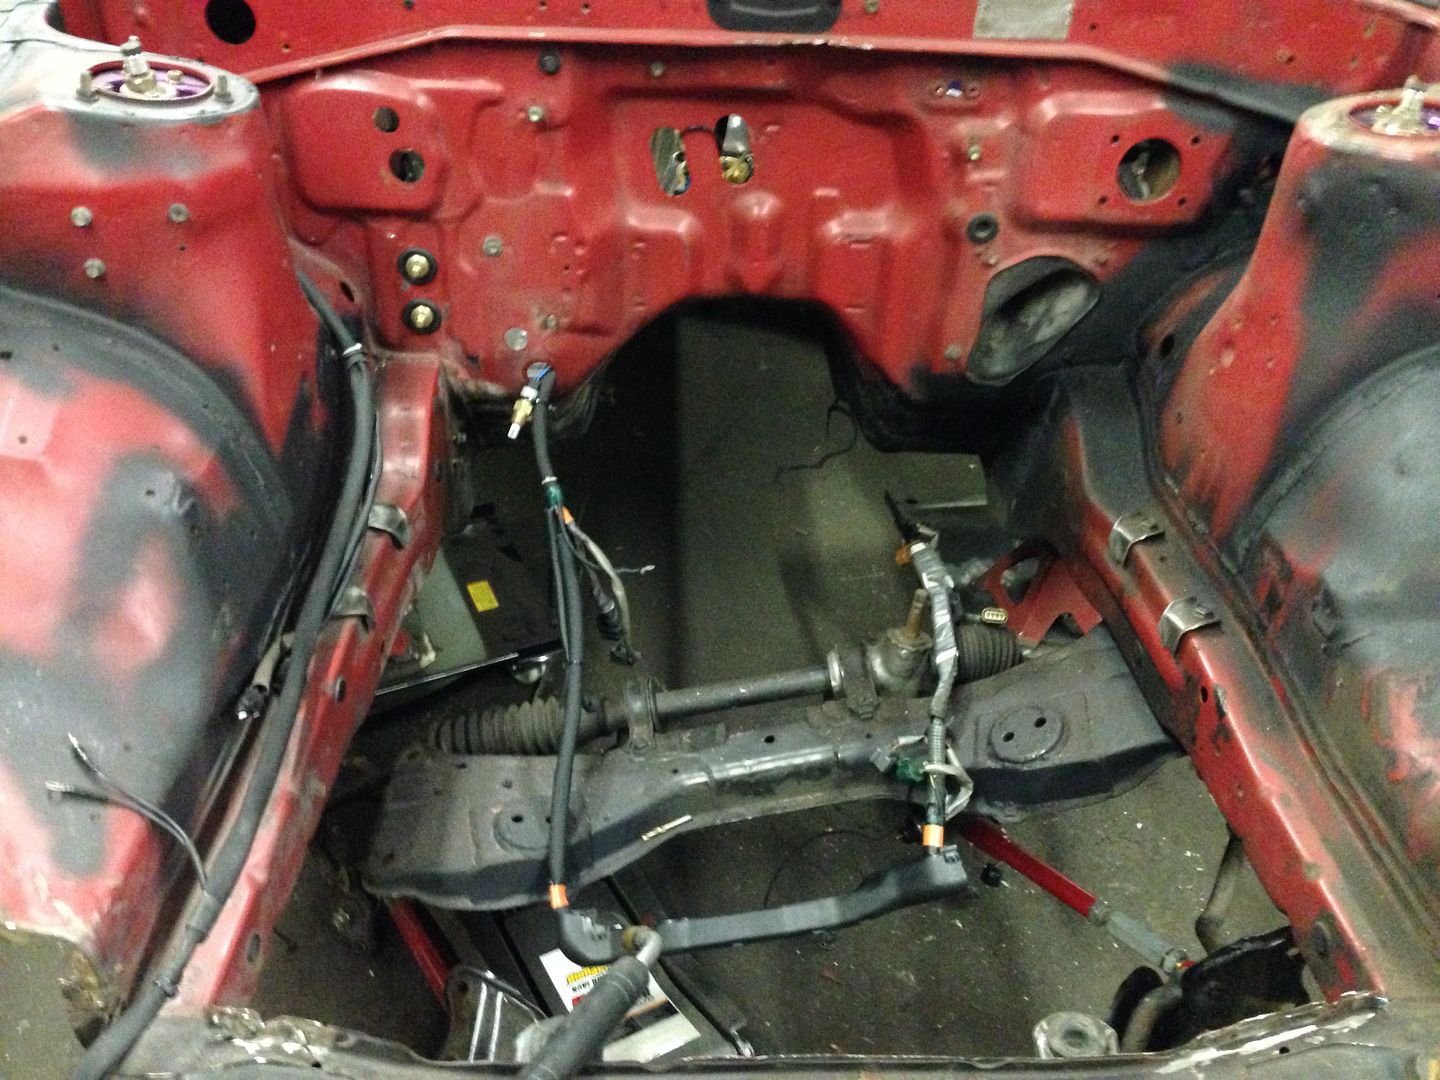
routed the wires along the passengers side, and rerouted the chassis harness to follow the trans tunnel.
Then we hit the kill switch and luckily everything powered up.
We got to test the headlights and so far everything is working as it should.
We didn't have time to throw the motor back in and try cranking it because vinny was still doing some welding in the bay. Next weekend i'll be back at it.
Made all the battery/power wires. Its so nice working with all new wiring stuff.


Mounted firewall bulkheads for the starter and alternator power wires.


routed the wires along the passengers side, and rerouted the chassis harness to follow the trans tunnel.

Then we hit the kill switch and luckily everything powered up.


We got to test the headlights and so far everything is working as it should.
We didn't have time to throw the motor back in and try cranking it because vinny was still doing some welding in the bay. Next weekend i'll be back at it.
Re: Red Death Revival: Beams
what a bad ass build! I love it
1985 Corolla Hatch widebody w/ SR20det (The Project)
1993 5SGTE stroker widebody MR2 Turbo (drag car)
2002 Miata SE hardtop (daily Driver)
1994 4runner (The truck)
1993 5SGTE stroker widebody MR2 Turbo (drag car)
2002 Miata SE hardtop (daily Driver)
1994 4runner (The truck)
Re: Red Death Revival: Beams
Thanks!
Re: Red Death Revival: Beams
Getting close and looking great! Arc panel hell yeah! Pretty straightforward wiring on those?
Re: Red Death Revival: Beams
i didnt actually build the harness, a friend of mine did. I'm pretty wiring incompetent, but so far running the power wires has been pretty simple. Just need to feed power to the alt, starter, and relay board and thats it.
Re: Red Death Revival: Beams
Great work & progress bro...Look forward to reading & seeing more of you're progress as it goes.
Also like the way you did the engine mounts for the motor
Also like the way you did the engine mounts for the motor
Re: Red Death Revival: Beams
OK, all of these pics turned out REALLY shitty for some reason. Seems as though HDR was turned off on my phone. Whoops.
My friend and I went down to DW yesterday hell bent on getting that first startup. Left Green Bay at like 6 in the fucking morning even.
anyways. First thing on the agenda was to finish running all the power/ground cables. These pics are boring to you probably, but if you know me, I don't know **** about wiring, and I did all these cables myself from drawing the diagram on, so **** you. I think they look nice.
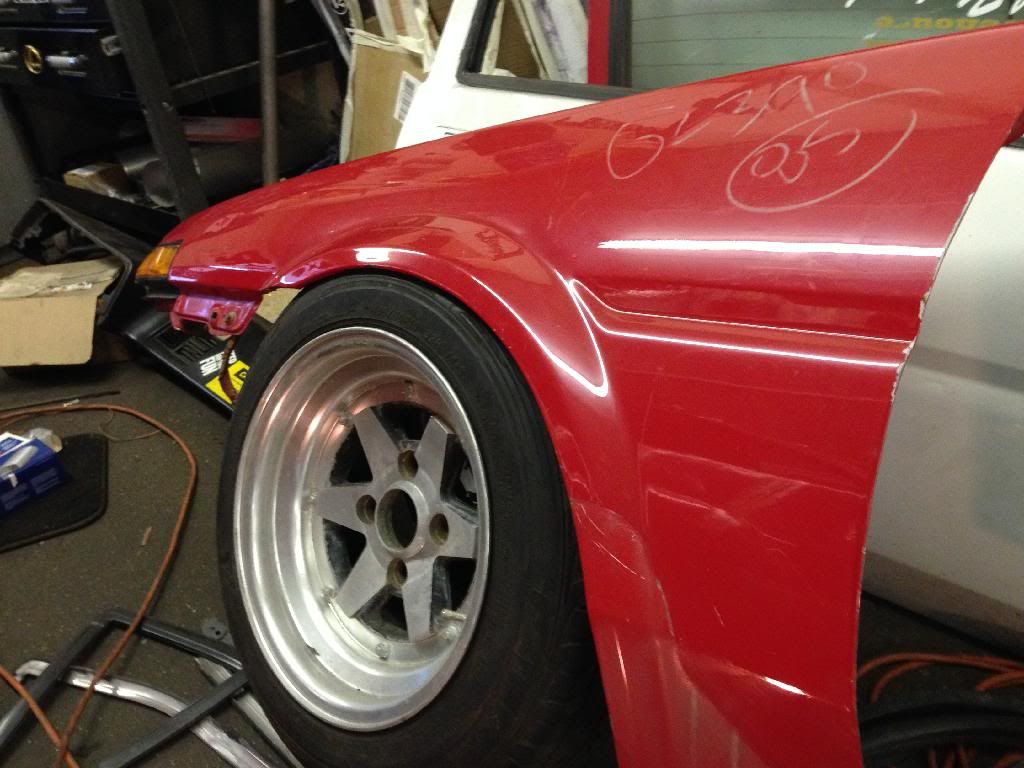
Next I fucked around with my front wheel fitment a little and got it about where I want it. might lower the front more though.
then we put the gas tank in, I didnt take any pictures of that part, or the part where we put some gas in it, just imagine it in your head, except it was probably better than the in-your-head version.
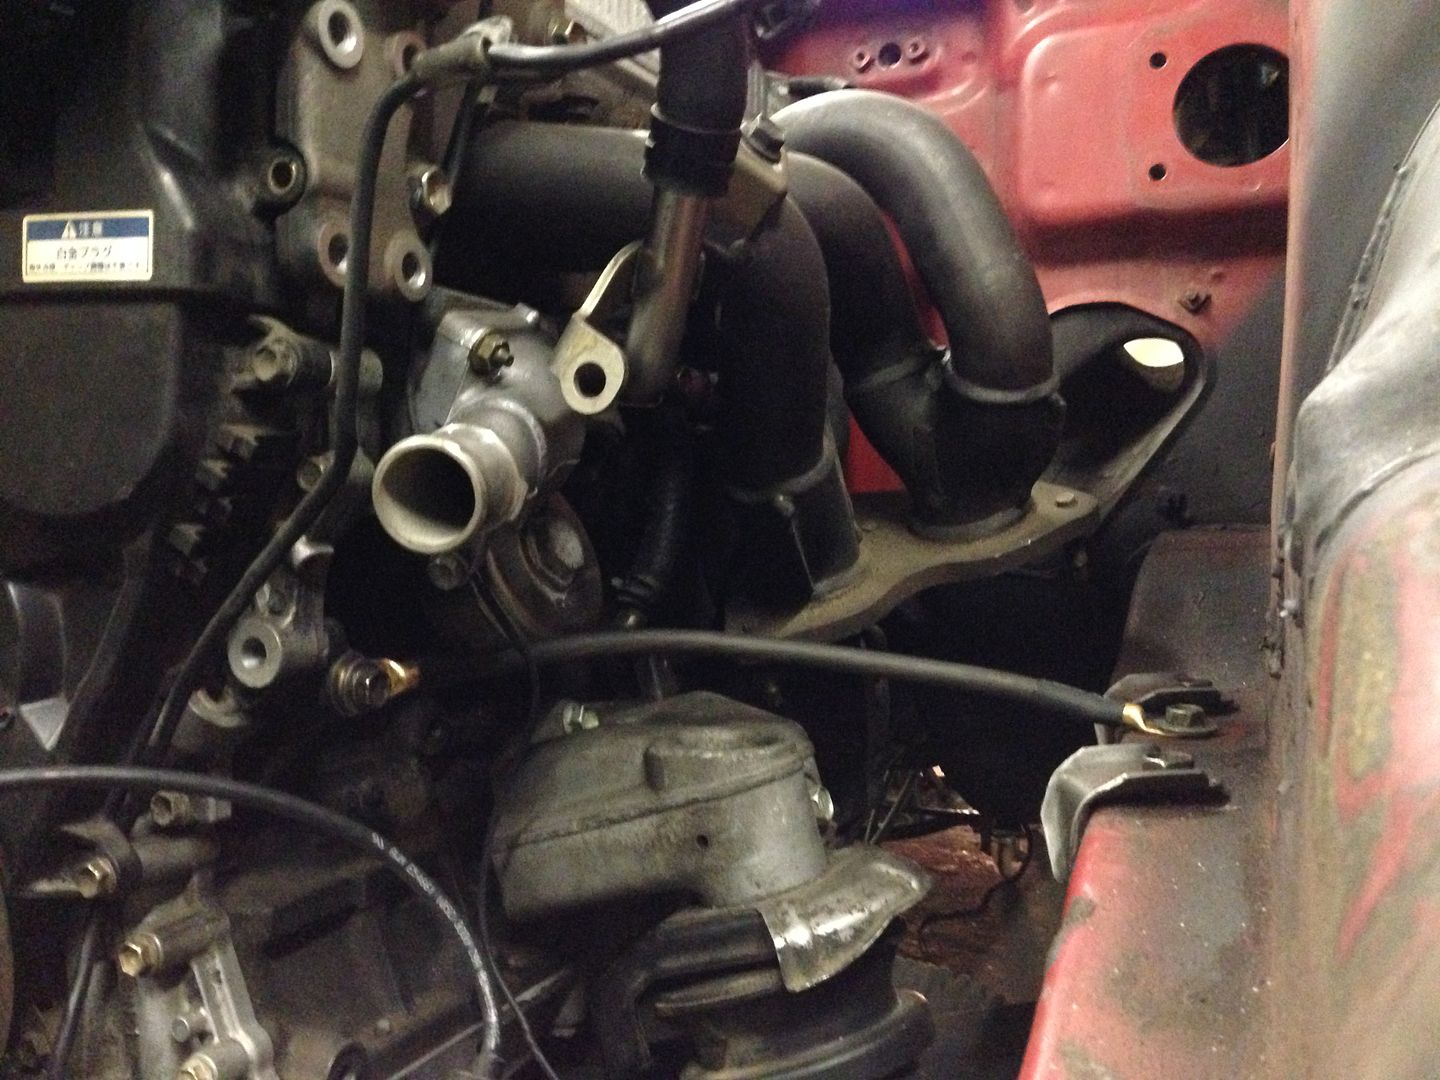
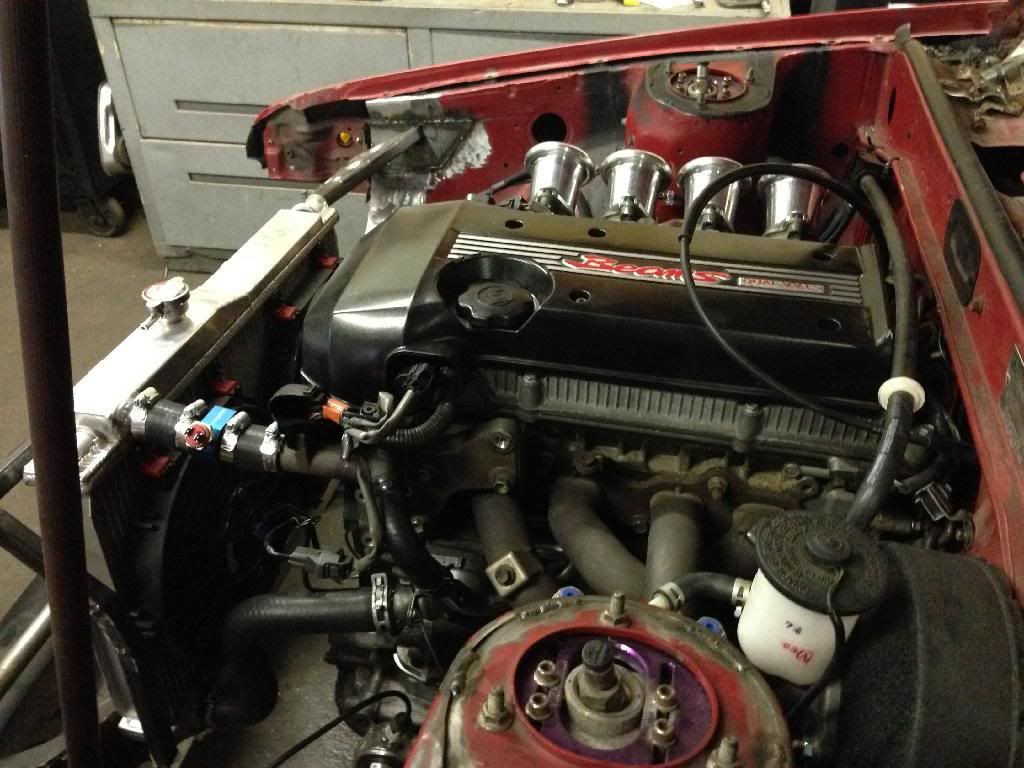
Ran all fuel lines and hooked up the vacuum lines. Everything looks sloppy now, but once I decide where the vacuum block is going to sit I will make it look nicer. This was just a quick and dirty mockup. also the core support/rad/headlights obviously aren't on so I have nothing to do with the wiring for those.
and well. After a few tries and working out some cobwebs, it started up a few times. I was an idiot and forgot to bring a laptop to talk to the AEM, which would have helped a **** load and saved us a bunch of time, but oh well, next time we will get it running all sweet.
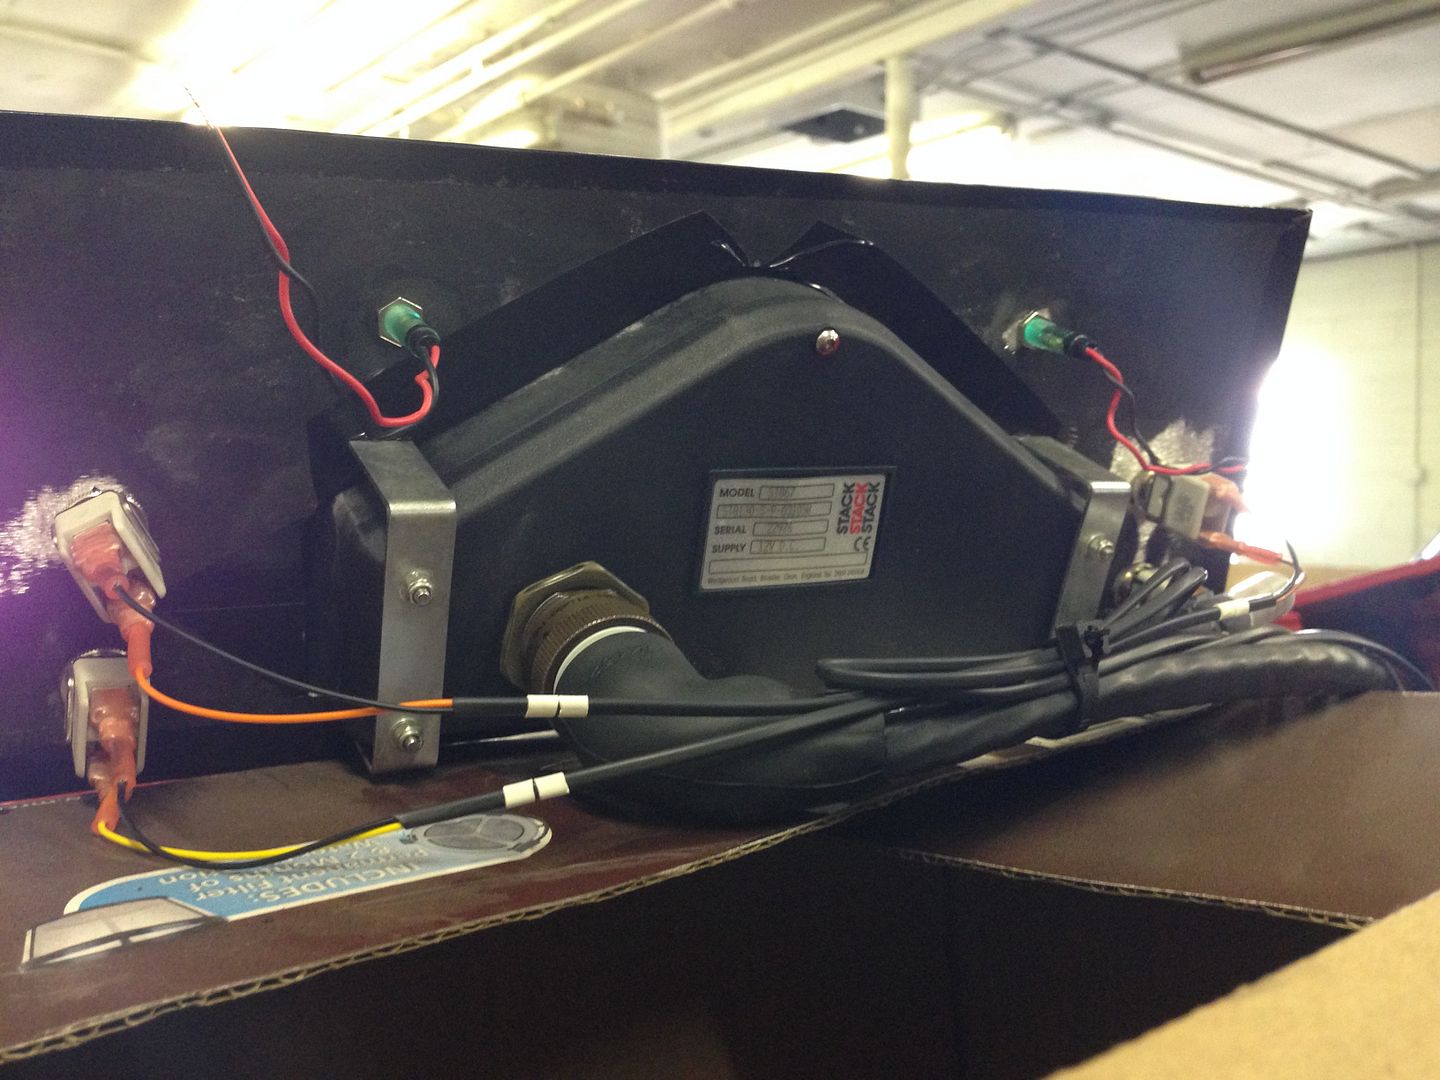
Then I just fucked around with my interior a bit to see what it was going to look like. tossed the dash in, mounted switch panel, marked the spots where the hydro needs to go, and then found out the panel I made for the stack doesnt fit, the wiring harness on the back hits the dash bar for the cage. **** me, right? oh well.
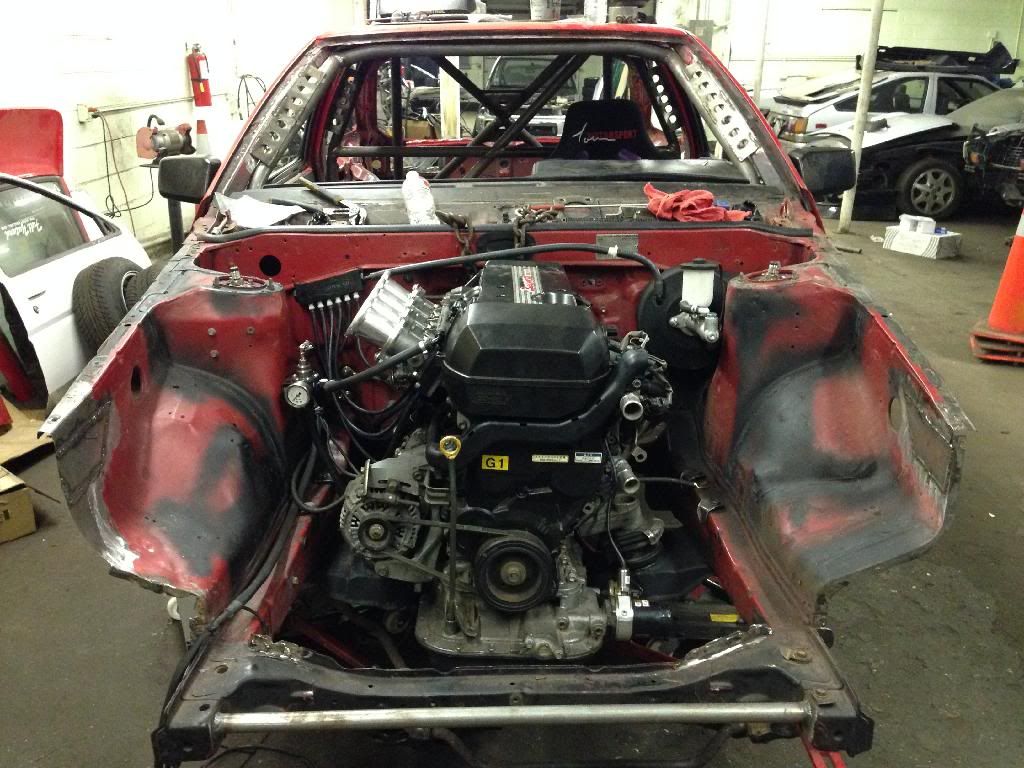
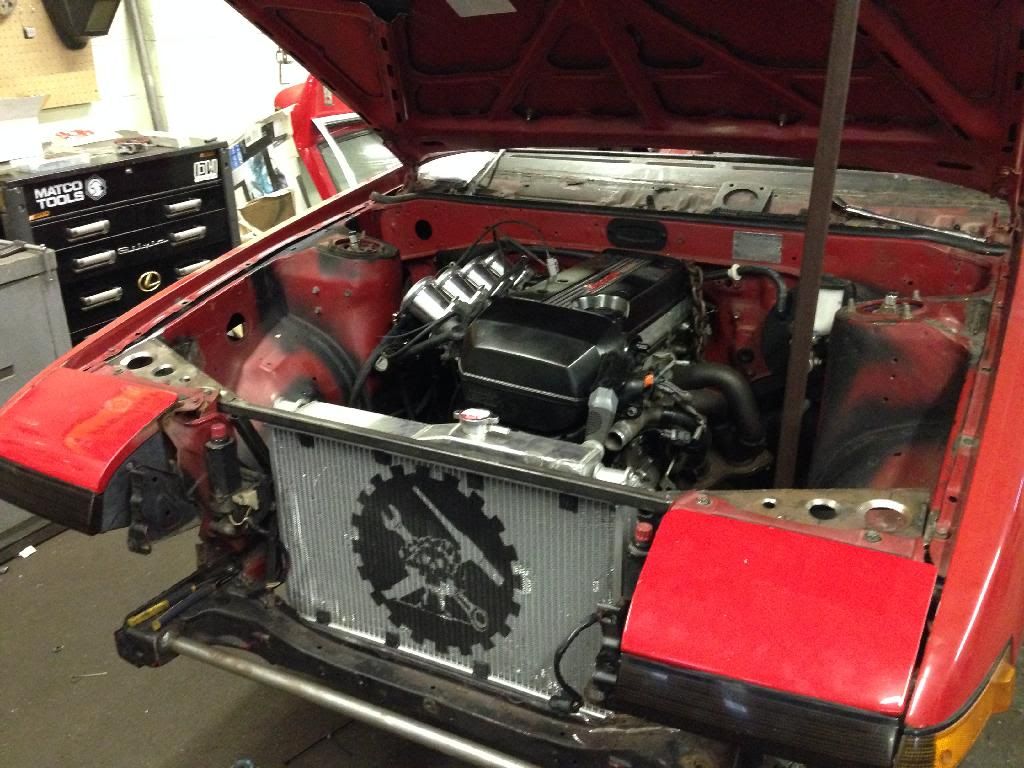
went and fucked around with this thing again today. Need to be able to put coolant in it if I want it to run properly (need to get it up to temp) so that meant finishing the core support/front end. Which also meant fitting the body panels.
Was amazed to find out that the hood actually fit without dropping the subframe. Take that, everyone else who's ever done this swap. Suck my dick because I'm better than you.


Good panel fitment. Like stock!
I did have to cut out the skeleton on the bottom of the hood, so its all floppy and **** now, which I think is pretty cool because thats how all the J dudes have been doing it forever.
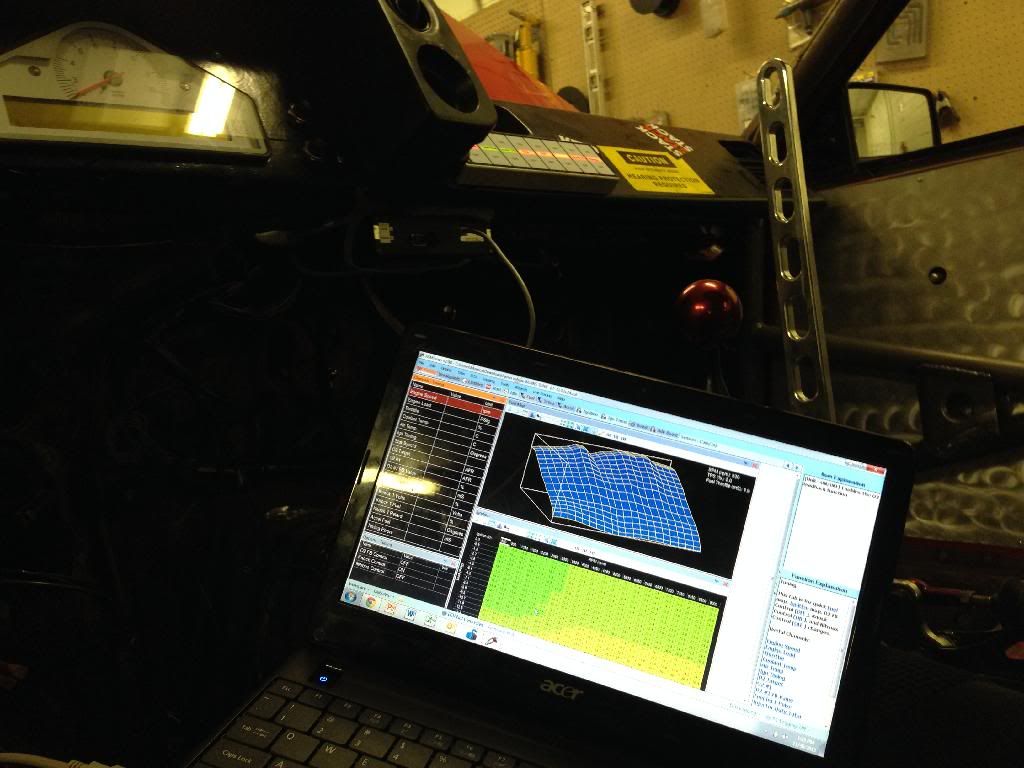
also brought a laptop and plugged the ECU in and loaded a new tune on that bitch.

and check out this sweet **** right here.
My friend and I went down to DW yesterday hell bent on getting that first startup. Left Green Bay at like 6 in the fucking morning even.
anyways. First thing on the agenda was to finish running all the power/ground cables. These pics are boring to you probably, but if you know me, I don't know **** about wiring, and I did all these cables myself from drawing the diagram on, so **** you. I think they look nice.


Next I fucked around with my front wheel fitment a little and got it about where I want it. might lower the front more though.

then we put the gas tank in, I didnt take any pictures of that part, or the part where we put some gas in it, just imagine it in your head, except it was probably better than the in-your-head version.
Ran all fuel lines and hooked up the vacuum lines. Everything looks sloppy now, but once I decide where the vacuum block is going to sit I will make it look nicer. This was just a quick and dirty mockup. also the core support/rad/headlights obviously aren't on so I have nothing to do with the wiring for those.

and well. After a few tries and working out some cobwebs, it started up a few times. I was an idiot and forgot to bring a laptop to talk to the AEM, which would have helped a **** load and saved us a bunch of time, but oh well, next time we will get it running all sweet.
Then I just fucked around with my interior a bit to see what it was going to look like. tossed the dash in, mounted switch panel, marked the spots where the hydro needs to go, and then found out the panel I made for the stack doesnt fit, the wiring harness on the back hits the dash bar for the cage. **** me, right? oh well.


went and fucked around with this thing again today. Need to be able to put coolant in it if I want it to run properly (need to get it up to temp) so that meant finishing the core support/front end. Which also meant fitting the body panels.
Was amazed to find out that the hood actually fit without dropping the subframe. Take that, everyone else who's ever done this swap. Suck my dick because I'm better than you.


Good panel fitment. Like stock!
I did have to cut out the skeleton on the bottom of the hood, so its all floppy and **** now, which I think is pretty cool because thats how all the J dudes have been doing it forever.


also brought a laptop and plugged the ECU in and loaded a new tune on that bitch.

and check out this sweet **** right here.

Re: Red Death Revival: Beams
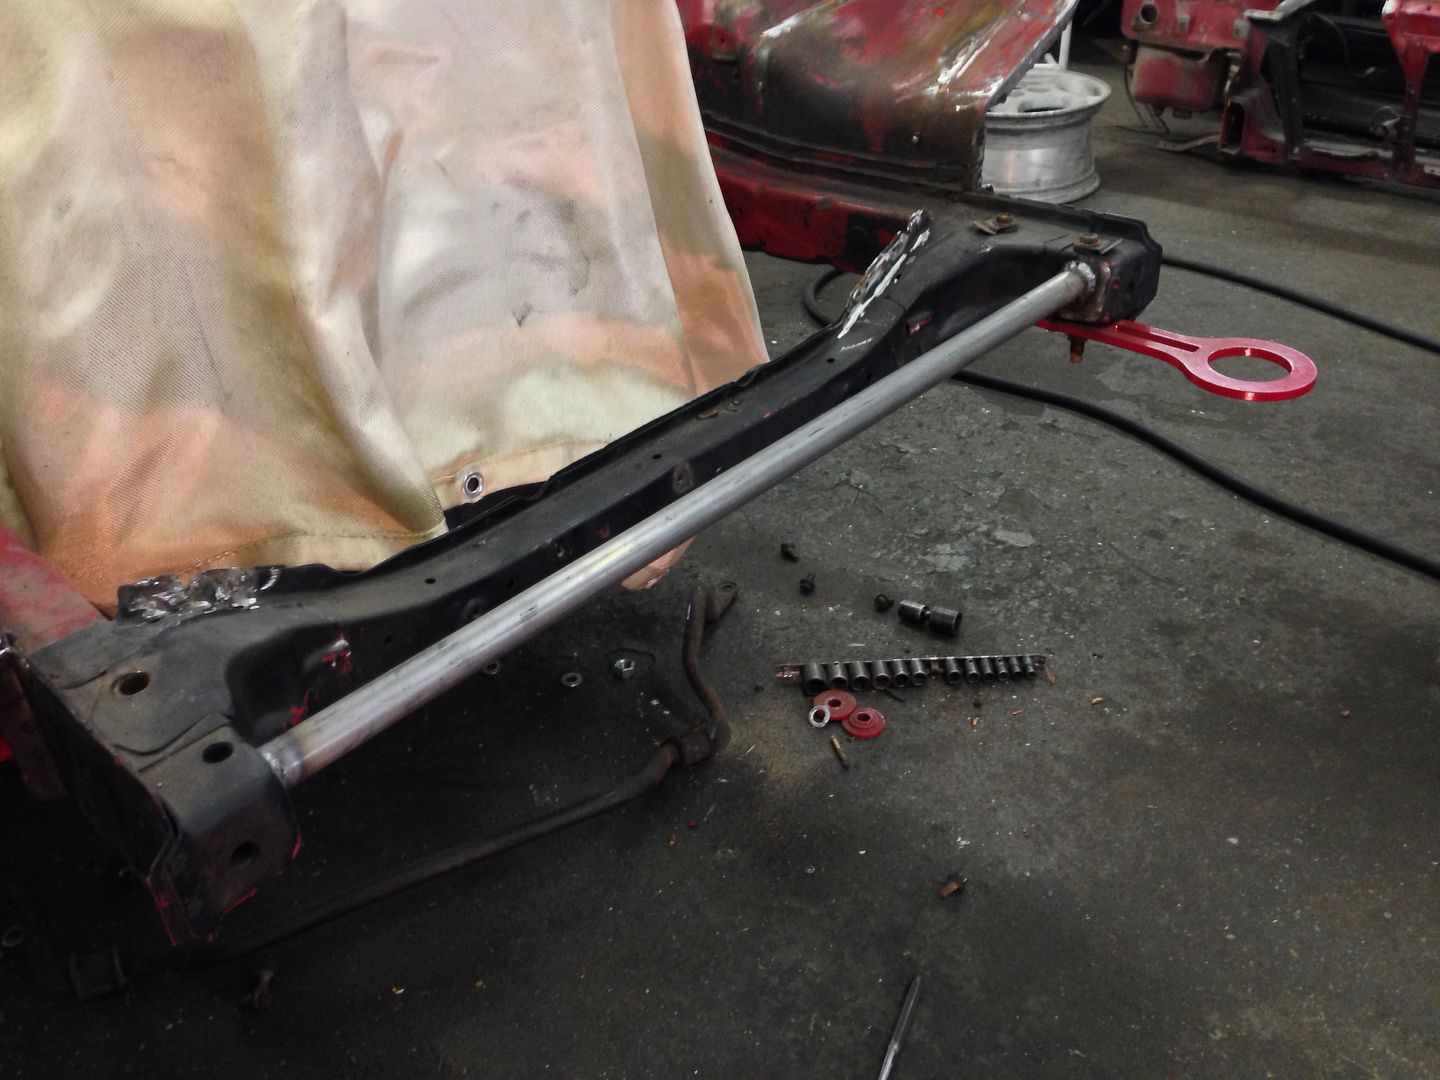
Ditched my T3 tow hook for a JSP jam. Thanks John!

-
Mazota TE51
- Club4AG Regular
- Posts: 21
- Joined: Thu Jul 18, 2013 8:48 pm
Re: Red Death Revival: Beams
Very Nice Build thanks for sharing.
Re: Red Death Revival: Beams
I put my vaccum block uner the ITBs, looks clean to me. I made a bracket and mounted the air temp sensor to it too. It's best to get it as close to the ITBs as possible.
Looking real good man!
How the hell did you fit it without subframe spacers??!!'
Did you bang the **** out of your firewall? How does the pan sit compared to the crossmember?
Looking real good man!
How the hell did you fit it without subframe spacers??!!'
Did you bang the **** out of your firewall? How does the pan sit compared to the crossmember?
Re: Red Death Revival: Beams
Very cool build
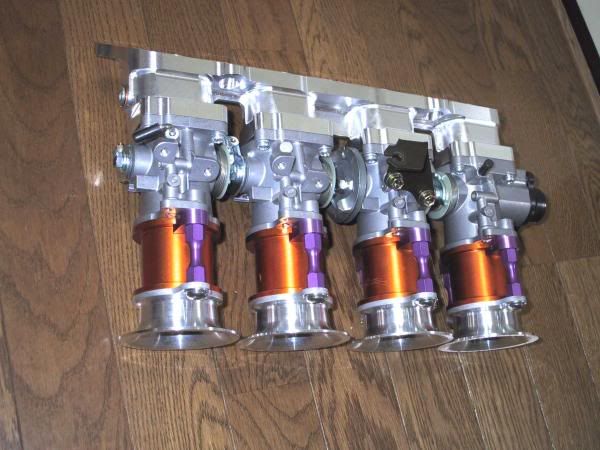
So the Beams 3sg has a front sump oil pan? (I am asking for my Opel GT)
Also you don't see to many ITB manifolds for a 3SG
I saved this pic off yahoo japan
So the Beams 3sg has a front sump oil pan? (I am asking for my Opel GT)
Also you don't see to many ITB manifolds for a 3SG
I saved this pic off yahoo japan

Davegt27 Code One Racing
Re: Red Death Revival: Beams
Davegt27 wrote:Very cool build
So the Beams 3sg has a front sump oil pan? (I am asking for my Opel GT)
Also you don't see to many ITB manifolds for a 3SG
I saved this pic off yahoo japan
What kind of ITBs are those?
Do you have the link to yahoo Japan auctions?
Re: Red Death Revival: Beams
firewall is not modified, subrame is not spaced. stock altezza mounts are used.
and for the ITB thing, I'm using AE111 blacktop 20v itb's
and for the ITB thing, I'm using AE111 blacktop 20v itb's
Re: Red Death Revival: Beams
JOshua a wrote:Davegt27 wrote:Very cool build
So the Beams 3sg has a front sump oil pan? (I am asking for my Opel GT)
Also you don't see to many ITB manifolds for a 3SG
I saved this pic off yahoo japan
What kind of ITBs are those?
Do you have the link to yahoo Japan auctions?
they are just black top ITB's
Davegt27 Code One Racing
-
onelungderryl

- Club4AG Regular
- Posts: 35
- Joined: Mon Jan 14, 2013 9:20 pm
Re: Red Death Revival: Beams
Re: Red Death Revival: Beams
Thanks D
-
dominicanedwin
- Club4AG Regular
- Posts: 24
- Joined: Sun Dec 29, 2013 2:25 pm
- Location: Danbury CT 06810
- Contact:
Re: Red Death Revival: Beams
LongGrain PM replied please PM best way to conact you as I cannot PM unforunetly
Thank you
Thank you
Re: Red Death Revival: Beams
i'm sure most of you dudes are friends with me on fb so you saw the vid I posted there. However, yesterday my bro and I went down to the shop to see if we couldn't get the car to actually start up and run/idle on its own. We only had about 3 hours to work with before vinny had to close up shop, so we had to rush.
stopped off at a napa and bought some random rad hoses hoping we could get them to work, and picked up 2 gallons of ZEREX coolant for asian vehicles for no other reason really other than it is hot pink.
rad hoses actually turned out really nice. Blind luck.
the previous times I would try to start it, it would just kind of burble and pop and maybe fire for just a second or two. it would start up if you sprayed starting fluid in, so we figured something had to be up with the injectors.
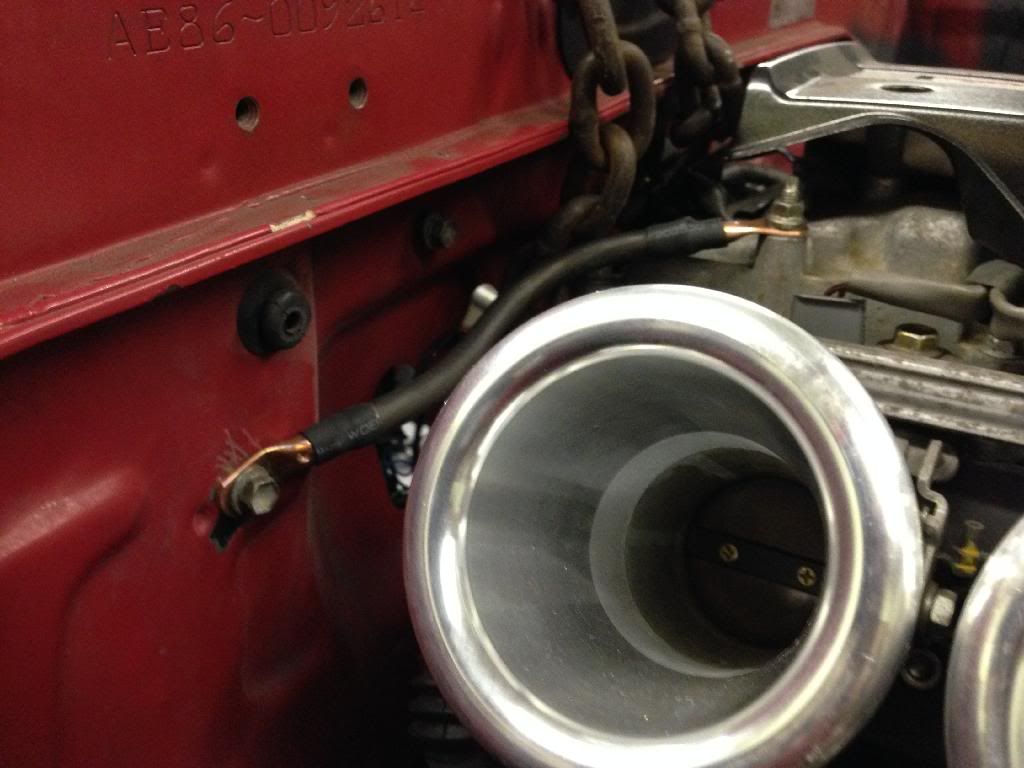
ITB's happen to be extremely convenient for seeing if injectors are spraying. So we just opened the throttles wide open and cranked the motor while looking inside. Saw that only injector 1 was spraying gas.
Checked the easy stuff first, like making sure they were turned on in the tune, they were. Then checked voltage, all 4 were getting a solid 11.5-12 volts, which was a relief, it wasn't a wiring/grounding issue. So the injectors must either be bad or just stuck from sitting, pulled the rail out and made a make shift jumper for the injectors using some wire, alligator clips and the constant power to the starter. Started tapping each one with a screw driver until we started hearing the solenoids click. Eventually got all 4 spraying, and then like magic. car started up and idled on its own pretty much the first try.
Tracked down a couple vacuum leaks from the throttles and the vacuum nipples not being tightened down, but overall its running well. Let it idle until it got up to temp. I don't have any exhaust on it so it's mega loud right now, and shoots fire when you rev it. But who cares, **** starts up like a regular ass car now and I'm psyched about it.
https://www.youtube.com/watch?v=0sd6TEM ... r_embedded
stopped off at a napa and bought some random rad hoses hoping we could get them to work, and picked up 2 gallons of ZEREX coolant for asian vehicles for no other reason really other than it is hot pink.
rad hoses actually turned out really nice. Blind luck.


the previous times I would try to start it, it would just kind of burble and pop and maybe fire for just a second or two. it would start up if you sprayed starting fluid in, so we figured something had to be up with the injectors.
ITB's happen to be extremely convenient for seeing if injectors are spraying. So we just opened the throttles wide open and cranked the motor while looking inside. Saw that only injector 1 was spraying gas.
Checked the easy stuff first, like making sure they were turned on in the tune, they were. Then checked voltage, all 4 were getting a solid 11.5-12 volts, which was a relief, it wasn't a wiring/grounding issue. So the injectors must either be bad or just stuck from sitting, pulled the rail out and made a make shift jumper for the injectors using some wire, alligator clips and the constant power to the starter. Started tapping each one with a screw driver until we started hearing the solenoids click. Eventually got all 4 spraying, and then like magic. car started up and idled on its own pretty much the first try.
Tracked down a couple vacuum leaks from the throttles and the vacuum nipples not being tightened down, but overall its running well. Let it idle until it got up to temp. I don't have any exhaust on it so it's mega loud right now, and shoots fire when you rev it. But who cares, **** starts up like a regular ass car now and I'm psyched about it.
https://www.youtube.com/watch?v=0sd6TEM ... r_embedded
Re: Red Death Revival: Beams
I love where this is going. Beams motors are awesome. Never driven a dual vvti one but the Red/Grey top ones I've driven in MR2s are a riot!

Re: Red Death Revival: Beams
NICE man i'm psyched. Whats left to do as of now?

ANYONE CAN BUY A NEW CAR. IT TAKES A TRUE ENTHUSIAST
TO BREATHE LIFE INTO AN OLDER ONE.
Re: Red Death Revival: Beams
redrill pinion flange, fit driveshaft, fill trans.
fit brake master/booster/lines/calipers. fill and bleed.
Mount hydro, run lines
fit clutch master cylinder/line/slave. Fill and bleed.
make front bash bar.
make an aluminum dash and wire in the STACK (basically just plug it all in, it already has its own harness)
Bodywork and paint (I need to buy new doors)
Get it on a dyno and make sure the tune is all solid.
at least thats all i can think of right now.