
My Trueno GT-Apex 20v swap and resto.
-
idreamofdrifting

- Club4AG MASTER
- Posts: 1122
- Joined: Fri Jan 11, 2013 2:35 pm
Re: My Trueno GT-Apex 20v swap and resto.
IndiaDorifto7 wrote:I wouldn't lower it, keep it looking like it is. AE86's can still look good while not being excessively lowered. BTW love the build and the car
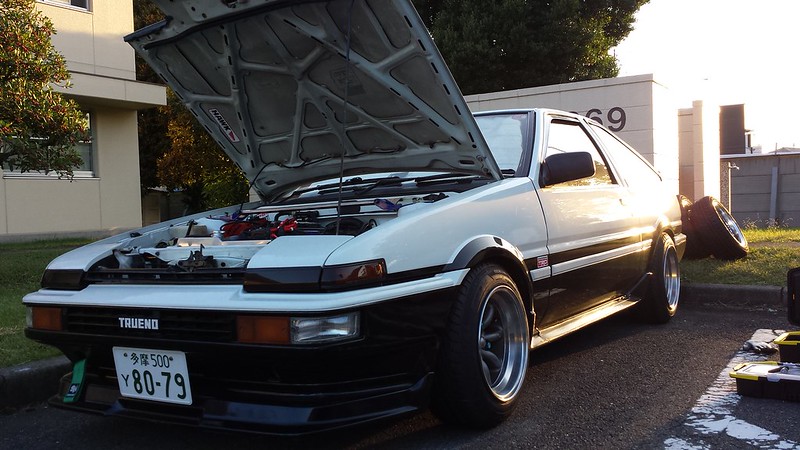
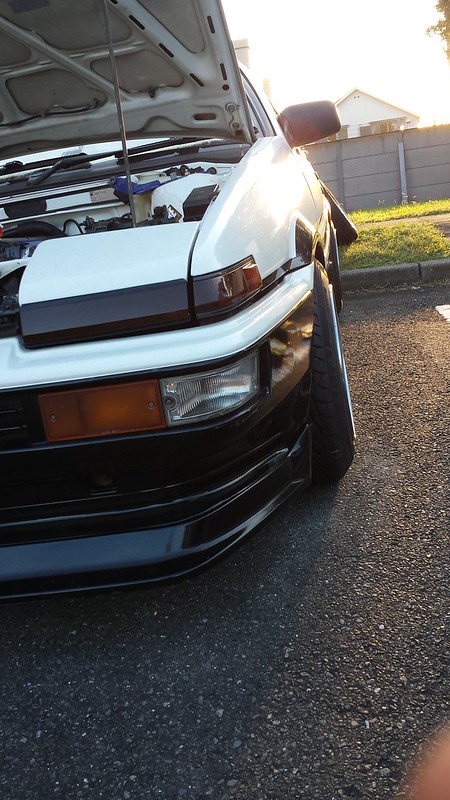
I lowered it in the last set of photos on the previous page. Thats how it sits now.
my diary/build: http://club4ag.com/forums/viewtopic.php?f=7&t=10479
-
idreamofdrifting
- Club4AG MASTER
- Posts: 1122
- Joined: Fri Jan 11, 2013 2:35 pm
Re: My Trueno GT-Apex 20v swap and resto.
JyuRoku wrote:IndiaDorifto7 wrote:I wouldn't lower it, keep it looking like it is. AE86's can still look good while not being excessively lowered. BTW love the build and the car
I lowered it in the last set of photos on the previous page. Thats how it sits now.
IMO It's Perfect!

-
ronny
- Club4AG Expert
- Posts: 316
- Joined: Thu Jan 10, 2013 11:05 am
- Location: orange county - irvine
- Contact:
Re: My Trueno GT-Apex 20v swap and resto.
finally something thats not done ghetto club4ag style...
bump! nice setup!
bump! nice setup!
Rays - Project Mu - TE37 club
BLUE MOON / CUSCO
AE86fightclub.com
PM me for Contact
BLUE MOON / CUSCO
AE86fightclub.com
PM me for Contact
Re: My Trueno GT-Apex 20v swap and resto.
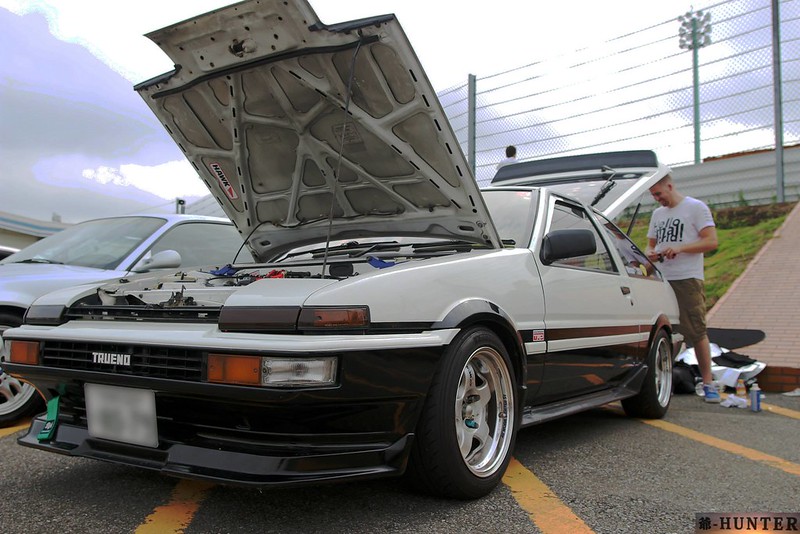
So I really want to update this thread but I have little to no pictures...I have scavenged my facebook and heres what I've got.
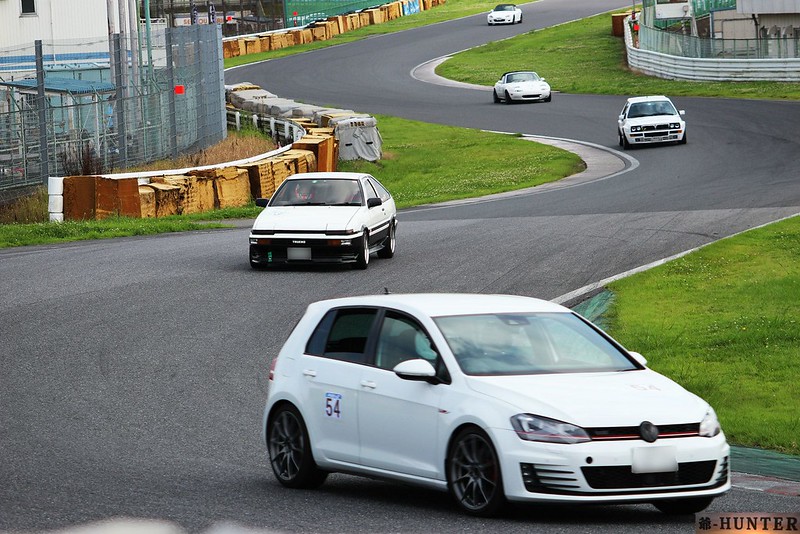
I went to Sports Land Yamanashi first after everything was finished. Found out my brake pads(Hawk HPS) were good, but after my first track day there and i really started pushing, they werent enough. Stepped up to HAWK HP+ all around and never had fade again. I also felt the rear shocks were just not right...soft settings still felt too hard so I removed them and put in some TRD 8-way blues before Tsukuba...felt leaps and bounds better!
Best Lap at Yamanashi
https://www.youtube.com/watch?v=wyaOkWc93_M
I managed to knock off 2 seconds from that after my 3rd day, unfortunately I never edited the video so its sitting somewhere on my other PC.
After that I finally got an open slot at a Tsukuba Circuit trackday, and it went AWESOME. The car felt super tight, my only complaint was it was a little oversteery on the final high speed corner.
https://www.youtube.com/watch?v=VfFsEmQUpms
and my best lap:
https://www.youtube.com/watch?v=ivv-B3mJcKA


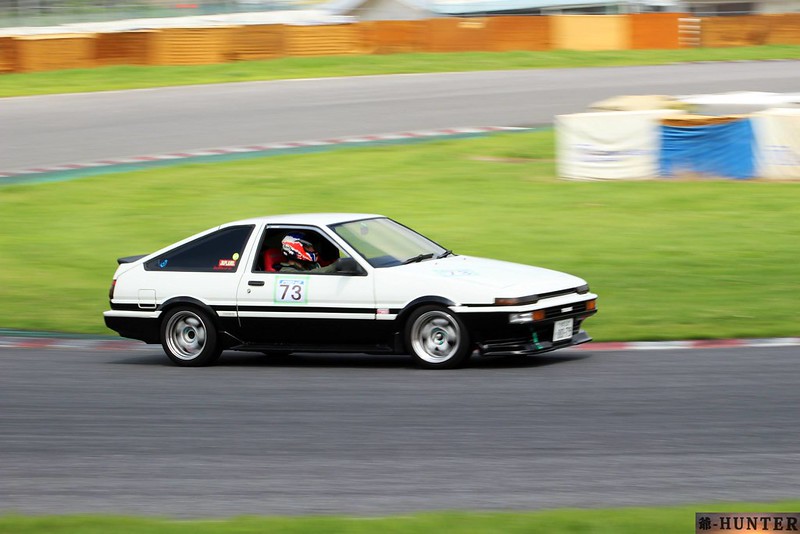
And a few more Located here: https://www.flickr.com/photos/48054840@N03/sets/72157647636421987/
Other than that I have installed a AC condensor fan for colder AC while sitting in traffic, and built the harness for the simple 3-wire COP conversion...though im unsure if I will actually do it or not.
I went to Sports Land Yamanashi first after everything was finished. Found out my brake pads(Hawk HPS) were good, but after my first track day there and i really started pushing, they werent enough. Stepped up to HAWK HP+ all around and never had fade again. I also felt the rear shocks were just not right...soft settings still felt too hard so I removed them and put in some TRD 8-way blues before Tsukuba...felt leaps and bounds better!
Best Lap at Yamanashi
https://www.youtube.com/watch?v=wyaOkWc93_M
I managed to knock off 2 seconds from that after my 3rd day, unfortunately I never edited the video so its sitting somewhere on my other PC.
After that I finally got an open slot at a Tsukuba Circuit trackday, and it went AWESOME. The car felt super tight, my only complaint was it was a little oversteery on the final high speed corner.
https://www.youtube.com/watch?v=VfFsEmQUpms
and my best lap:
https://www.youtube.com/watch?v=ivv-B3mJcKA
And a few more Located here: https://www.flickr.com/photos/48054840@N03/sets/72157647636421987/
Other than that I have installed a AC condensor fan for colder AC while sitting in traffic, and built the harness for the simple 3-wire COP conversion...though im unsure if I will actually do it or not.
my diary/build: http://club4ag.com/forums/viewtopic.php?f=7&t=10479
-
The Robot Cow
- Club4AG Enthusiast
- Posts: 77
- Joined: Wed Jan 09, 2013 3:28 pm
- Location: Cen-Cal
Re: My Trueno GT-Apex 20v swap and resto.
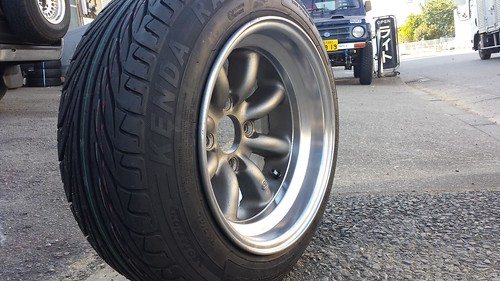
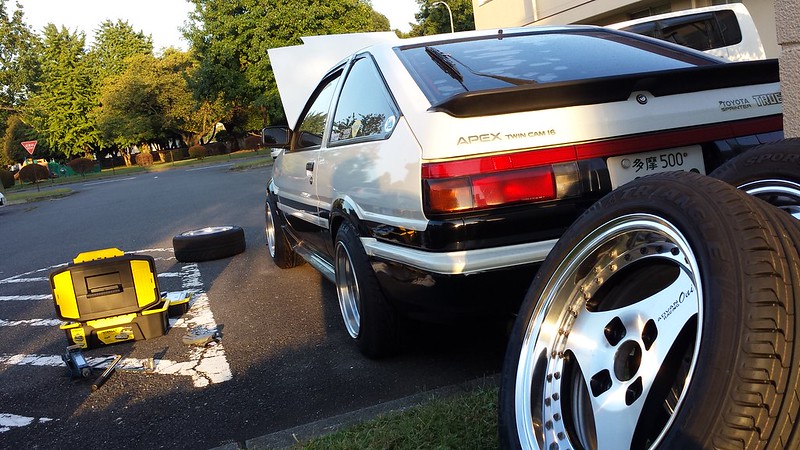
Just ordered some 14x8.5 -13 Watanabe's. Going old school!

my diary/build: http://club4ag.com/forums/viewtopic.php?f=7&t=10479
Re: My Trueno GT-Apex 20v swap and resto.
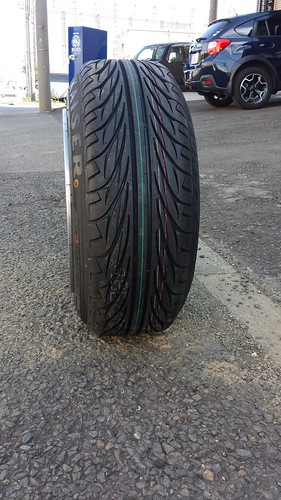
The wheels came the day after they were ordered. Japans shipping is lightning fast...at least the domestic type. Ordered some cheap Kenda Kaisers in 185/60-14 for roughly $30(a little less since the Yen is weak right now) per tire including shipping. Sizes are 14x8.5 -13
my diary/build: http://club4ag.com/forums/viewtopic.php?f=7&t=10479
-
grappletech

- Club4AG Expert
- Posts: 344
- Joined: Sat Jan 12, 2013 12:13 pm
Re: My Trueno GT-Apex 20v swap and resto.
I'd slap my mother for a set of those advans... Great build!
87 GTS Coupe stock and Super Duper Clean
87 GTS Coupe Beams 3sge (under construction cuz I'm slow and lazy and broke-FML)
87 SR5 Coupe Shell. (Sold)
86 SR5 Hatch Shell
86 GT-SR5 Coupe 20v Swap
87 GTS Coupe Beams 3sge (under construction cuz I'm slow and lazy and broke-FML)
87 SR5 Coupe Shell. (Sold)
86 SR5 Hatch Shell
86 GT-SR5 Coupe 20v Swap
Re: My Trueno GT-Apex 20v swap and resto.
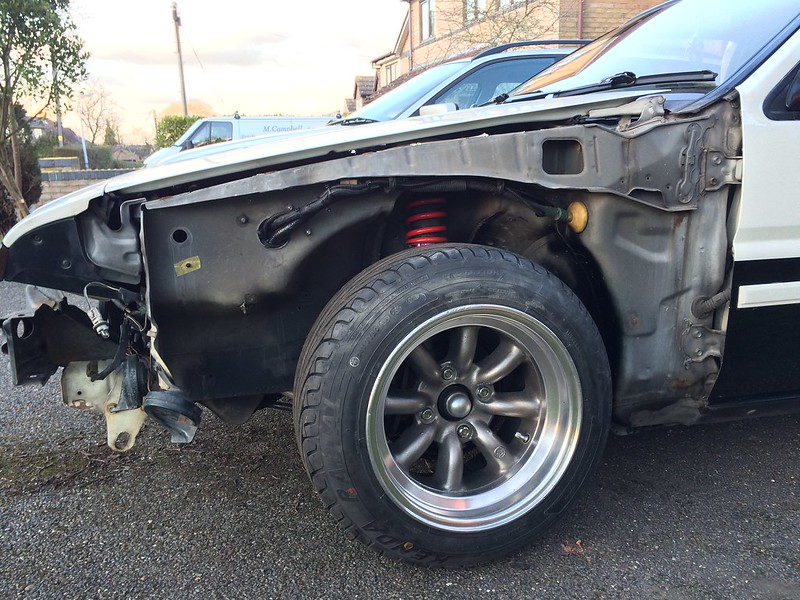
I forgot to add that my fenders still need to be rolled and slightly flared to fit this wheels properly. I just did a quick install to estimate what needed to be done. It will get lowered about an inch with a little more negative camber.
None of this will probably happen untill it gets shipped to England, my future home for the next 4 years.
None of this will probably happen untill it gets shipped to England, my future home for the next 4 years.
my diary/build: http://club4ag.com/forums/viewtopic.php?f=7&t=10479
-
RuizXIII

- Club4AG Enthusiast
- Posts: 165
- Joined: Wed Jan 16, 2013 7:33 pm
- Location: Smell Ya Later, NJ
Re: My Trueno GT-Apex 20v swap and resto.
Love the car, sir. It looks so perfect. Keep up the good work
Sports Land Yamanashi looks like so much fun!
Sports Land Yamanashi looks like so much fun!
irony.cc
Re: My Trueno GT-Apex 20v swap and resto.
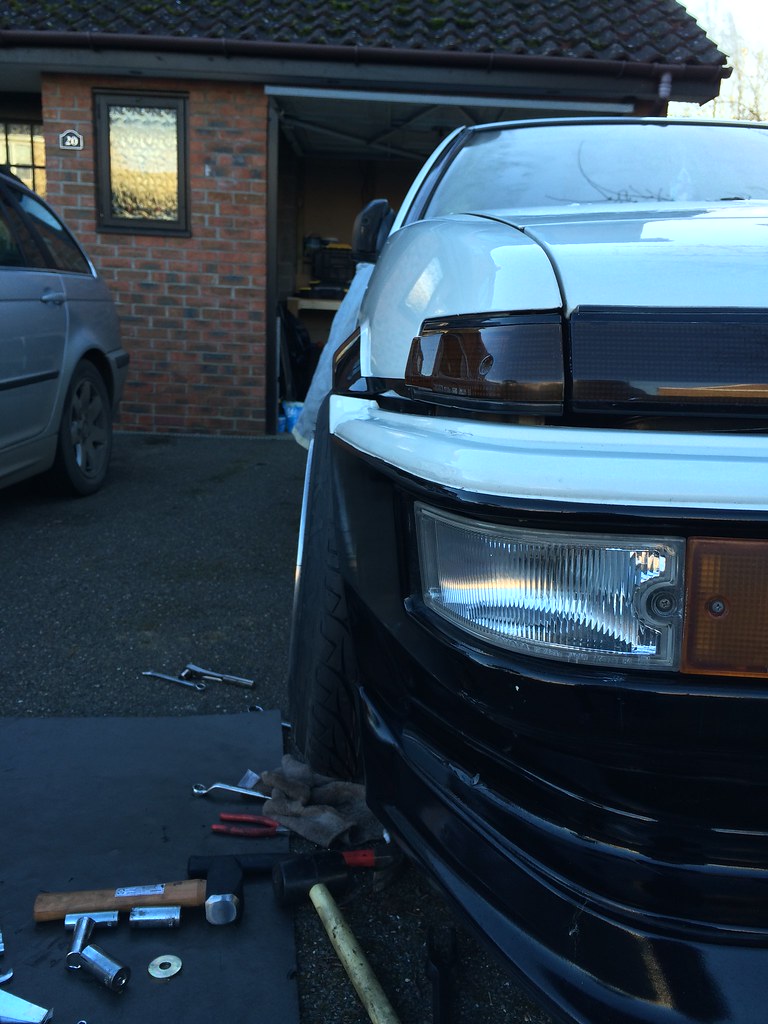
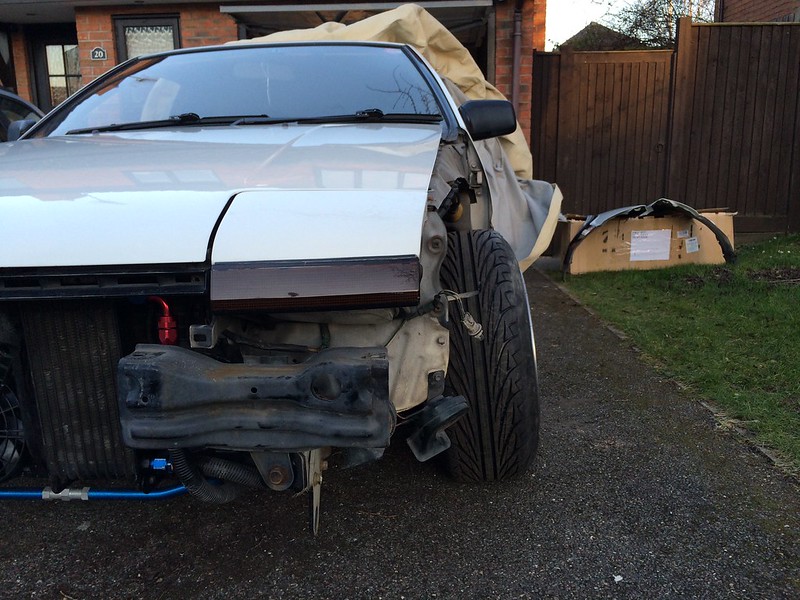
Progress was halted for quite a while due to moving. I am now living in the UK and the car has finally arrived. Lots of projects on the to-do list:
20mm extended LCA's(In work right now, photos soon)
Fender rolling and paint to fit Watanabe's
100mm T3 velocity Stacks(tricky to fit with RHD)
Goodline Bumper
TRD spoiler (needs heavy repairs first)
5pt Safety 21 cage
20mm extended LCA's(In work right now, photos soon)
Fender rolling and paint to fit Watanabe's
100mm T3 velocity Stacks(tricky to fit with RHD)
Goodline Bumper
TRD spoiler (needs heavy repairs first)
5pt Safety 21 cage
my diary/build: http://club4ag.com/forums/viewtopic.php?f=7&t=10479
Re: My Trueno GT-Apex 20v swap and resto.
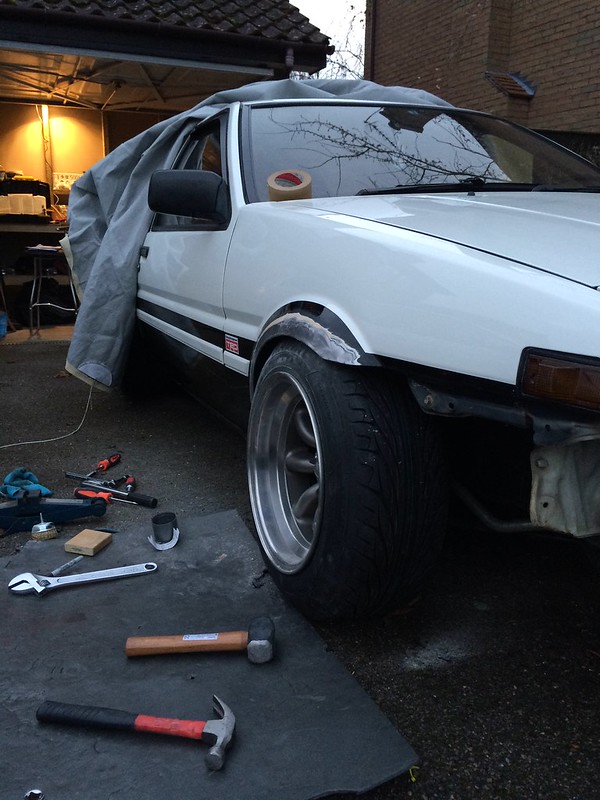
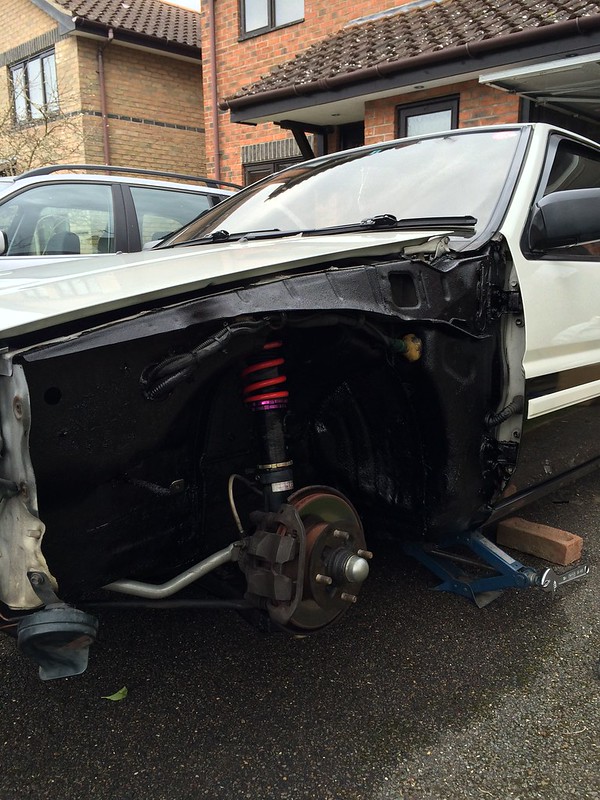
So I finally got some work done on the car. Only one side as it was freezing cold but enough to get a test fit done.

my diary/build: http://club4ag.com/forums/viewtopic.php?f=7&t=10479
Re: My Trueno GT-Apex 20v swap and resto.
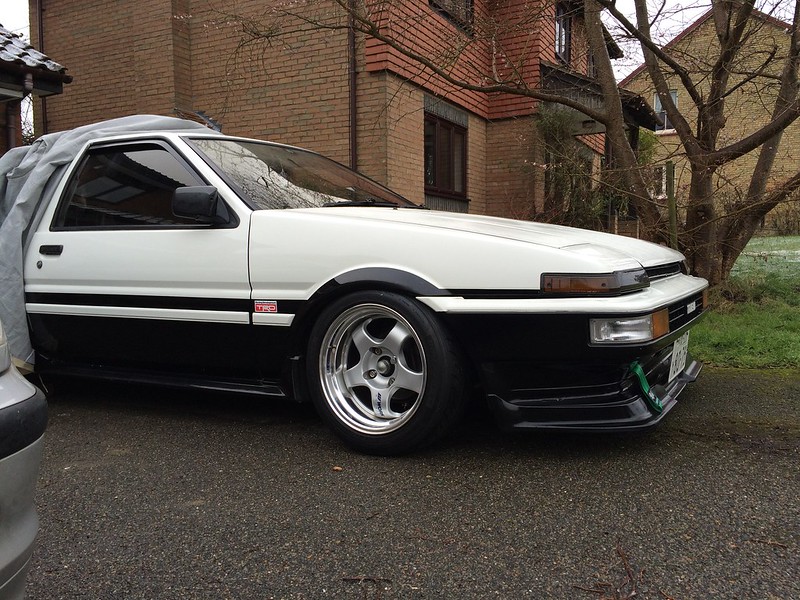
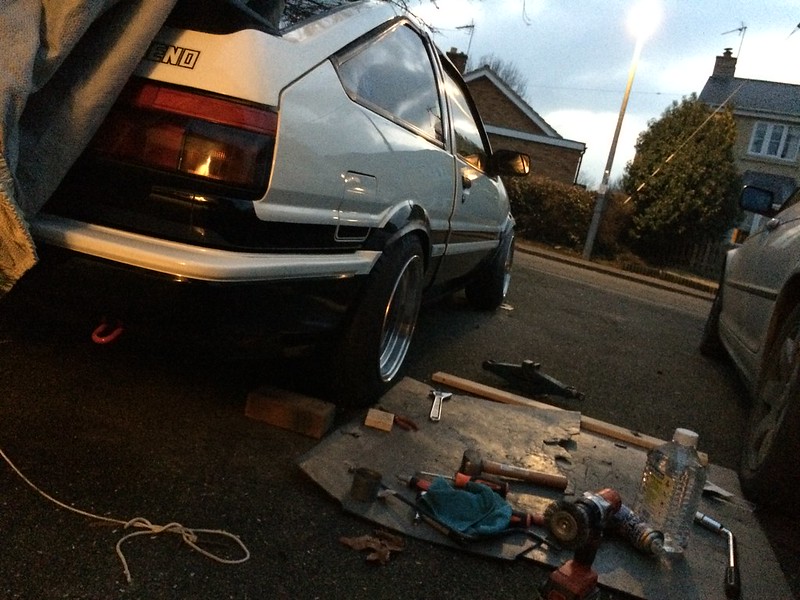
Got both the arms on and lowered the car a bit more. Its a little too low for my tastes and with the current height the Watanabe's wouldnt fit at all so the Meisters have to stay on for now.


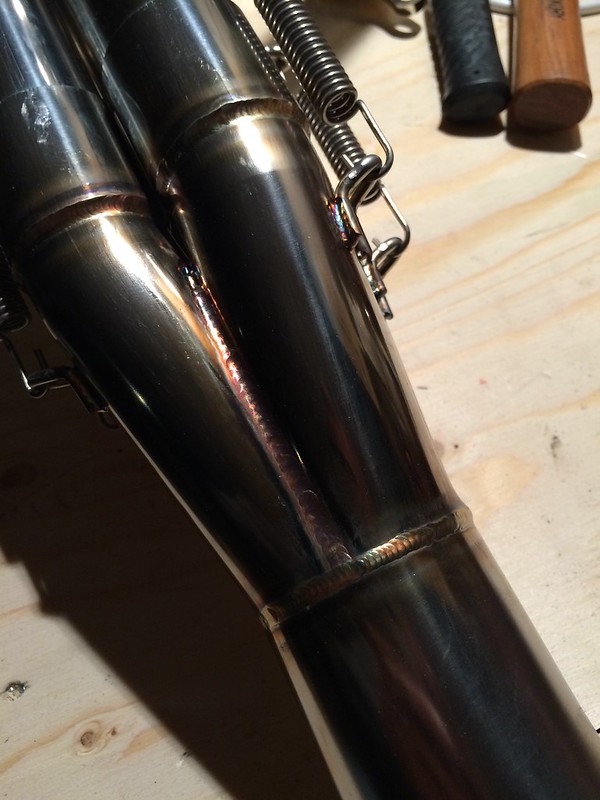
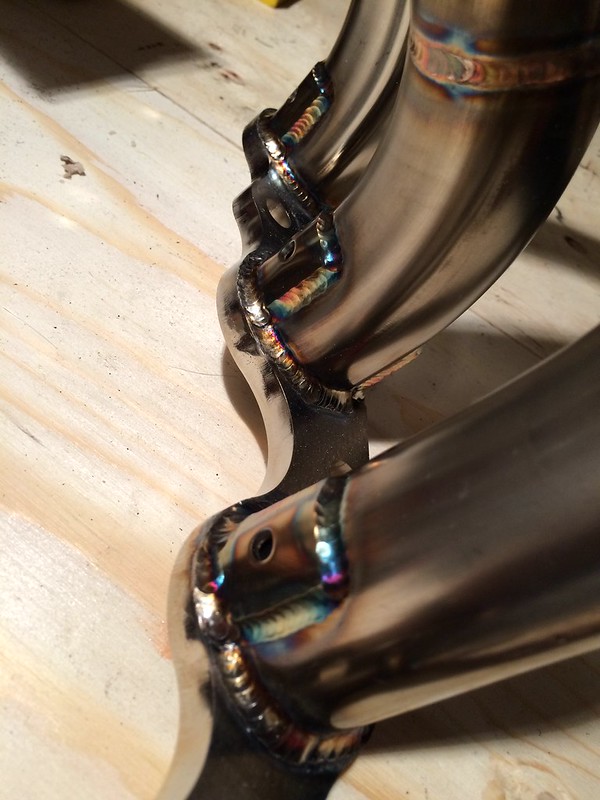
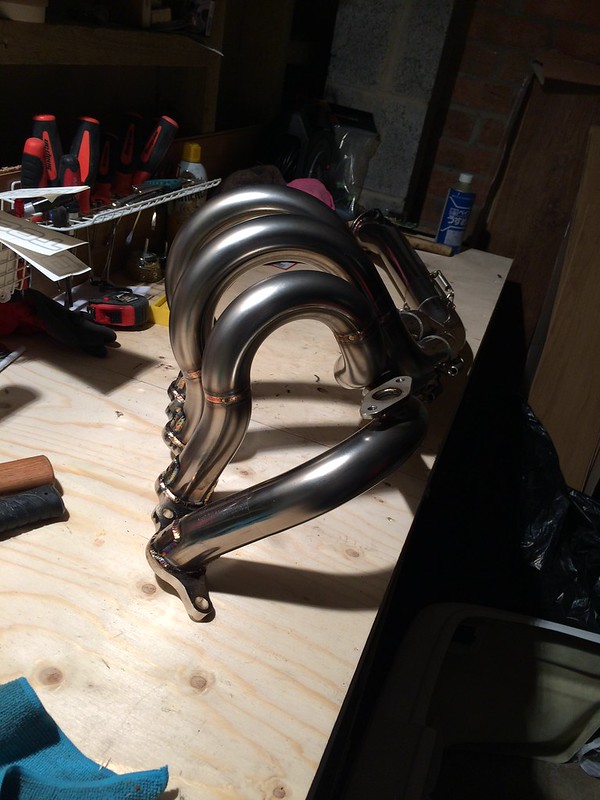
The new Powercraft 4-1 N2 has just been finished as well. Its currently being shipped over from Japan. Cant wait to put this in...its seriously a work of art!


The new Powercraft 4-1 N2 has just been finished as well. Its currently being shipped over from Japan. Cant wait to put this in...its seriously a work of art!
my diary/build: http://club4ag.com/forums/viewtopic.php?f=7&t=10479
Re: My Trueno GT-Apex 20v swap and resto.
That header is amazing! How much did it cost you if you don't mind me asking?
Re: My Trueno GT-Apex 20v swap and resto.
shagymc wrote:That header is amazing! How much did it cost you if you don't mind me asking?
+1
There shouldn't be a day that goes by where you don't learn something new.
Re: My Trueno GT-Apex 20v swap and resto.
I paid $750 for mine. I know a guy can get them direct from Powercraft. If your in the UK I can get you one for a similar price.
my diary/build: http://club4ag.com/forums/viewtopic.php?f=7&t=10479

Re: My Trueno GT-Apex 20v swap and resto.
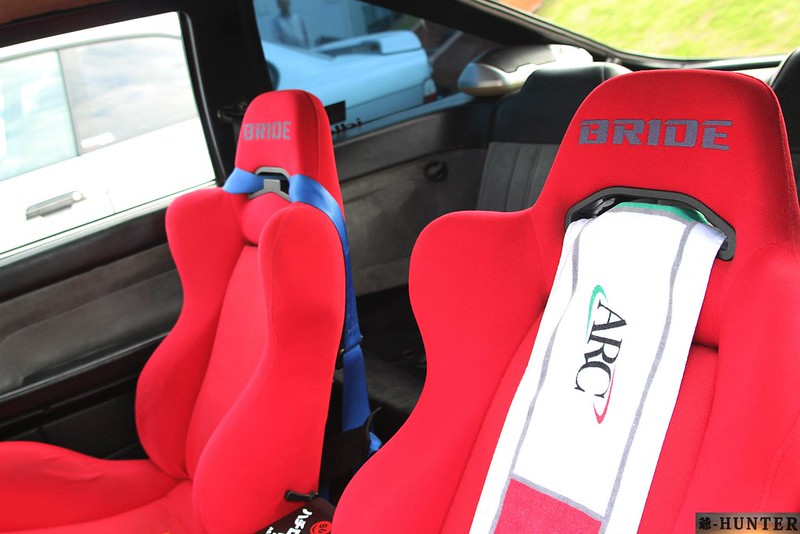
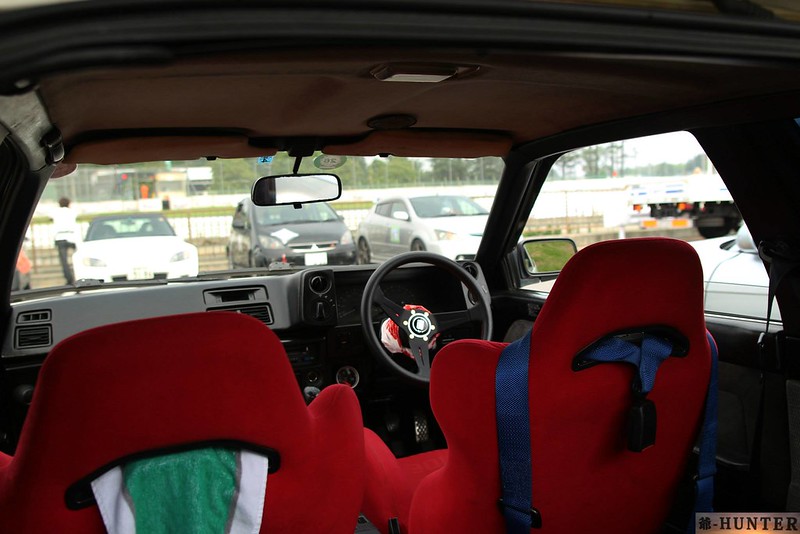
Love this build man. We are PCSing back to the states soon from Okinawa, and as much as I need to save my tax money for the move, your pictures of those Wats is starting to make me feel like having $1500 less won't hurt us haha
Re: My Trueno GT-Apex 20v swap and resto.
Do it while you in Japan brother. A nice fitting set of wats in the US is mega expensive. Even **** fitments cost $1000+.
my diary/build: http://club4ag.com/forums/viewtopic.php?f=7&t=10479
Re: My Trueno GT-Apex 20v swap and resto.
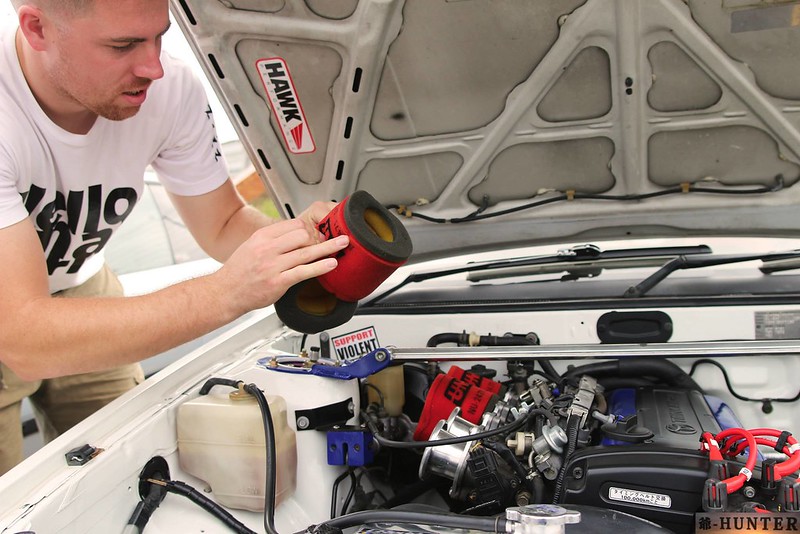
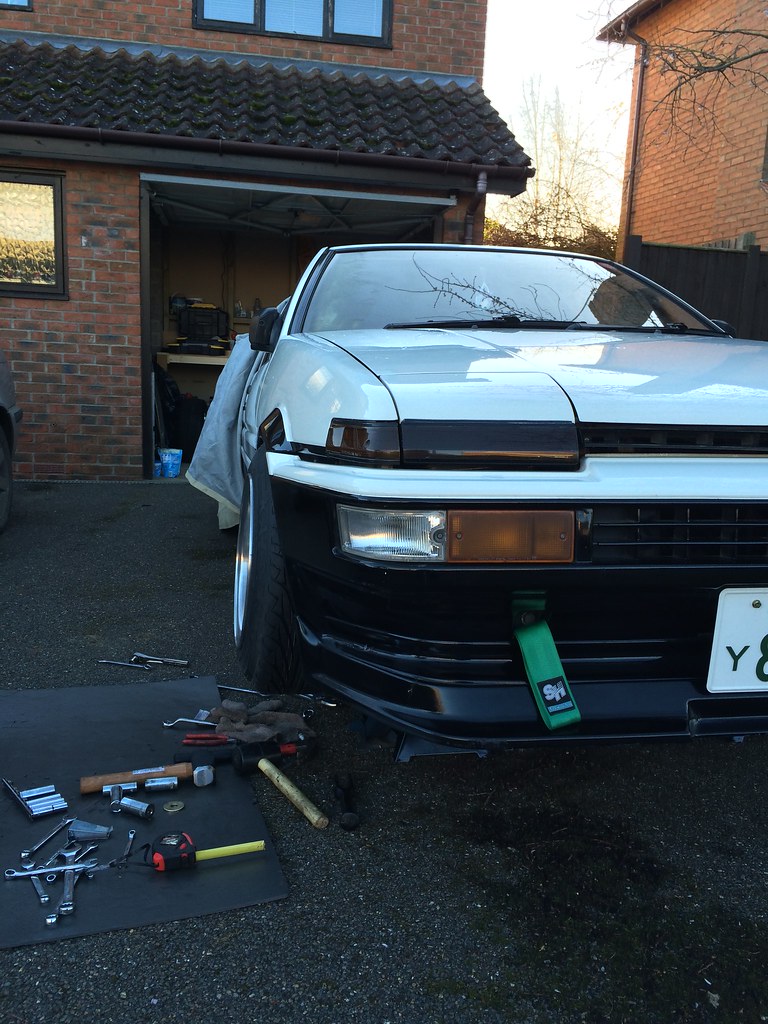
This just came in today. They were used and for a great price so I couldn't say no. Not 100% sure if ill be using them or not though...as I keep reading how effective the factory clutch fan is once it gets hot and the revs get going. It sure would clean up the engine bay a lot so I'm not totally throwing out the idea.

my diary/build: http://club4ag.com/forums/viewtopic.php?f=7&t=10479
Re: My Trueno GT-Apex 20v swap and resto.
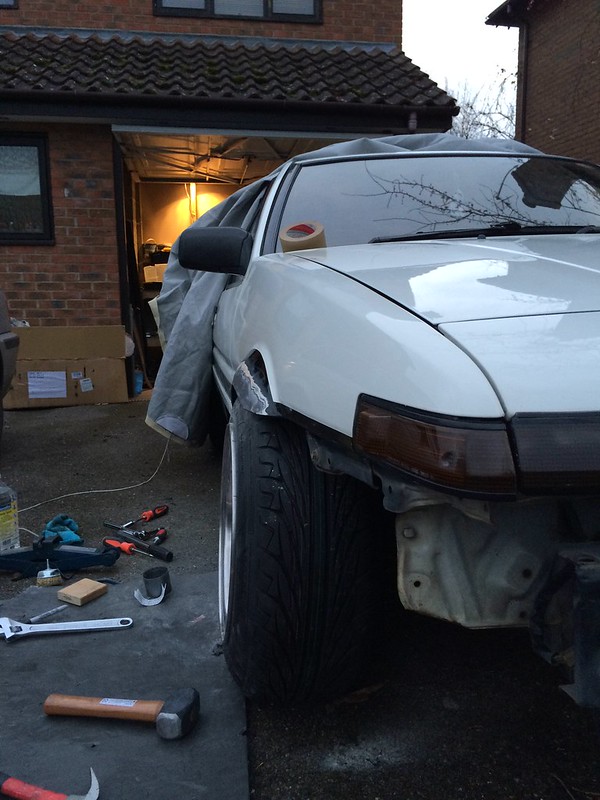
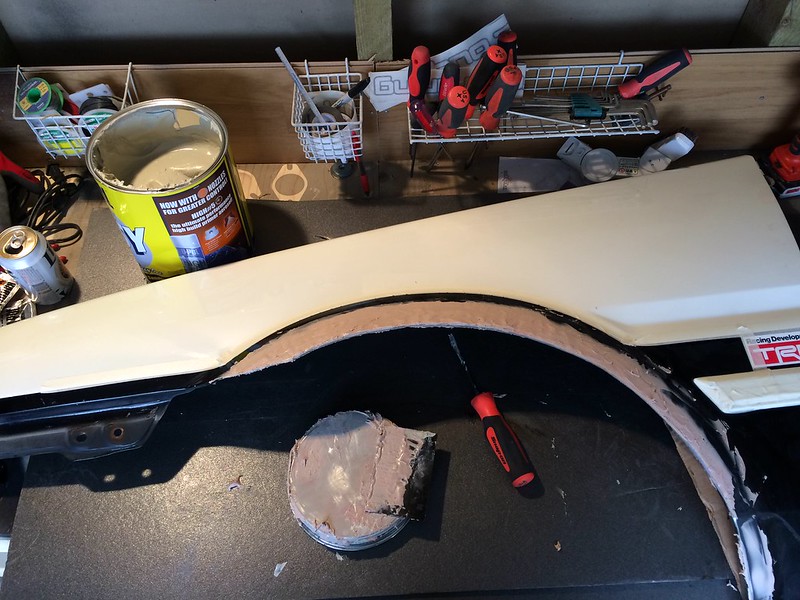
So i started hammer and dolly flaring the fenders the other day, turned out the right-front and left-rear arches are loaded with body filler.


I pressed on with the hammering and got to a decent stopping point. I want to do them all and then go for a few test drives to make sure its not rubbing. Then press on for filler and paint.


Remember this is only progress...in no way am I finished. This is a long process!
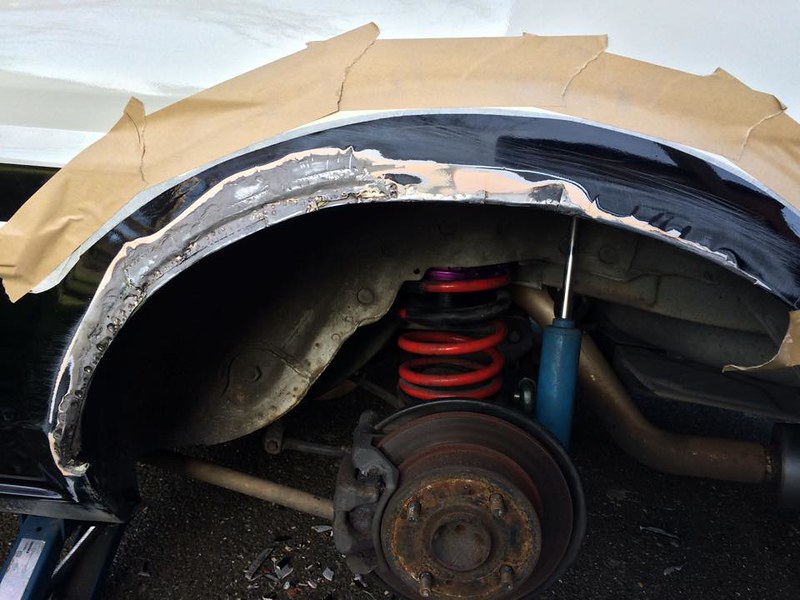
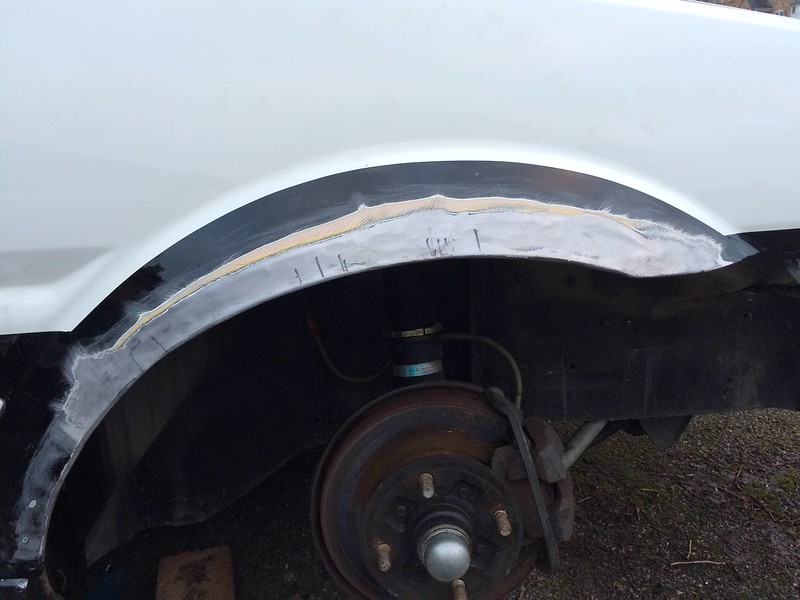
The Left-rear was horrible. Rust, crash damage...and loads of filler. Im already planning to have it all cut out next winter with a fresh arch welded in.
Its crazy to think that under that beautiful paint was such horrible sheet metal. Japanese are truly masters with bondo!

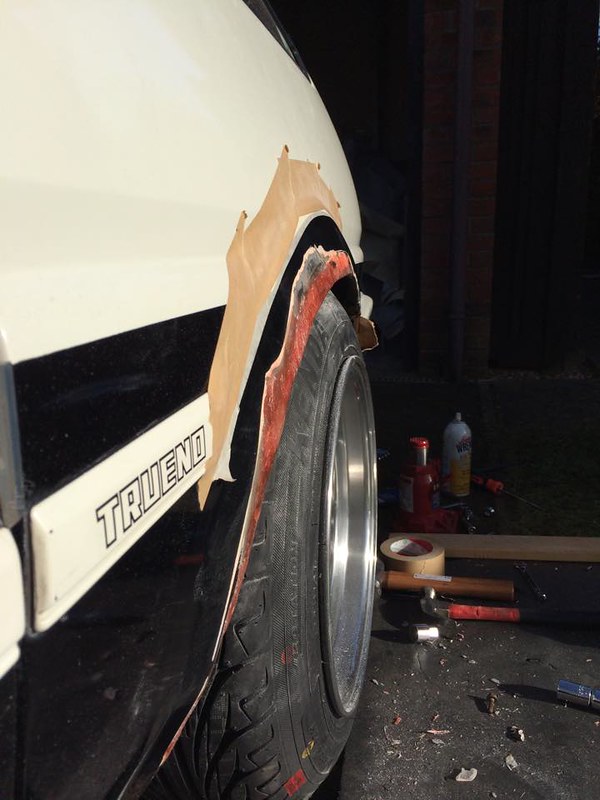
My first thought was to get something to renforce the weak edge of the arch so i smothered it in fiberglass. Ill be smoothing that and adding more filler to get it looking good until i can get it properly fixed next winter.
I pressed on with the hammering and got to a decent stopping point. I want to do them all and then go for a few test drives to make sure its not rubbing. Then press on for filler and paint.
Remember this is only progress...in no way am I finished. This is a long process!
The Left-rear was horrible. Rust, crash damage...and loads of filler. Im already planning to have it all cut out next winter with a fresh arch welded in.
Its crazy to think that under that beautiful paint was such horrible sheet metal. Japanese are truly masters with bondo!
My first thought was to get something to renforce the weak edge of the arch so i smothered it in fiberglass. Ill be smoothing that and adding more filler to get it looking good until i can get it properly fixed next winter.
my diary/build: http://club4ag.com/forums/viewtopic.php?f=7&t=10479
-
RuizXIII
- Club4AG Enthusiast
- Posts: 165
- Joined: Wed Jan 16, 2013 7:33 pm
- Location: Smell Ya Later, NJ
Re: My Trueno GT-Apex 20v swap and resto.
Those Power Craft extractors are a work of art.
They would be fit to hang on display and just stare at, haha.
Amazing!
They would be fit to hang on display and just stare at, haha.
Amazing!
irony.cc
Re: My Trueno GT-Apex 20v swap and resto.
RuizXIII wrote:Those Power Craft extractors are a work of art.
They would be fit to hang on display and just stare at, haha.
Amazing!
tell me about it! I am tempted to just display it but its almost a waste of money lol. maybe ill paint my old one white and display it instead.
my diary/build: http://club4ag.com/forums/viewtopic.php?f=7&t=10479
Re: My Trueno GT-Apex 20v swap and resto.
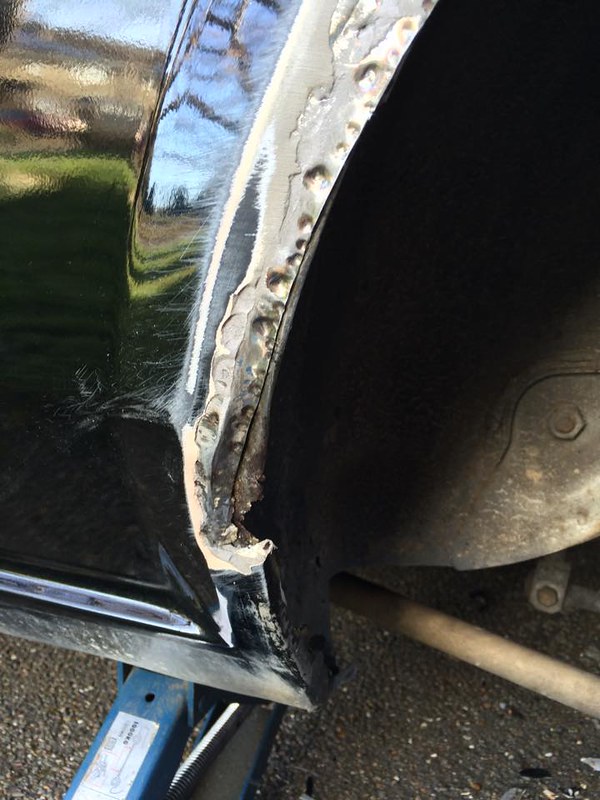
Finally got some work done on the fenders. Right side complete(minus paintwork)!
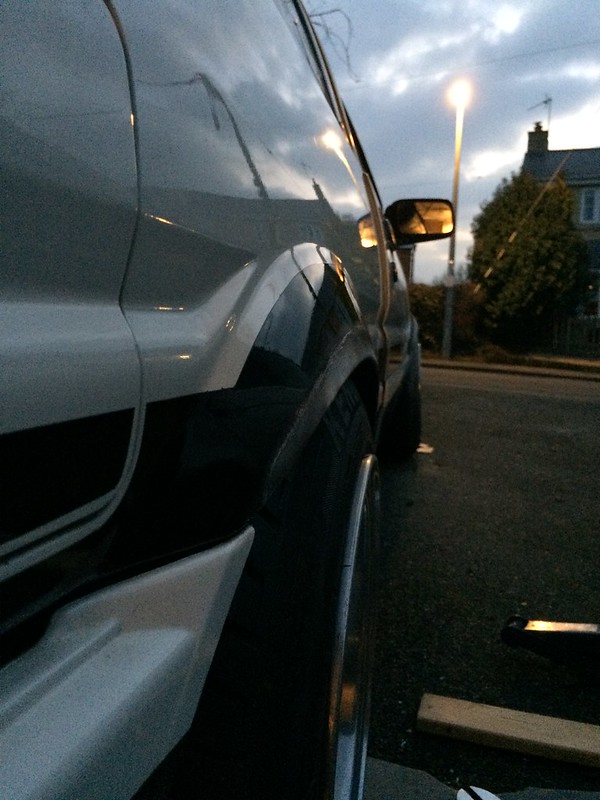
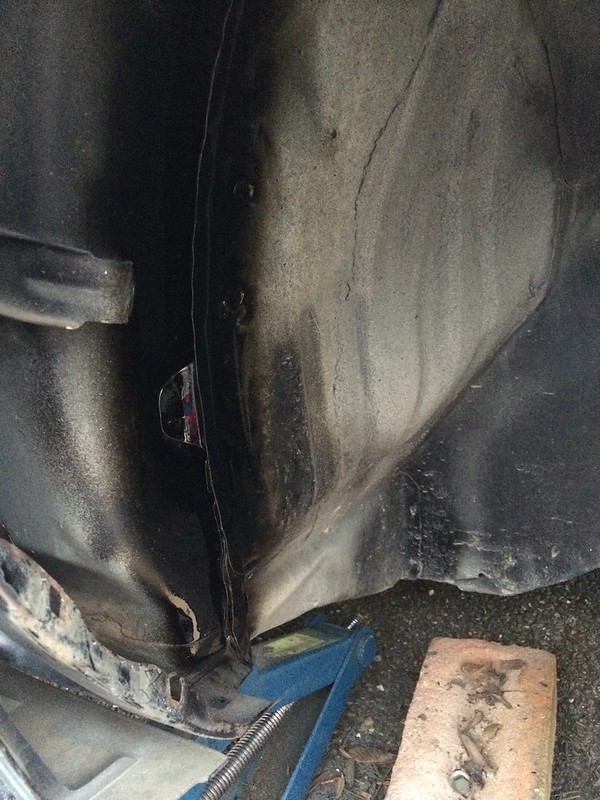
Also hammered this seam flat and coated it in some paint. Cant clear it without maxxing out the caster which makes drifting super difficult.
Finally unboxed the header and took a few detail pics.

Also hammered this seam flat and coated it in some paint. Cant clear it without maxxing out the caster which makes drifting super difficult.
Finally unboxed the header and took a few detail pics.
my diary/build: http://club4ag.com/forums/viewtopic.php?f=7&t=10479
-
hachi-6 D0ri

- Club4AG Enthusiast
- Posts: 116
- Joined: Fri Jan 11, 2013 10:06 pm
- Location: Huntington Beach
Re: My Trueno GT-Apex 20v swap and resto.
How did you go about hammering out the fenders. What tools and methods did you use. I'm having a hard time grasping the concept as I have never seen it done in real time. Did you do this with the fenders on the car?
If your not crashing .. Stop being a p**$y Go hard in the paint!
~Stig
~Stig
Re: My Trueno GT-Apex 20v swap and resto.
Whew....that's one hell of a question!
Here we go...
In the photos you can see the two hammers im using. For the front, I placed the large hammer on the outside edge, using it as a dolly, and used the small hammer to hit the inner lip and flatten it smooth(or roll it as you would with an Eastwood style roller). Be sure to clean behind the lip really good before hammering it smooth. Once that is smooth you can place the large hammer on the body line of the curve. Where it goes from a smooth curve to the flat face of the arch. Then strike the edge of the fender with the hammer. Its really hard to explain via typing....Ill make a picture.
Done!

I hold the dolly(big hammer) along the red line, I then hit the inside of the fender outward along the yellow line. The goal is to make the red line a smooth curve vs a sharp edge.
For the rear I basically cleaned the inner lip, hammered it up nice and smooth with the big hammer while holding my hand along the outside. Then once its smooth I hammered REALLY REALLY hard with the big hammer to flare that smooth edge out. It works really well and seems to only go to a certain point and then stop. Its not hard to do the rear at all. It literally took 20mins, whereas I spent 2+ hours on the front because the metal is thin and it takes a while it get the edge nice and straight from all angles.
Once you get it flared out, you'll need to apply body filler and all of that prep and paint work that there are endless youtube guides for. Youtube is your friend! There are Hammer and Dolly guides as well but not specifically for AE86.
This may also help. https://www.youtube.com/watch?v=Eo2m-ID6LMk
Here we go...
In the photos you can see the two hammers im using. For the front, I placed the large hammer on the outside edge, using it as a dolly, and used the small hammer to hit the inner lip and flatten it smooth(or roll it as you would with an Eastwood style roller). Be sure to clean behind the lip really good before hammering it smooth. Once that is smooth you can place the large hammer on the body line of the curve. Where it goes from a smooth curve to the flat face of the arch. Then strike the edge of the fender with the hammer. Its really hard to explain via typing....Ill make a picture.
Done!
I hold the dolly(big hammer) along the red line, I then hit the inside of the fender outward along the yellow line. The goal is to make the red line a smooth curve vs a sharp edge.
For the rear I basically cleaned the inner lip, hammered it up nice and smooth with the big hammer while holding my hand along the outside. Then once its smooth I hammered REALLY REALLY hard with the big hammer to flare that smooth edge out. It works really well and seems to only go to a certain point and then stop. Its not hard to do the rear at all. It literally took 20mins, whereas I spent 2+ hours on the front because the metal is thin and it takes a while it get the edge nice and straight from all angles.
Once you get it flared out, you'll need to apply body filler and all of that prep and paint work that there are endless youtube guides for. Youtube is your friend! There are Hammer and Dolly guides as well but not specifically for AE86.
This may also help. https://www.youtube.com/watch?v=Eo2m-ID6LMk
Last edited by JyuRoku on Mon Feb 16, 2015 5:19 pm, edited 1 time in total.
my diary/build: http://club4ag.com/forums/viewtopic.php?f=7&t=10479
-
hachi-6 D0ri
- Club4AG Enthusiast
- Posts: 116
- Joined: Fri Jan 11, 2013 10:06 pm
- Location: Huntington Beach
Re: My Trueno GT-Apex 20v swap and resto.
Dude Thanks! This was very helpful. I guess the best way is to just jump in. Nice build by the way. Pretty cherry
If your not crashing .. Stop being a p**$y Go hard in the paint!
~Stig
~Stig
Re: My Trueno GT-Apex 20v swap and resto.
hachi-6 D0ri wrote:Dude Thanks! This was very helpful. I guess the best way is to just jump in. Nice build by the way. Pretty cherry
So a trick I learned today doing my Left Front fender. Use a brick wrapped in a towel on the outter edge when hammering the inner lip flat. The large flat surface and weight of the brick helps that lip roll flat quickly and consistently.
my diary/build: http://club4ag.com/forums/viewtopic.php?f=7&t=10479
-
hachi-6 D0ri
- Club4AG Enthusiast
- Posts: 116
- Joined: Fri Jan 11, 2013 10:06 pm
- Location: Huntington Beach
Re: My Trueno GT-Apex 20v swap and resto.
JyuRoku wrote:hachi-6 D0ri wrote:Dude Thanks! This was very helpful. I guess the best way is to just jump in. Nice build by the way. Pretty cherry
So a trick I learned today doing my Left Front fender. Use a brick wrapped in a towel on the outter edge when hammering the inner lip flat. The large flat surface and weight of the brick helps that lip roll flat quickly and consistently.
O Nice! I will do that . Thank you
If your not crashing .. Stop being a p**$y Go hard in the paint!
~Stig
~Stig
Re: My Trueno GT-Apex 20v swap and resto.
UPDATES!
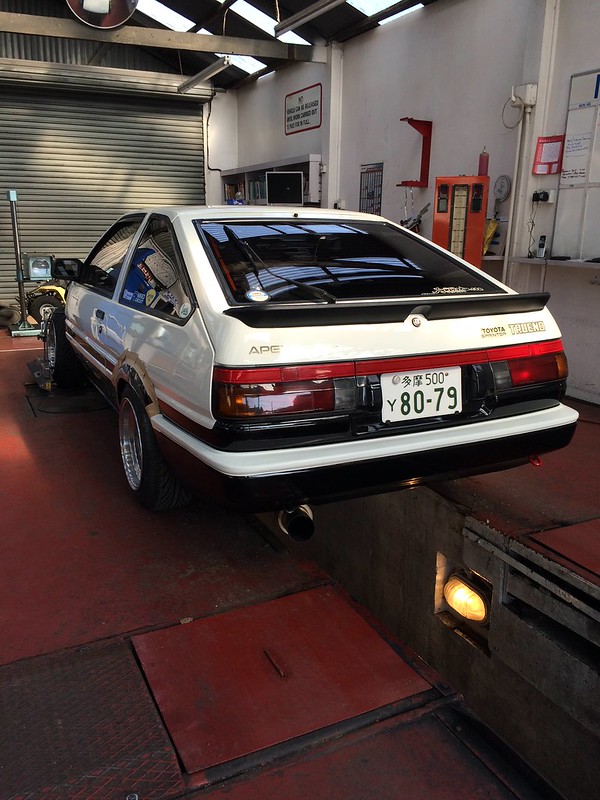
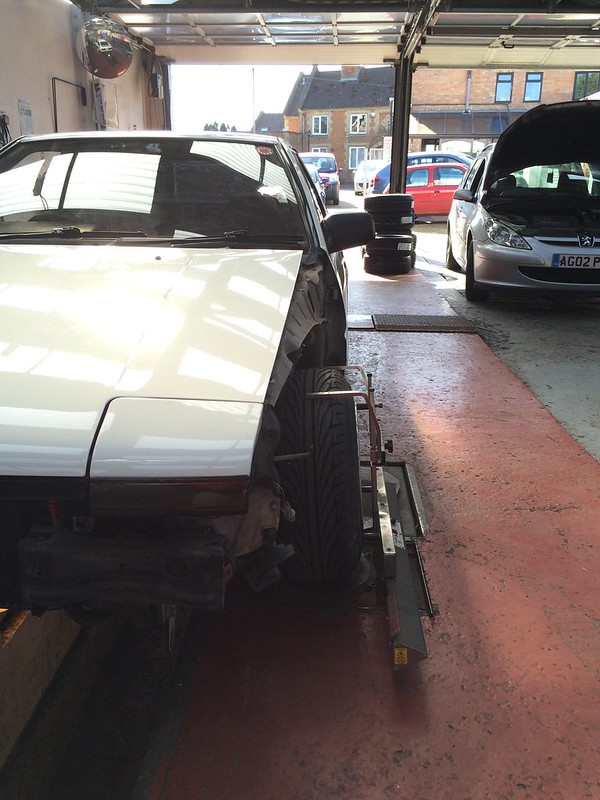
Pulled off the fenders to have an alignment done.
Went To get my alignment. They said they can only do toe. And they couldn't even do that right...steering wheel cocked to the left at 11 o'clock while driving straight on the way home...

Top half of bumper painted in Toyota 041 White.

Bottom half painted.

Started putting filler on the flared fenders. Actually got it pretty much done, just forgot to take photos.

Decided the front wheel wells were looking a little tatty..decided to coat them in a heavy layer of underbody seal. I'm sure i'll regret it one day, but for now, it looks tits!

Pulled off the fenders to have an alignment done.
Went To get my alignment. They said they can only do toe. And they couldn't even do that right...steering wheel cocked to the left at 11 o'clock while driving straight on the way home...
Top half of bumper painted in Toyota 041 White.
Bottom half painted.
Started putting filler on the flared fenders. Actually got it pretty much done, just forgot to take photos.
Decided the front wheel wells were looking a little tatty..decided to coat them in a heavy layer of underbody seal. I'm sure i'll regret it one day, but for now, it looks tits!
my diary/build: http://club4ag.com/forums/viewtopic.php?f=7&t=10479