Do's and Dont's on installing metal HG

PDB
Club4AG Enthusiast
Posts: 146
Joined: Sat Nov 29, 2014 2:47 pm

Do's and Dont's on installing metal HG

Postby PDB » Mon Dec 01, 2014 10:00 am

My TRD head gasket arrived today, its a 0.5mm item. I've done some research on fitting it and a lot of folk in the USA and OZ seem top talk about spraying the mating surfaces with copper grease !

Anyone able to explain the reasons for doing this ? I was all set to just place it all together but wanted to see if I was missing a trick ? The head and block have been skimmed and are super flat, I use a local tooling shop who have large rotating polishing wheels and they just sit the items on them for me until all marks have been removed.

Image
Image
Image
Image

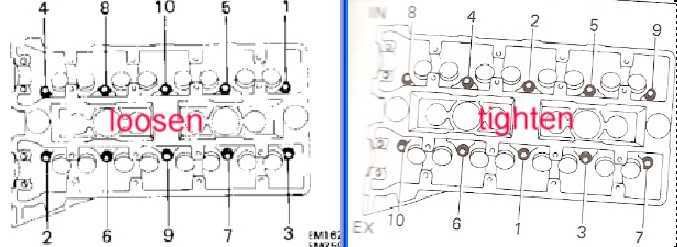
Also the definitive answer to torqueing it up would be great, 22ft'lbs + 90' + 90' ?

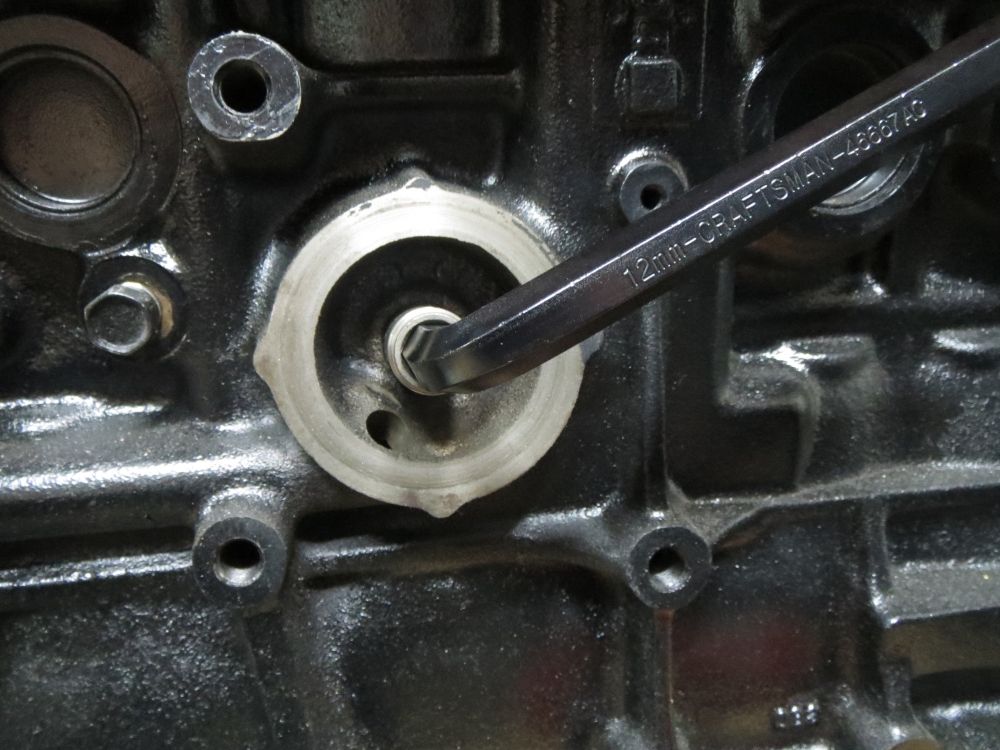
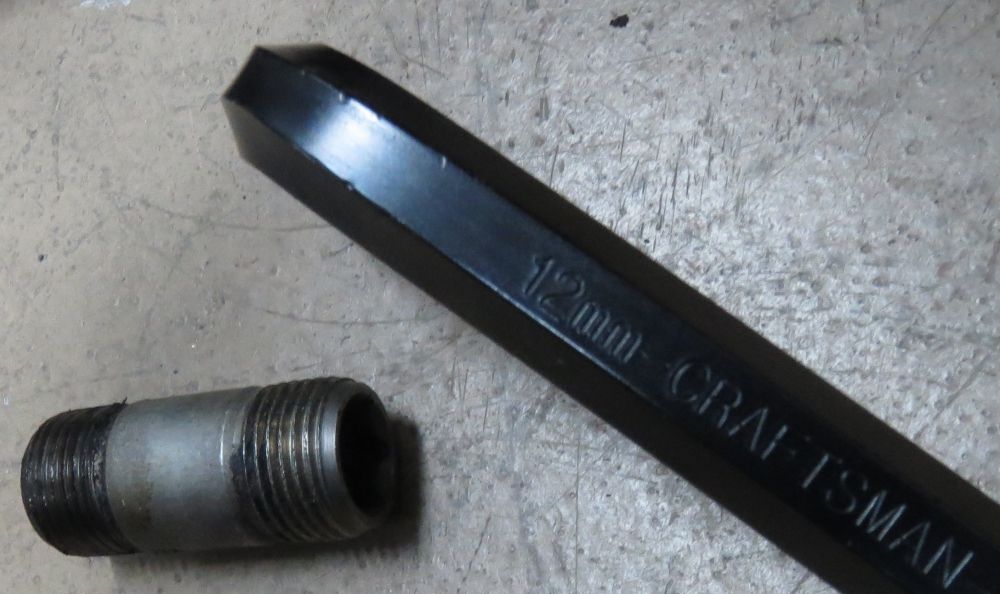
And finally what do I replace the oil sandwich plate with so I can just use a oil filter and no oil cooler ? Need a double threaded adaptor but cant find something suitable.

MisterJerk
Club4AG Pro
Posts: 582
Joined: Wed Jan 09, 2013 6:10 pm

Re: Do's and Dont's on installing metal HG

Postby MisterJerk » Mon Dec 01, 2014 1:52 pm

0.5mm trd hg.. I only spray copper on them after repainting it for re-use(not recommended) **backyard mechancs only

Also I torque mine to 65 ft/lbs in stages(hand tight, 30, 50, 65) with the correct tightening sequence. try to use new or "newer" headbolts.
TRD metal head gaskets will leak if you use the stock torque specs(speaking from my own experience here)

for removing the cooler: I took apart the oil cooler adapter and used the double threaded adapter from inside it, or it was out of the BT 20v oil filter tower, for lack of a better term. Either way my filter is directly on the block, jdm style. Oil filter is 3/4 -16, you have the cooler to find the thread sizing for the block

PDB
Club4AG Enthusiast
Posts: 146
Joined: Sat Nov 29, 2014 2:47 pm

Re: Do's and Dont's on installing metal HG

Postby PDB » Mon Dec 01, 2014 2:10 pm

Was planning on using the original head bolts, the engine was totally original, not been apart before and came from a running AE82 Corolla with 82,000 miles.

Thanks for the advise, I'll look to source a 20v sandwich plate to take apart.

User avatar
Rogue-AE95
Club4AG Expert
Posts: 493
Joined: Thu Jan 10, 2013 4:03 pm
Location: Tampa Bay, FL

Re: Do's and Dont's on installing metal HG

Postby Rogue-AE95 » Mon Dec 01, 2014 6:32 pm

You can get an oil filter adapter (whatever it's called) from a 4A-FE out of any '88-'92 or '93-'97 Corolla or Geo Prizm. You'll need a 12mm hex key to remove it from the block. At least that was the case for the '97 4A-FE block I have:

Image

Image
'88 Corolla All-Trac x2 (manual, auto)

Jimmee1990
Club4AG Enthusiast
Posts: 113
Joined: Sun Apr 07, 2013 2:48 am

Re: Do's and Dont's on installing metal HG

Postby Jimmee1990 » Tue Dec 02, 2014 2:48 am

That surface finish is no where near smooth enough for an MLS gasket in my opinion, it might hold for a little while but it could be so much better. The finish you need to get to is almost like a mirror finish, how yours is currently is quite coarse.

MLS gaskets are coated anyway, they don't need anything like copper coat extra unless you're re-using them. It's more like a paint that dries, definitely not copper grease which is completely different.

PDB
Club4AG Enthusiast
Posts: 146
Joined: Sat Nov 29, 2014 2:47 pm

Re: Do's and Dont's on installing metal HG

Postby PDB » Tue Dec 02, 2014 9:21 am

Jimmee1990 wrote:That surface finish is no where near smooth enough for an MLS gasket in my opinion, it might hold for a little while but it could be so much better. The finish you need to get to is almost like a mirror finish, how yours is currently is quite coarse.

MLS gaskets are coated anyway, they don't need anything like copper coat extra unless you're re-using them. It's more like a paint that dries, definitely not copper grease which is completely different.


The lines you can see are just smeared lubrication, if I lick my finger and wipe it, its smooth, trust me. Ive seen heads before that have been skimmed, that isn't suitable for MH, this has been placed on a FLAT turning wheel as seen in the above pictures with my block on it.

allencr
Club4AG Expert
Posts: 394
Joined: Thu Jan 10, 2013 9:59 pm

Re: Do's and Dont's on installing metal HG

Postby allencr » Tue Dec 02, 2014 9:50 am

I wouldn't use the torque-angle(20ftlbs, 90 & 90degrees) method with a different then stock gasket that won't compress anyway near as much, probably put the final torque around 90+ftlbs!
Clean smooth lubed threads, smooth flat lubed washers & bolt heads.
http://www.aa1car.com/library/ic697.htm
Some might say that those lapped surfaces are TOO SMOOTH to actually bite/grip the gasket and it'll move/walk/slip. IDK, more surface area & riding on less high spots must have a limit but I'd like it. Maybe the gasket sealant/cement/paint/whatever is what keeps it from moving around when it's too smooth & solved a SIW/inadvertent problem?
////
PDB, just curious, what does that shop usually work on, thanks?
////
What was done to it before that? It had to be very flat & smooth & clean before the lapping, else fuckup their machine.

PDB
Club4AG Enthusiast
Posts: 146
Joined: Sat Nov 29, 2014 2:47 pm

Re: Do's and Dont's on installing metal HG

Postby PDB » Tue Dec 02, 2014 1:39 pm

They make bespoke tooling and high end automotive parts.

They don't normally skim heads and blocks as like you say it's hard wearing on the wheels, I've known them for years. Only downside is you don't know how much material has been removed, it's guesswork guided by experience.

I've never had an issue in the past, nor have the few others that get there parts re-surfaced.

I just ran I wire wheel over the block before I took it there to clean the crud off.

This is taken from there website -

"Opticron is a professional mould polisher and flat lapping company based in the South East of England providing its services on both a national and International basis to a varied business customer base that varies from small businesses up to blue chip companies.

Mirror Polishing Service.

Opticron have over 25 years experience in polishing all types of mould tools, prototype models, engineered components and more. We specialise in high quality mould polishing but are flexible enough to be able to provide a full range of finishes including the preparation of surfaces for texturing to commercial finishes right the way up to lens standard polishing. We work to contract or a one off basis.
Flat Lapping Service.

Opticron also offer a comprehensive Flat Lapping service using a range of machines. Our experienced staff work to the highest tolerances, including flatness of one helium light band, and sub micron surface finishes.

Surface finish is often the last consideration but it is always the first thing your customer sees. When quality and attention to detail matter get it right first time by calling us."
Last edited by PDB on Tue Dec 02, 2014 2:11 pm, edited 1 time in total.

jdm86gtz
Club4AG Expert
Posts: 307
Joined: Fri Jan 11, 2013 10:13 pm
Location: Ireland

Re: Do's and Dont's on installing metal HG

Postby jdm86gtz » Tue Dec 02, 2014 2:09 pm

The TRD bible states the 0.5mm and 0.8mm (11115-AE814/824)gaskets require 650 +/- 20 kg-cm approx 64Nm
according to the following conversion site http://www.convertunits.com/from/N-m/to/kg-cm

PDB
Club4AG Enthusiast
Posts: 146
Joined: Sat Nov 29, 2014 2:47 pm

Re: Do's and Dont's on installing metal HG

Postby PDB » Tue Dec 02, 2014 2:16 pm

jdm86gtz wrote:The TRD bible states the 0.5mm and 0.8mm (11115-AE814/824)gaskets require 650 +/- 20 kg-cm approx 64Nm
according to the following conversion site http://www.convertunits.com/from/N-m/to/kg-cm


Does this bible happen to state torquing sequence ? Is this info online somewhere ! :D

User avatar
oldeskewltoy
Club4AG MASTER
Posts: 2183
Joined: Wed Jan 09, 2013 4:44 pm
Location: Portland, Oregon

Re: Do's and Dont's on installing metal HG

Postby oldeskewltoy » Tue Dec 02, 2014 2:29 pm

PDB wrote:
Does this bible happen to state torquing sequence ? Is this info online somewhere ! :D


Image


BEFORE you start this engine... you may want to check that your unmeasurable machining hasn't cut too much from the block. Assemble a piston on a rod, and attach it to the crank, rotate the crank so the rod is @ TDC, measure the deck. If the piston sits above the block, the .5mm gasket is too thin and will likely cause the piston to hit the head.

"Safe" squish is down to about .75mm
OST Cyl head porting, - viewtopic.php?f=22&t=300

Building a great engine takes knowing the end... before you begin :ugeek:

Enjoy Life... its the only one you get!

allencr
Club4AG Expert
Posts: 394
Joined: Thu Jan 10, 2013 9:59 pm

Re: Do's and Dont's on installing metal HG

Postby allencr » Tue Dec 02, 2014 4:06 pm

Thanks,
I'd thought the headless engine sitting on the table pic with all its dirt dropping potential was a joke, are you working with an apprentice/gofer after hours?

yoshimitsuspeed
Club4AG MASTER
Posts: 2084
Joined: Sun Jan 13, 2013 1:18 pm
Contact:

Re: Do's and Dont's on installing metal HG

Postby yoshimitsuspeed » Tue Dec 02, 2014 8:41 pm

Cometic calls for 50 RA or finer surface finish. Judging by what you posted about that company if you specifically requested that I am sure they could hit it but if not then who knows. Definitely not something you can tell with your fingers. Someone very experienced with surface finishes could eyeball it kind of close but not terribly.
Cometic also specifically says to not use any type of sealant/coating.
http://www.cometic.com/technical.aspx
http://www.enginebuildermag.com/2007/06 ... ds-blocks/
Allencer is 100% right about only using TTA with the stock HG and bolts. If either change you need to change the torque to suit.
Definitely make sure you have enough squish gap.
http://www.matrixgarage.com/content/4ag ... ormation-0

PDB
Club4AG Enthusiast
Posts: 146
Joined: Sat Nov 29, 2014 2:47 pm

Re: Do's and Dont's on installing metal HG

Postby PDB » Wed Dec 03, 2014 12:44 am

allencr wrote:Thanks,
I'd thought the headless engine sitting on the table pic with all its dirt dropping potential was a joke, are you working with an apprentice/gofer after hours?


The engine is totally clean and dry with no "dirt dropping potential" and no gofers were present, there's only 4 members of staff all over 60.

Crank was assembled with pistons in to ensure that not too much material was removed.

Thanks guys for you inputs, some good valid pointers there for myself and others in the future.

User avatar
oldeskewltoy
Club4AG MASTER
Posts: 2183
Joined: Wed Jan 09, 2013 4:44 pm
Location: Portland, Oregon

Re: Do's and Dont's on installing metal HG

Postby oldeskewltoy » Wed Dec 03, 2014 8:48 am

PDB wrote:
Thanks guys for you inputs, some good valid pointers there for myself and others in the future.


**IF** your piston is above the deck....... May I suggest, you measure how much... and do it accurately. My idea... is you machine the block further, or until you near the point where the piston sticks out of the block 3/10 mm, then use a stock Toyota head gasket. This will get you to a squish of about .9mm.

You might be able to go further... but because you can't cut a known amount, get it close. Other advantage to doing it this way is your machined surfaces will work better with a stock gasket then the MHG
OST Cyl head porting, - viewtopic.php?f=22&t=300

Building a great engine takes knowing the end... before you begin :ugeek:

Enjoy Life... its the only one you get!

PDB
Club4AG Enthusiast
Posts: 146
Joined: Sat Nov 29, 2014 2:47 pm

Re: Do's and Dont's on installing metal HG

Postby PDB » Tue Dec 09, 2014 3:12 am

It seems my calculations were a bit wrong, taking on advice about the piston head clearances my squish is far to small.

Had the block skimmed a bit further, the piston crown that will be in the squish zone now sticks out 0.25 MM

I'm now using a stock head gasket so will have a safe squish gap.

Thanks again guys, and anyone reading this for future reference, please take note of advise from those with the knowledge :)

And am I right in saying valve clearances should be

Inlet 0.15 - 0.25mm

Exhaust 0.20 - 0.30mm

Stone cold.

User avatar
oldeskewltoy
Club4AG MASTER
Posts: 2183
Joined: Wed Jan 09, 2013 4:44 pm
Location: Portland, Oregon

Re: Do's and Dont's on installing metal HG

Postby oldeskewltoy » Tue Dec 09, 2014 9:41 am

PDB wrote:
And am I right in saying valve clearances should be

Inlet 0.15 - 0.25mm

Exhaust 0.20 - 0.30mm

Stone cold.

correct......
OST Cyl head porting, - viewtopic.php?f=22&t=300

Building a great engine takes knowing the end... before you begin :ugeek:

Enjoy Life... its the only one you get!