Page 3 of 6
Re: My recap and ongoing final stretch of building my Hatch
Posted: Fri Jan 23, 2015 9:15 am
by yellowsnow4free
shagymc wrote:The mirrors do just pop out however they are pretty fragile. I suggest kind of bending a corner and just slowly working the plastic off of it around the mirror.
This is the best video I've seen of how to twist the wires:
https://www.youtube.com/watch?v=uTJhrTTl-EEYou are going to want to tie off one end of the wires to something. I usually screw a screw in a little bit on the bench and then tie the strands to it. Just like the video shows, you'll then put the other two ends into the drill and tighten down. As you tighten, you'll have to move forward as the wire length shrinks. You'll also want to keep the wires taught as you do this to keep the twist even throughout.
Try it out with some scrap wire first! Hope this helps and thanks for the feedback. Hopefully I'll have them figured out by this weekend.
Awesome video, and thanks for the info!

Re: My recap and ongoing final stretch of building my Hatch
Posted: Sat Jan 24, 2015 7:27 am
by shagymc
Thanks Evo, I'll research it. I bought some new bigger door clips hoping they'd do the trick but I'm not sure it'll work. The magnet idea seems pretty good actually but I'm not sure how I'd mount them. They'd need to be very strong though.
Re: My recap and ongoing final stretch of building my Hatch
Posted: Thu Jan 29, 2015 8:46 pm
by shagymc
Re: My recap and ongoing final stretch of building my Hatch
Posted: Fri Jan 30, 2015 12:49 pm
by shagymc
I'll do a write up of this tonight but my finished product is pretty great!
Re: My recap and ongoing final stretch of building my Hatch
Posted: Fri Jan 30, 2015 5:50 pm
by EvoSolley
shagymc wrote:I'll do a write up of this tonight but my finished product is pretty great!
looking forward to your write up! It turned out awesome, looks OEM, great job!
Re: My recap and ongoing final stretch of building my Hatch
Posted: Sun Feb 01, 2015 7:38 pm
by shagymc
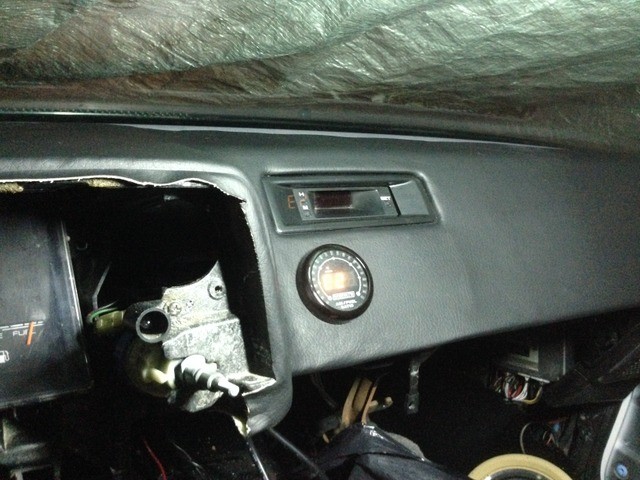
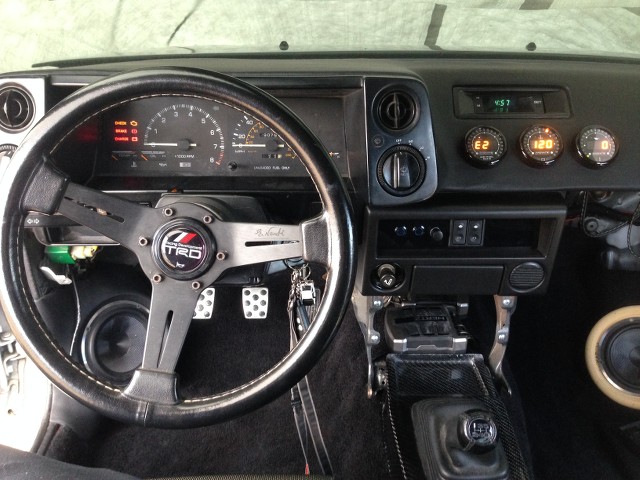
Finished up a majority of the wiring today. Everything is labeled and zip tied so there is no spaghetti mess of wires behind the dash. I love the gauges where they are. I just have to finish cleaning and painting the factory plastics and then the inside will be all but complete.
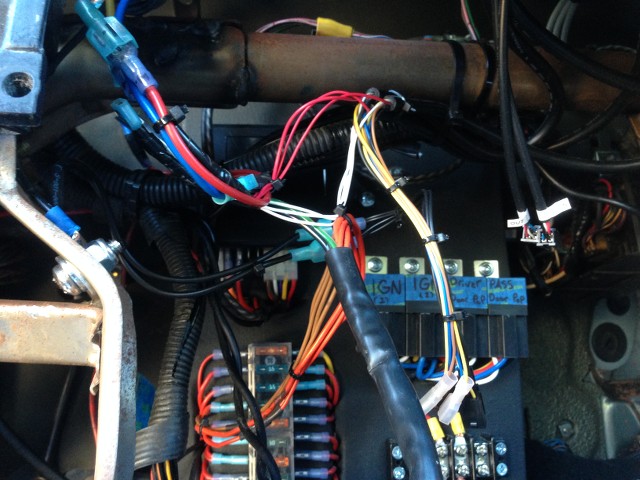
I ordered a few more things for the interior to bring it up to speed but I still have to fabricate the passenger tweeter pod and the kick panel. I also think that I am going to have to redesign the door panels. I don't think I can get these to work. We'll see what happens.
Re: My recap and ongoing final stretch of building my Hatch
Posted: Mon Feb 02, 2015 8:42 pm
by ryanroberson695
What rear end did you have that you where a let swap the front disc brakes to? Any information on this would be much appreciated as im in the middle of a build
Re: My recap and ongoing final stretch of building my Hatch
Posted: Mon Feb 02, 2015 8:47 pm
by shagymc
As far as I know It was just a stock GTS rear end. When I bought it, it had drums in the back but it had an LSD. Unfortunately this was years ago and I don't really have any pictures or records of the swap. Good luck with your build!
Re: My recap and ongoing final stretch of building my Hatch
Posted: Tue Feb 03, 2015 1:29 pm
by yellowsnow4free
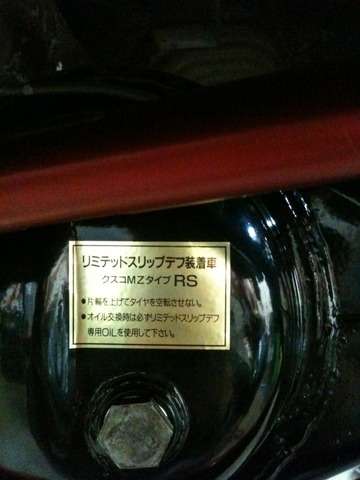
shagymc wrote:I rebuilt the rear with a weir ring and pinion and Cusco 2-way LSD.
I also went with a Rotora big brake kit up front with stainless lines, moved the stock calipers to the rear in place of the drums, and put on an new Fujitsubo over axle exhaust with a straight pipe.
ryanroberson695 wrote:What rear end did you have that you where a let swap the front disc brakes to? Any information on this would be much appreciated as I'm in the middle of a build
shagymc wrote:As far as I know It was just a stock GTS rear end. When I bought it, it had drums in the back but it had an LSD. Unfortunately this was years ago and I don't really have any pictures or records of the swap. Good luck with your build!
Yes, I didn't catch that either, but I've never heard of being able to swap the front brakes to the rear on an AE86, at least not without custom brackets.
Outside of the US there are AE86's with rear disc brakes I think, and there are also a few rare (TRD?) LSD's for the SR5's 6.38" rear end.
I wish I knew what the writing on the differential cover said in the 1st pic; maybe a Club4AGer would be able to help with that?
Re: My recap and ongoing final stretch of building my Hatch
Posted: Tue Feb 03, 2015 9:27 pm
by shagymc
That emblem came with the Cusco 2-way LSD. While I was deployed, I had a mechanic put the rear together for me. That's why I know so little about it

Re: My recap and ongoing final stretch of building my Hatch
Posted: Thu Feb 05, 2015 10:38 pm
by justinleexxx
I love the door panels! great job!
Re: My recap and ongoing final stretch of building my Hatch
Posted: Fri Feb 06, 2015 10:33 am
by yellowsnow4free
shagymc wrote:That emblem came with the Cusco 2-way LSD. While I was deployed, I had a mechanic put the rear together for me. That's why I know so little about it
Yeah, it's the drum to disc part that has me intrigued.
I don't mean to drill you about it; it's more of a curiosity thing for me
Mostly as a potential option to put disc brakes on my SR5 (without buying a costly GTS rear end).
Assuming the Cusco LSD is for a 6.7" rear end (which would be correct for a GTS rear end), it should be a T series rear axle.
However, the drums part is what put a wrench in that. In the USA, I believe the Celica also had a T series rear end, but with drum brakes. If you search online you can find a number of guys who convert these rear ends to use AE86 rear brakes on their Celicas. There's also a guy on here who converted his using JDM AE101 parts or something.
No big deal, just curiosity. I guess if you ever have the wheels / axles off for some reason, take some pics

Re: My recap and ongoing final stretch of building my Hatch
Posted: Sun Feb 08, 2015 9:33 pm
by shagymc
Yea man, I'll try to get a wheel off in the near future!
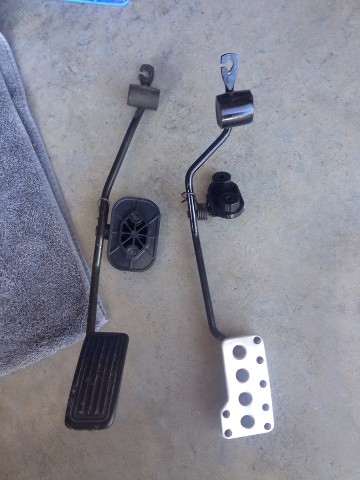
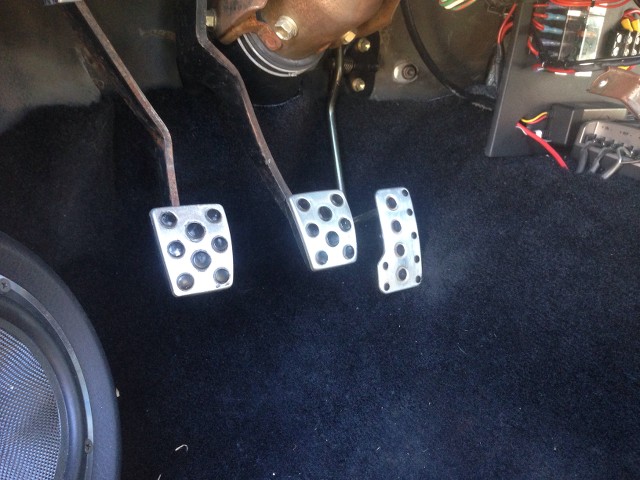
I ordered an IS250 gas pedal from eBay to replace my accelerator pedal thinking it would just bolt up.... I was way wrong. So long story short I had to strip the IS pedal and transfer over the parts. I finally have a complete looking pedal set. The IS spring transferred over too and it is 10 times better than the old stock one. I'm excited to drive it!
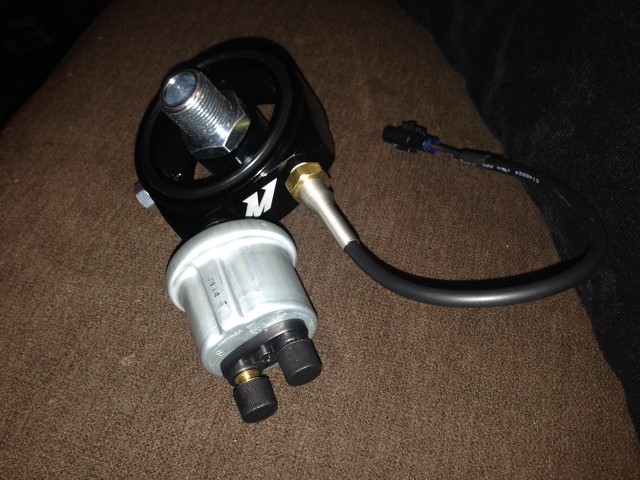
Still working on the plastics and waiting on a sandwich plate from Matrix Garage for the gauge sensors for oil temp and pressure.
Re: My recap and ongoing final stretch of building my Hatch
Posted: Tue Feb 10, 2015 10:36 pm
by shagymc
Sandwich plate came in today so I mounted the sensors in it for now and it'll sit until we pull the motor next week.
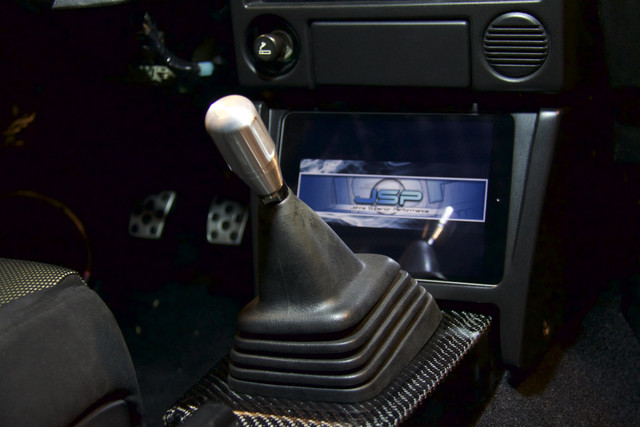
I'm still having trouble with paint chipping on the iPad dash so I'm trying a different method to hopefully make it more durable. I really need to get the interior plastics done and remounted. I saw an interesting video on youtube where they used a heat gun to bring back the old plastic and I'm curious how well that would work. I'm only going to use it on the seat belt plastics and maybe the glove box but I've got some time. Money is also set aside for paint so I'm pretty excited.
Re: My recap and ongoing final stretch of building my Hatch
Posted: Wed Feb 11, 2015 5:05 am
by EvoSolley
^^ Hope you figure out the paint situation on the Ipad mount, such a nice idea and it looks really good. So are you re-painting your car? Panda scheme or something different? Goodluck and keep the updates coming!
Re: My recap and ongoing final stretch of building my Hatch
Posted: Wed Feb 11, 2015 12:58 pm
by shagymc
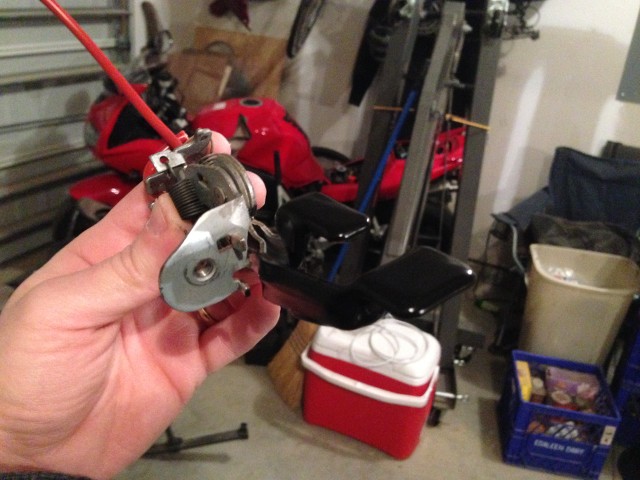
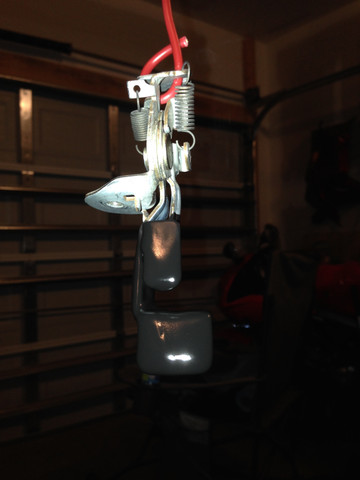
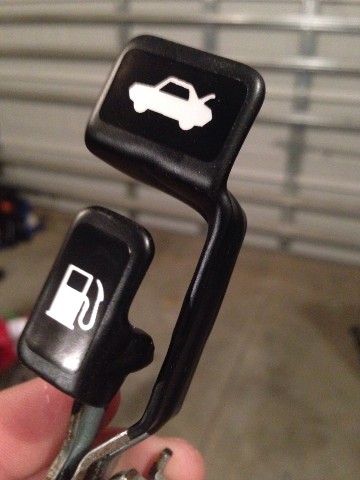
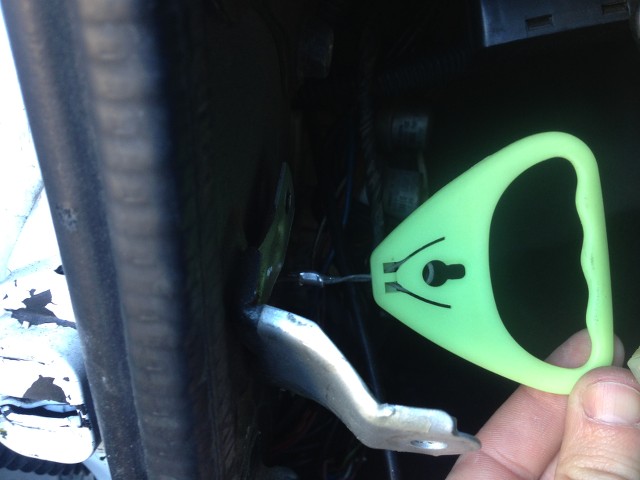
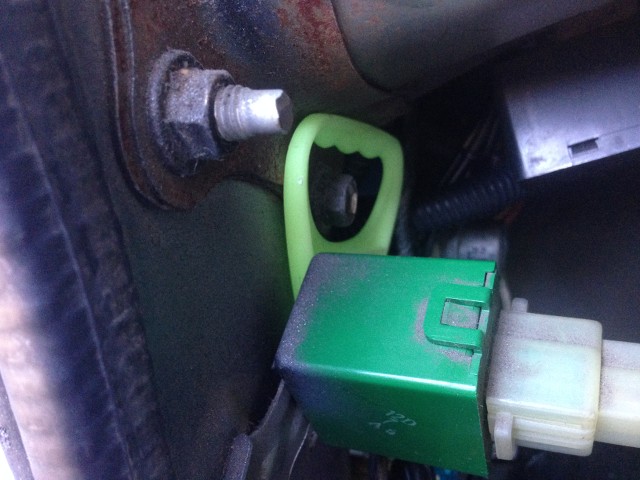
I think I'm going to paint it the tacoma charcoal color with something special for the hood but I'm still deciding. The ipad dash looks decent but theres a small area that keeps rubbing away that's frustrating to deal with. Today I installed my emergency pull handle for the driver side. If the solenoid fails or the battery dies I'll still be able to get the door open with this handle, and it glows in the dark. It tucks away nice too behind the flasher.
Re: My recap and ongoing final stretch of building my Hatch
Posted: Wed Mar 04, 2015 10:38 pm
by shagymc
Sorry, no cool pictures tonight. I've started pulling things apart to get the motor out so I can deep clean the bay before paint and replace and/or clean up some parts on it. I pulled the exhaust header off first so I can get my wideband O2 bung welded in and noticed that my head gasket is leaking oil. So it looks like I'll be taking the head off now. I also drained the fluid and disconnected all the wiring. There was a leak coming from the trans that looks to be the clutch slave cylinder so I guess I'm replacing that too.
Some upgrades I'm doing with it out and questions I have:
-Going to try to go boosterless on the brakes. I ordered the T3 kit. I'm just wondering what it takes to install. Any write ups on this or how os would be great. I'll do
more research when the part actually shows up but some direction would be nice.
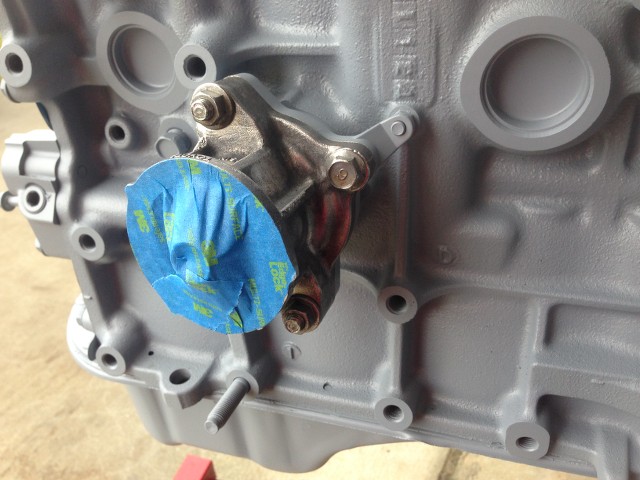
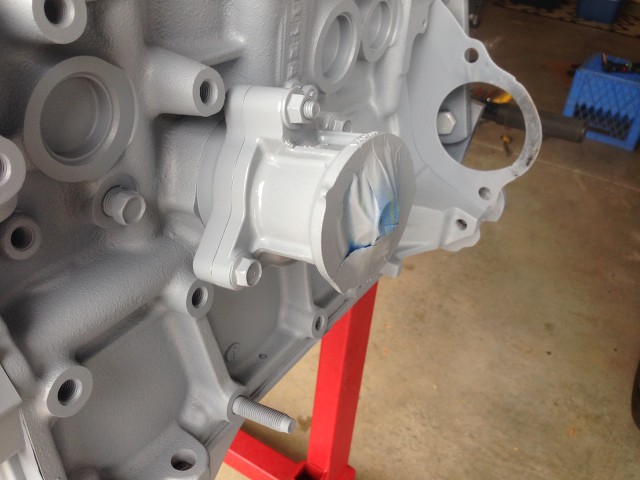
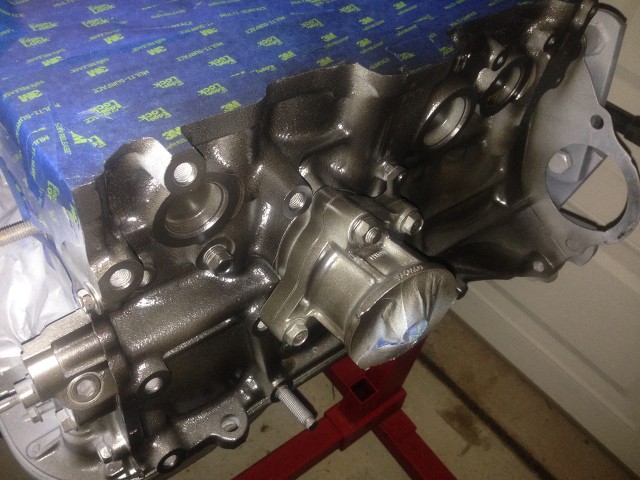
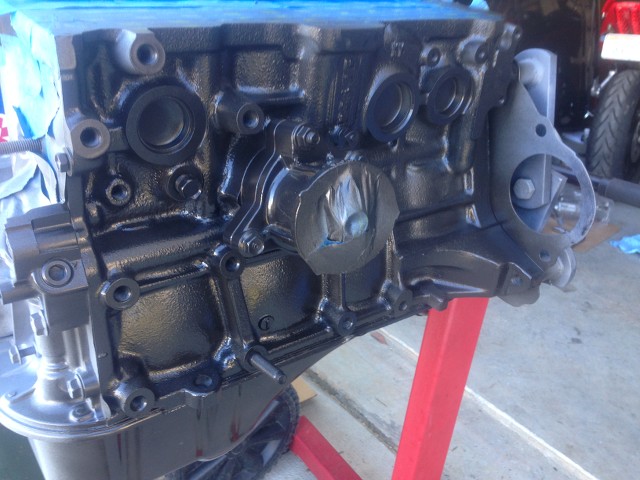
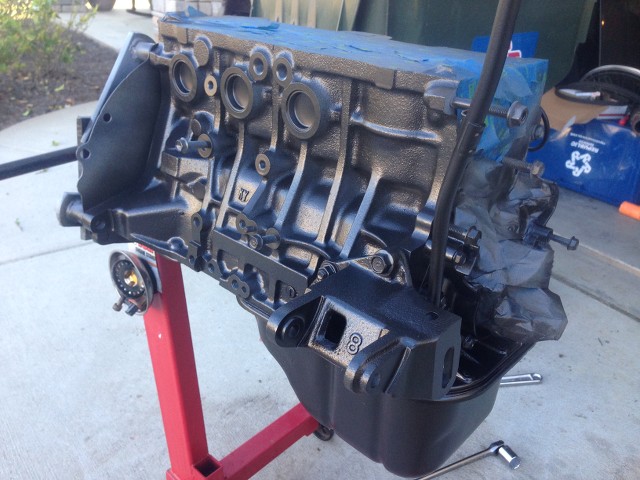
-I'm going to paint the motor mounts, block, and valve cover
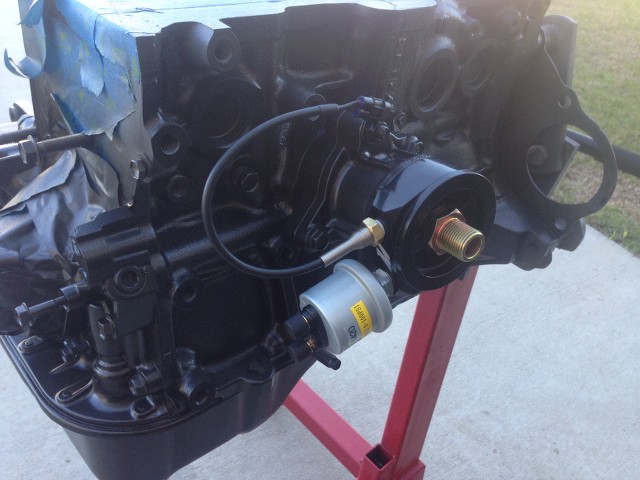
-I'm installing a Tomei FPR with a gauge
-Extending some wires in the harness for a cleaner tuck and look
-Possibly replacing the alternator and starter
-Installing an oil filter sandwich plate that has my innovate oil temp and pressure sensors
-Installing the innovate water temp sensor
-Installing the dust cover between the trans and the block
I also grabbed a couple door grommets from the local junk yard and I'm going to modify the door to make them work. The driverside is complete but I only had one in the correct size so I'll be enlarging the hole leaving the passenger door panel.
Re: My recap and ongoing final stretch of building my Hatch
Posted: Sun Mar 08, 2015 9:51 pm
by shagymc
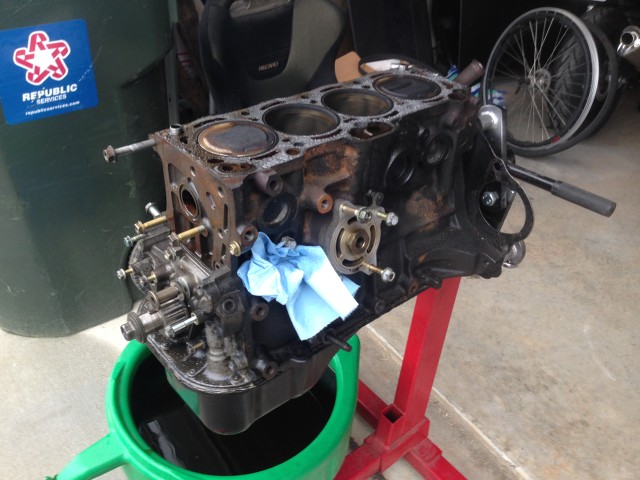
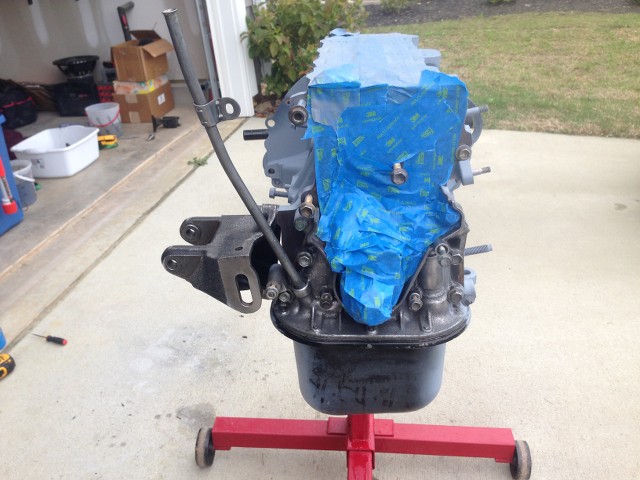
So after noticing some issues, i.e. Oil leaking from the head and a leaking clutch slave cylinder, I decided to give the motor a pull for clean up and some upgrades.
After pulling the header, you can see the oil leak is pretty bad. The starter had oil all over it.
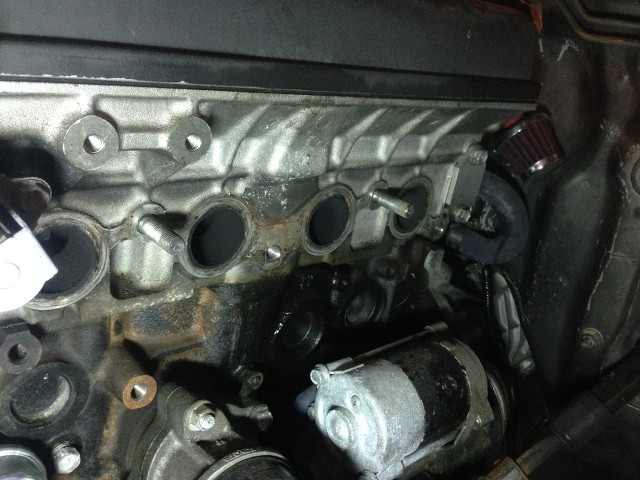
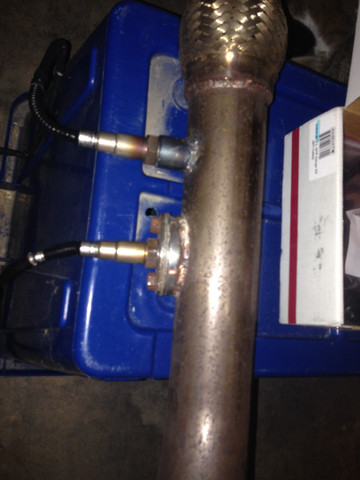
While, the exhaust was out I had the wideband O2 sensor bung welded in.
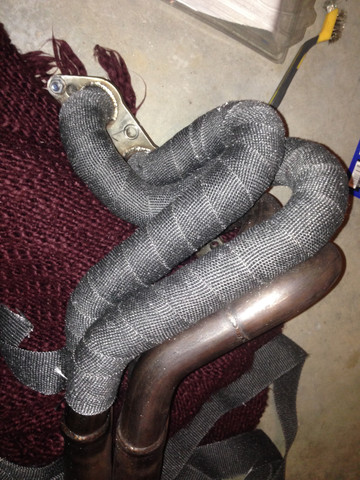
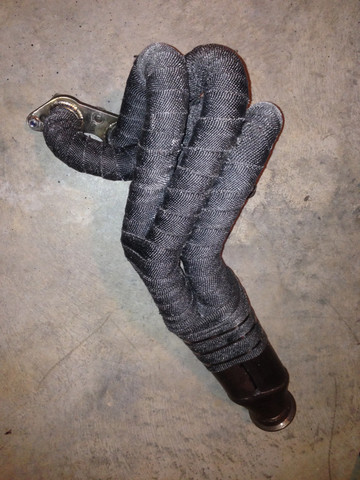
I also bought some black fiberglass exhaust wrap because I like the look. I should have done a little more research on how you do it but I didn't and I learned some important lessons with this stuff. First, I handle fiberglass enough to know that it isn't great to handle without gloves but It's usually not so bad. Well the strands on the wrap are pretty short and they give splinters pretty easily. If you are going to do this, wear long sleeves and pants and wear gloves. Breathing protection is a good idea too. I haven't finished the wrap, I'm just cutting to length but I already love it.

I bought the BG engine lifting hook but the waterline kit that is on the 20V prevented me from using it right so I had to improvise with some tow straps and the hook but I finally got it out! Never pulled a motor before but it was fun.
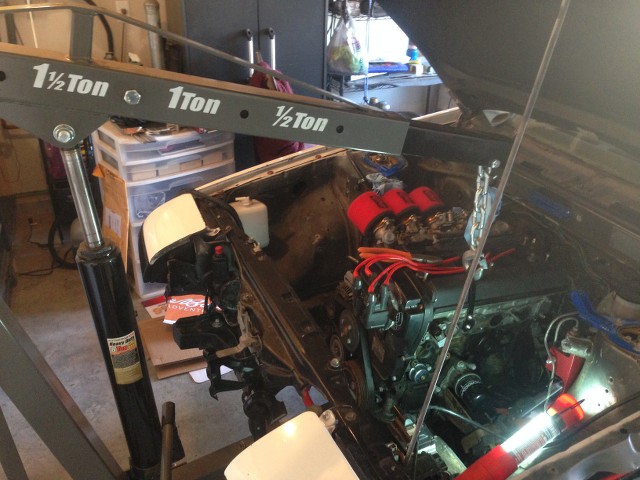
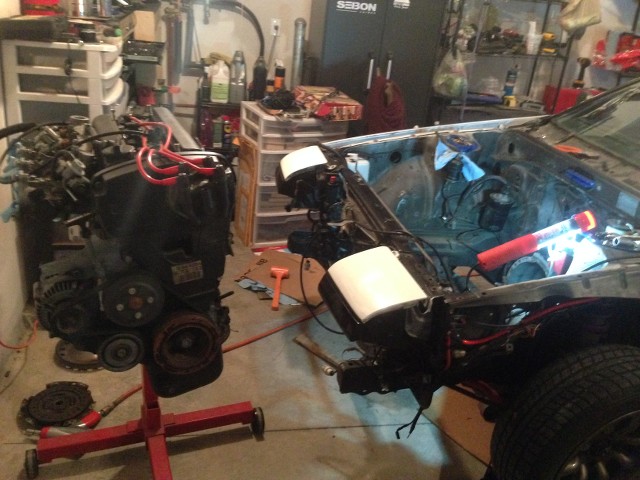
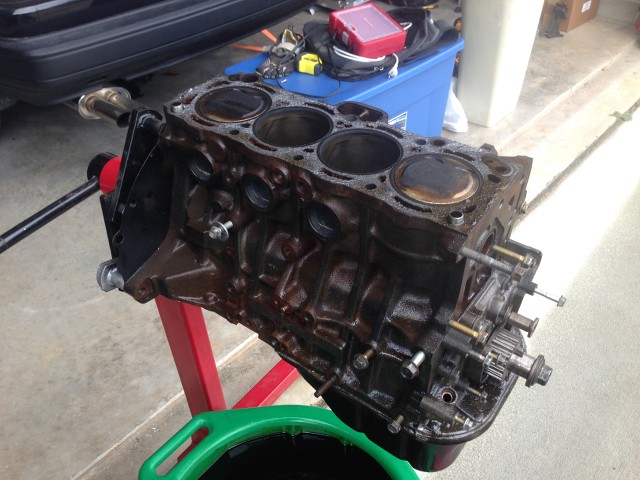
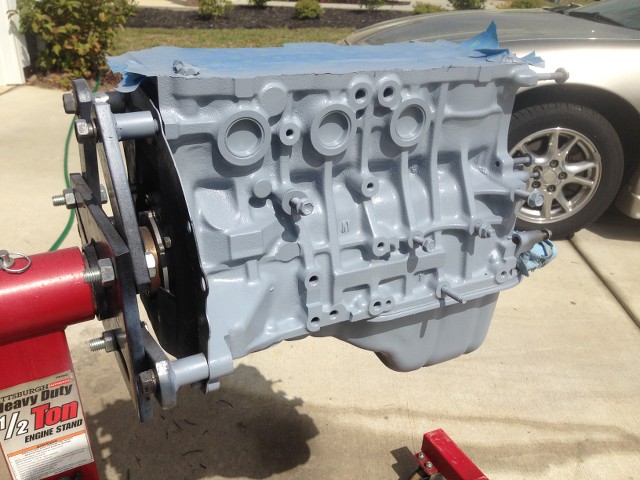
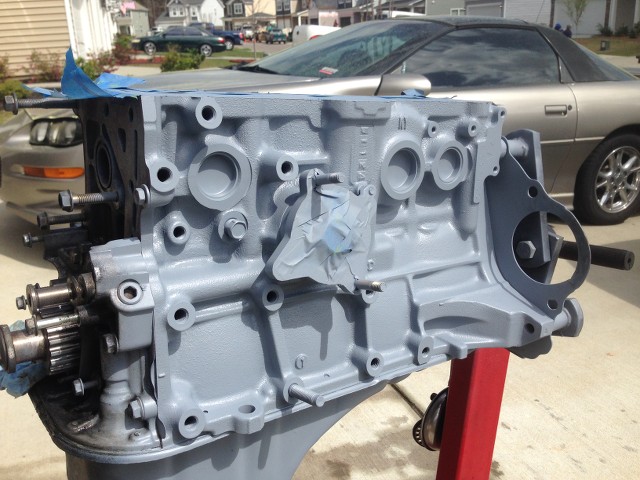
It's mounted to the stand now and i'm excited to clean her up and paint the block.
Re: My recap and ongoing final stretch of building my Hatch
Posted: Mon Mar 09, 2015 8:31 pm
by shagymc
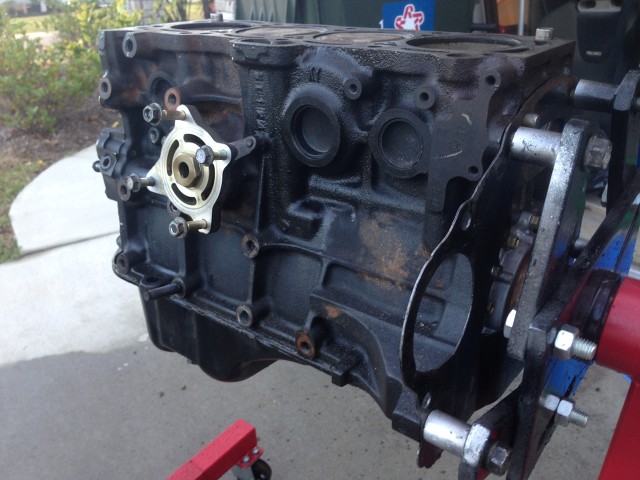
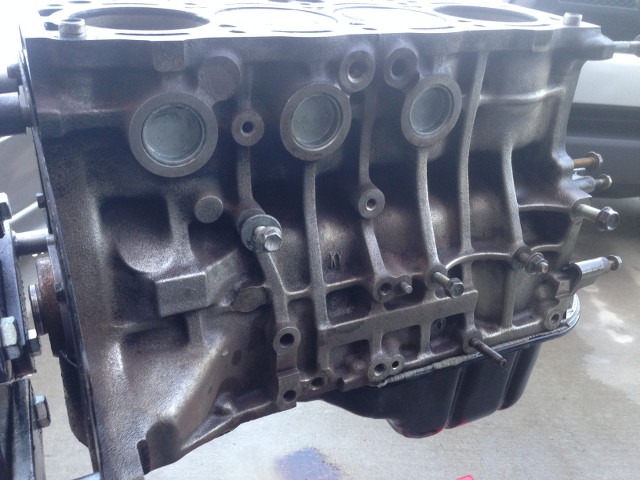
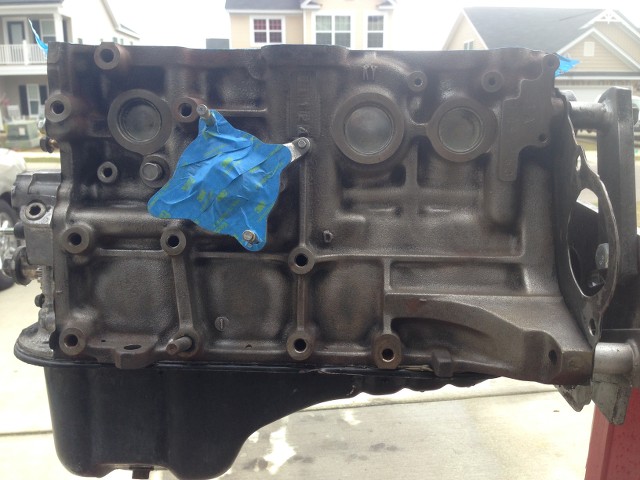
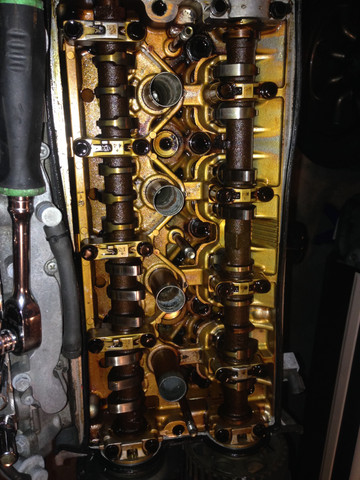
So tonight I got a few things removed from from the motor and a few goodies from T3. The first thing I removed was the valve cover. To be honest, I don't know how to tell if it looks like things are ok in there so if you have any feedback for me on what you think, I'd appreciate it. I think everything looks decent with some minor build up in a few places but nothing to be worried about.
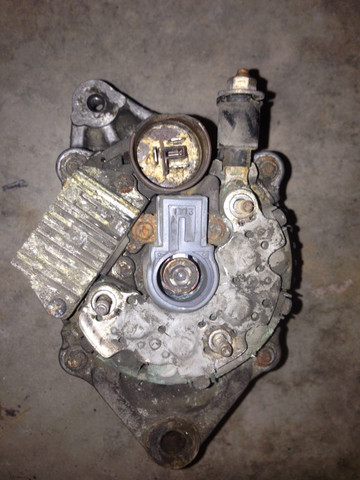
I also pulled the alternator and it looks really nasty, I think I'm going to go buy a new one tomorrow. Here's what it looked like. There was tons of grease caked on the bottom of it and when I took the back cover off, the innards were rotting and corroded. That's enough for me to say replace.
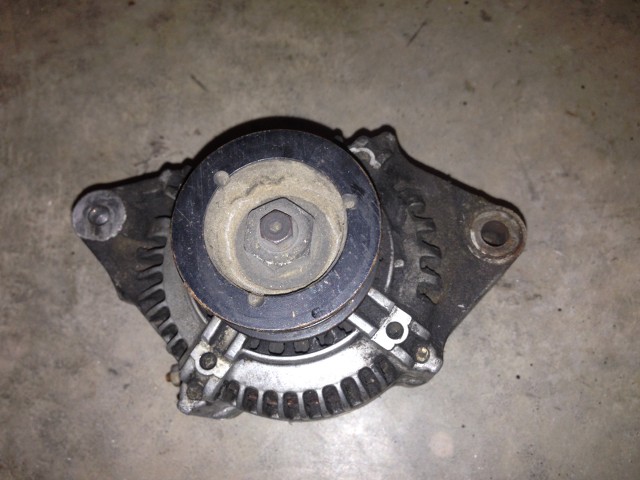
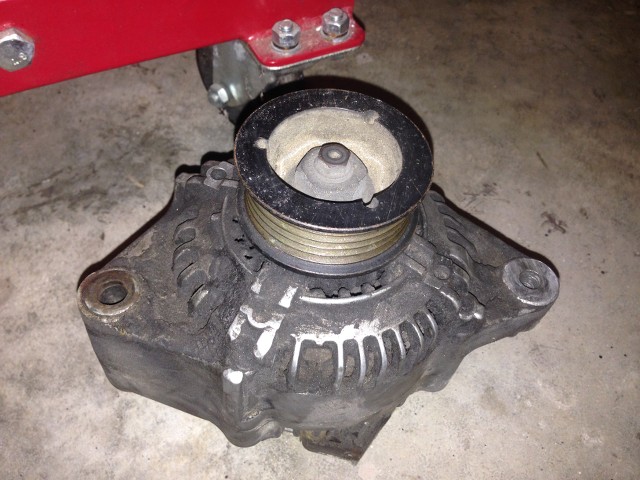
I also snapped a shot of what the pulleys look like and you can see why I'm replacing them.
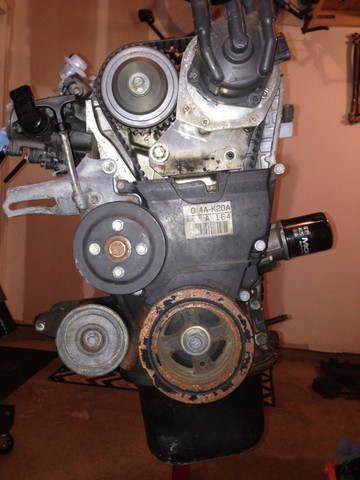
The parts I ordered were a stainless clutch line and a boosterless brake bracket. Please give me any feedback as I'm new to the entire mechanics side of the house and I don't know what is bad to look for in a motor. Thanks in advance!
Re: My recap and ongoing final stretch of building my Hatch
Posted: Thu Mar 12, 2015 1:07 am
by shagymc
I got a new starter and alternator from autozone and the alternator is a higher amp one from the early 90s camry. I also just finished wrapping my header with the black fiberglass wrap too. What a PITA! I don't want to ever do that again .
When I have more time off I'd like to start cleaning and painting the block as well as painting the motor mounts and other accessories.
Re: My recap and ongoing final stretch of building my Hatch
Posted: Thu Mar 12, 2015 9:09 am
by yellowsnow4free
shagymc wrote:I got a new starer and alternator from autozone and
the alternator is a higher amp one from the early 90s camry. I also just finished wrapping my header with the black fiberglass wrap too. What a PITA! I don't want to ever do that again .
When I have more time off I'd like to start cleaning and painting the block as well as painting the motor mounts and other accessories.
Hey shagymc,
Can you think of any electrical problems that might occur with a higher amp alternator? Not trying to discourage you, just curious.
I replaced the alternator on my 4AC a while ago with a stock rebuilt one (would've gone for a higher amp model if I thought about it), so I'm curious if there are any problems that can occur (hopefully not).
Thanks!
Re: My recap and ongoing final stretch of building my Hatch
Posted: Thu Mar 12, 2015 9:29 pm
by shagymc
From what limited research I've done, as long as your battery is the right size for it than you should be ok. I will post up reviews and articles I find but everything I've read says it's ok and that people have been very happy with the difference it makes.
Edit: Check out this post, seems pretty informative:http://www.qualitypowerauto.com/pages/AlternatorFAQ.php
Re: My recap and ongoing final stretch of building my Hatch
Posted: Sat Mar 21, 2015 3:07 pm
by TORPARTS
One of the best built evar! Top 3 in my book!
Bowdown! Attention to detail is unreal!
Are we related lol
Keep up the good work!duma approved
Re: My recap and ongoing final stretch of building my Hatch
Posted: Fri Mar 27, 2015 7:36 pm
by shagymc
Re: My recap and ongoing final stretch of building my Hatch
Posted: Sun Mar 29, 2015 4:20 pm
by shagymc
Re: My recap and ongoing final stretch of building my Hatch
Posted: Sun Mar 29, 2015 4:40 pm
by jdm86gtz
You should lose the Toyota oil filter spacer completely and just run the sandwich plate and filter for RWD use.
If you remove the threaded adaptor from the Toyota spacer and thread it straight into the block it might be long enough to use with the sandwich plate adaptor, if not you will the Toyota adaptor for fitting the filter directly to the block P/N 90404-19001
Re: My recap and ongoing final stretch of building my Hatch
Posted: Sun Apr 05, 2015 6:38 am
by shagymc
I'll look into that if there's issues, thanks!
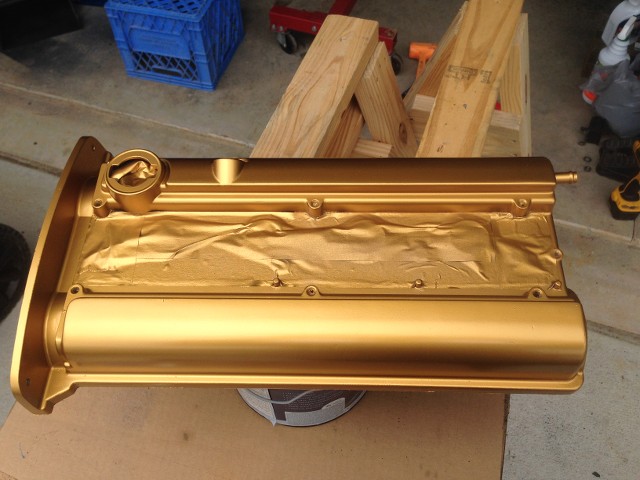
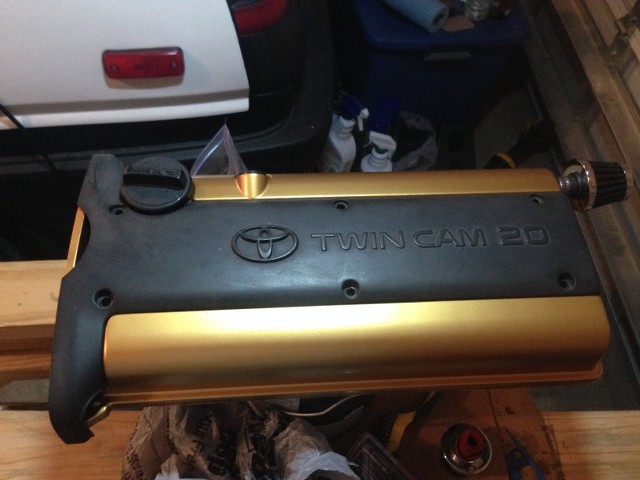
I stripped the valve cover and painted it over the past couple days. I replaced the grommet and the breather on the back as well. I'm not sure what I'm going to do with the plug cover yet but I think I'm just going to paint the letters and toyota symbol gold. We'll see. The gold isn't as yellow as the pulleys or throttle bodies but I'm hoping once it's back together the'll be close enough.
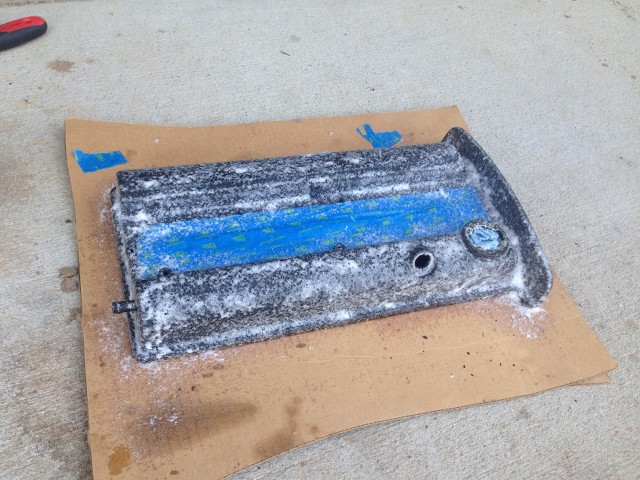
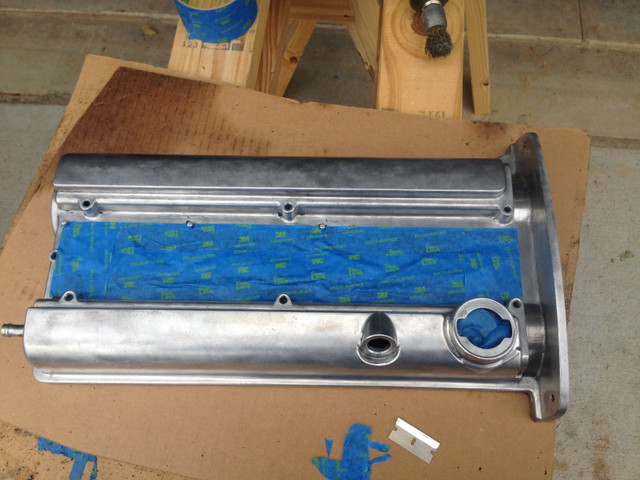
3 coats of VHT high temp primer:

5 coats of VHT high temp gold metallic:
Re: My recap and ongoing final stretch of building my Hatch
Posted: Sun Apr 05, 2015 6:25 pm
by grappletech
What did you use to stop the paint
Re: My recap and ongoing final stretch of building my Hatch
Posted: Mon Apr 06, 2015 2:54 am
by shagymc
I think you're asking what I used to strip the paint and I just got some stripper from lowes. It's the goo off aerosol can stuff for epoxy and paint. I had to do it about 4 times but it worked really well at taking off the old stuff but not leaving any chemical residue on the cover. At least, so far it looks decent.
Re: My recap and ongoing final stretch of building my Hatch
Posted: Mon Apr 06, 2015 9:21 am
by grappletech
Yes, strip it. That's cool. I have to do the same to my beams cover and repaint it.